Sewing Machine Needle Sizes Explained: Everything You Need to Know to Sew Perfectly Every Time
The tiniest tool in your sewing kit carries more responsibility than almost anything else. Pick the wrong needle and you’ll fight skipped stitches, shredded thread, and fabric damage all project long. This guide fixes that — permanently.
Why Sewing Machine Needle Size Matters More Than You Think
Here’s a scenario that will feel familiar to almost every home sewer: you sit down at your machine, thread it carefully, get everything set just right — and within three minutes the thread keeps snapping, or stitches skip inexplicably on every other seam, or tiny pulled threads appear across the surface of your beautiful fabric. You check the tension. You rethread. You slow down. Nothing changes. Then, almost by accident, you switch the needle, and everything is suddenly perfect.
That’s how powerful the correct needle size is. A sewing machine needle isn’t just a pointy piece of metal. It’s a precisely engineered instrument with a specific diameter, point shape, eye size, and scarf geometry. Every one of those features interacts with your fabric and thread in ways that completely determine stitch quality, thread integrity, and fabric longevity.
According to industry data, the wrong needle is responsible for more than 60% of all stitching problems home sewers experience. Before you dive into tension adjustment or machine servicing, the right needle is almost always the first fix to try. If you’ve ever wondered why your sewing machine isn’t sewing properly, needle size and type are always among the first diagnostics to check.
Using a needle that is too large for fine fabric will leave permanent holes. Using one that is too small for heavy fabric will cause the needle to bend, break, or skip stitches. Neither problem is caused by your machine — it’s the needle.
This guide is the most thorough reference on sewing machine needle sizes you’ll find anywhere. Whether you’re sewing delicate chiffon curtains, hemming stiff denim jeans, embroidering a monogram, or quilting through batting, you’ll know exactly which needle to reach for — and why. Let’s start at the very beginning.
The Anatomy of a Sewing Machine Needle
Before needle sizes make intuitive sense, you need to understand what the different parts of a needle actually do. Many sewers think of a needle as an undifferentiated spike, but every millimeter of its 3.5–4 cm length serves a specific engineering purpose.
The Shank
The shank is the thick top portion that clamps into the needle clamp of your sewing machine. On most modern domestic machines, the back of the shank is flat — this is a critical safety and orientation feature. The flat back ensures you can only insert the needle one way, with the long groove facing forward. The shank diameter is standardized across most home machines (15×1 system), though industrial machines use thicker shanks.
The Blade (Shaft)
The blade is the longest section of the needle, running from below the shank to just above the eye. The diameter of the blade is what needle size actually measures. A size 80 needle has an 0.80 mm blade diameter. A size 100 needle has a 1.0 mm diameter. This is the number your machine’s throat plate hole, your fabric weave, and your thread channel all need to accommodate correctly.
The Long Groove
Running down the front of the blade is a long channel called the groove. The thread lies in this groove as the needle descends into the fabric — this protects the thread from being shredded by friction between the needle and the fabric. The groove must be wide and deep enough to accommodate the thread you’re using. If it’s too shallow (which happens when using thread that’s too thick for the needle), the thread frays and breaks.
The Scarf
The scarf is the indented notch cut into the back of the needle just above the eye. It might look decorative, but it’s functionally critical: the scarf is what allows the hook of the rotary shuttle (the thing that forms your stitch) to pass as close as possible to the needle. The closer the hook passes, the more reliably it catches the thread loop. Needles designed for specific fabric types — especially stretch and jersey — have a deeper scarf to improve loop formation in slippery conditions.
The Eye
The eye is the hole through which thread passes. Its size must be proportional to the thread. Too small an eye for a thick thread causes friction and heat buildup. Too large an eye for a fine thread causes the thread to move around, leading to inconsistent stitches. The eye also has a small groove cut into it on both sides — these guide the thread into position as the needle rises.
The Point
The point is what actually penetrates the fabric, and it’s where needle types diverge most dramatically. Sharp points pierce between fibers (for wovens). Ballpoint tips push fibers aside rather than cutting through them (for knits). Wedge-shaped points cut the material cleanly (for leather). The geometry of the point determines whether fabric gets pushed, parted, or pierced.
When you understand that needle size refers specifically to the blade diameter, the entire numbering system becomes logical. Bigger fabric requires a needle with a bigger blade. Bigger blades leave bigger holes. So needle selection is always a balance: strong enough to penetrate, fine enough not to damage.
The Two Needle Numbering Systems: Singer vs. European
When you pick up a pack of needles and see “80/12” printed on the front, that dual number is telling you the same size in two different measurement systems simultaneously. Understanding both systems not only removes confusion — it actually makes the numbers feel logical and intuitive.
The European (Metric) System — The First Number
The first number in the dual notation is the European metric system, developed in Germany and now internationally standardized by ISO. The number represents the diameter of the needle blade in hundredths of a millimeter. So an 80 needle has a blade diameter of 0.80 mm. A 100 needle has a blade of exactly 1.00 mm. A 60 needle is 0.60 mm. The system is elegant, precise, and directly measurable with a micrometer.
The American (Singer) System — The Second Number
The second number in the notation is the American system, historically standardized by the Singer Sewing Company and widely used throughout North America. The numbers run from 8 to 19 (approximately) and do not represent any direct physical measurement — they’re an arbitrary scale that happens to correlate with the European numbers in a roughly consistent way.
The Simple Rule: In the dual notation (e.g., 80/12), the first number is metric (European) and always represents the blade diameter × 100. The second number is American (Singer) and is the traditional trade designation. Both always refer to the same needle.
Why Do Both Systems Still Exist?
Because both systems are entrenched in their respective markets. Needle packaging in Europe traditionally printed only the metric number. Packaging in the United States traditionally used only the Singer designation. As global trade became the norm, manufacturers began printing both — hence the ubiquitous dual notation you see today. Most modern packaging shows both, but some specialty needles (particularly industrial or vintage) may show only one system, so knowing both saves frustration.
| Metric (EU) | American (US/Singer) | Blade Diameter | Typical Use |
|---|---|---|---|
| 60 | 8 | 0.60 mm | Very fine sheers, organza, chiffon |
| 65 | 9 | 0.65 mm | Fine silk, tissue-weight fabrics |
| 70 | 10 | 0.70 mm | Lightweight cotton, lawn, batiste |
| 75 | 11 | 0.75 mm | Light jerseys, fine knits |
| 80 | 12 | 0.80 mm | Medium-weight cotton, linen |
| 90 | 14 | 0.90 mm | Medium-heavy fabrics, denim shirting |
| 100 | 16 | 1.00 mm | Heavy denim, canvas, thick twill |
| 110 | 18 | 1.10 mm | Very heavy canvas, upholstery |
| 120 | 19 | 1.20 mm | Thick leather, heavy sailcloth |
One thing to notice in the chart: there is no 80/13. The American scale jumps from 12 to 14. That’s not a typo — the scale simply has no 13, a quirk inherited from early Singer manufacturing conventions that nobody has ever bothered to correct.

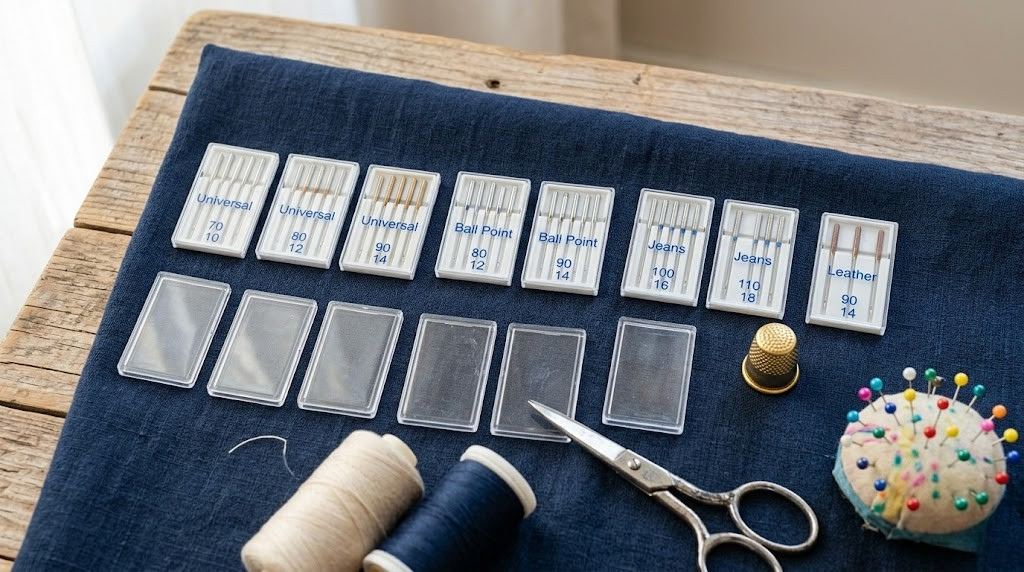
Schmetz Universal Needle Assortment (130/705 H)
The gold standard for home sewers. Sizes 60–90 in one pack — covers 80% of everyday sewing projects. German-engineered, machine-honed points, chrome-plated for durability.
Check Price on Amazon →The Complete Sewing Machine Needle Size Chart
The chart below is your master reference for everyday needle selection. It cross-references needle size with fabric weight, thread weight, and typical project applications. Bookmark it, print it, tape it inside your sewing cabinet — you’ll refer to it constantly.
| Size (EU/US) | Fabric Weight | Example Fabrics | Thread Weight | Common Projects |
|---|---|---|---|---|
| 60/8 | Gossamer-light | Chiffon, organza, tulle, georgette | 60–80 wt silk or cotton | Veils, overlay garments, formal wear |
| 65/9 | Very fine | Silk organza, tissue silk, voile | 60 wt cotton, silk thread | Lingerie, fine blouses, couture details |
| 70/10 | Lightweight | Batiste, lawn, challis, fine jersey | 50–60 wt cotton | Blouses, children’s wear, fine linings |
| 75/11 | Light-medium | Light knits, lycra, fine t-shirt jersey | 50 wt cotton or polyester | T-shirts, leggings, light stretch garments |
| 80/12 | Medium | Quilting cotton, shirting, broadcloth, linen | 40–50 wt all-purpose thread | Quilts, shirts, dresses, home décor |
| 90/14 | Medium-heavy | Light denim, canvas twill, fleece | 30–40 wt all-purpose or topstitch thread | Jeans, jackets, bags, light upholstery |
| 100/16 | Heavy | Denim (10–14 oz), heavy canvas, corduroy | 30 wt topstitch, jeans thread | Denim garments, bags, workwear, patches |
| 110/18 | Very heavy | Heavy denim (14 oz+), sailcloth, webbing | 30 wt or heavier jeans thread | Heavy bags, upholstery edges, straps |
| 120/19 | Maximum | Thick leather, heavy vinyl, multi-layer denim | Heavy-duty upholstery thread | Leather goods, heavy upholstery, saddlery |
The 80/12 universal needle is the “default” needle for a reason — it covers the enormous range of medium-weight fabrics that make up most everyday sewing. If you’re ever unsure, start here and adjust up or down based on how the fabric feels under your fingers.
One nuance the chart doesn’t capture: some fabrics are simultaneously heavy and delicate. Velvet, for instance, is relatively thick but crushes easily. Heavyweight silk dupioni is stiff but tears if the needle is too coarse. For these fabrics, you’re balancing penetration power against hole size — and you’ll usually find the answer in the needle type section below, where point geometry takes over from blade diameter.
Sewing Machine Needle Types Explained in Full Detail
Needle size (blade diameter) tells you how thick the needle is. Needle type tells you what the point is shaped to do. The combination of size and type is your complete needle specification. You need both to be right. A 90/14 universal in the wrong point style will cause problems on a fabric that a 90/14 stretch or denim would handle perfectly.
Slightly rounded point. Works on most woven and some knit fabrics. The generalist needle — not optimized for anything specific, but acceptable for most everyday sewing. Available in the widest size range.
Rounded ballpoint tip pushes fabric fibers aside rather than piercing through them. Deeper scarf for better stitch formation. Essential for jersey, knit, lycra, and elastic fabrics. Prevents skipped stitches on stretch.
Reinforced blade and extra-sharp acute point. Designed to punch cleanly through tightly woven, dense fabric without deflecting or breaking. Stiffer shaft resists bending under pressure. Also excellent for canvas and twill.
Extra-large, specially shaped eye to accommodate thicker, more delicate embroidery thread without shredding. Light ballpoint tip. Wider groove to protect thread during high-speed machine embroidery. Reduces thread breakage significantly.
Tapered, slightly acute point specifically designed to penetrate multiple layers (top fabric, batting, backing) without damaging fabric fibers. Strong shaft with a fine taper. Ideal for machine quilting, piecing, and free-motion work.
Cutting wedge-shaped point slices cleanly through leather, suede, vinyl, and faux leather. Does not push or pierce — it cuts a clean hole to allow thread passage. Never use on woven fabric — will permanently cut threads.
Extremely fine, acutely sharp point. Designed for microfiber, silk, taffeta, and fine wovens where precision is critical. Produces clean holes without distortion. Also excellent for topstitching fine fabrics and heirloom sewing.
Two needles mounted on a single shank. Creates parallel rows of stitching with a single pass — used for pintucks, parallel topstitching, and jersey hemming with a professional ripple effect. Requires machines with a center needle position.
Specialty Needles Worth Knowing
Beyond the standard lineup above, there are several specialty needles that experienced sewers keep in their toolkit for specific scenarios:
Topstitch Needles (80/12–100/16) have an extra-large eye and a deep groove to accommodate thick topstitching or decorative thread. The deeper groove prevents thread abrasion during the high-speed piercing action. These are the needles that allow you to use heavy buttonhole twist thread or metallic thread without constant breakage.
Metallic Needles (80/12) have a specially coated, elongated eye designed to handle the delicate structure of metallic thread. Metallic thread is made by wrapping a metallic film around a core fiber, and without the right eye shape, it shreds in seconds. If you’ve ever struggled with metallic thread snapping constantly, a metallic needle will solve it immediately.
Wing Needles (100/16–120/19) have two lateral wings on either side of the shaft. As the needle pierces and withdraws from tightly woven fabric (like linen), the wings pull the fibers aside and hold them there, creating decorative open holes. Used exclusively for heirloom and hemstitching techniques on fine wovens.
Self-Threading Needles have a small slot in the upper shaft that allows thread to be pulled in sideways rather than threaded through the eye. These are ergonomic aids for sewers with vision difficulties, not a performance needle category.
If you’re working on complex garment projects that involve zippers or buttonholes, it’s worth noting that needle choice affects those operations too. A microtex needle’s precision helps enormously when sewing a zipper through multiple fabric layers cleanly.
The Complete Fabric-to-Needle Matching Guide
Now that you understand both size and type, here’s how they combine for every major fabric category you’re likely to encounter. This is the section to return to every time you start a new project with an unfamiliar fabric.
Woven Natural Fabrics
| Fabric | Size | Type | Why |
|---|---|---|---|
| Chiffon, georgette, organza | 60/8 – 65/9 | Microtex/Sharp | Fine point prevents snags; tiny holes don’t show |
| Batiste, lawn, voile | 70/10 | Microtex or Universal | Lightweight fabric tears with larger needle |
| Cotton shirting, quilting cotton | 80/12 | Universal or Microtex | Standard all-purpose choice; clean hole formation |
| Linen (light-medium) | 80/12 – 90/14 | Universal or Sharp | Linen weave can resist needle; slightly larger helps |
| Heavy linen, canvas | 100/16 | Denim/Jeans | Reinforced point handles dense weave without bending |
| Denim (light, under 10 oz) | 90/14 | Denim/Jeans | Penetrates denim twill cleanly at medium weight |
| Denim (heavy, 12–16 oz) | 100/16 – 110/18 | Denim/Jeans | Full reinforced shaft prevents deflection on thick hems |
| Silk (light) | 65/9 – 70/10 | Microtex | Silk’s delicate weave needs the finest, sharpest point |
| Silk dupioni, taffeta | 70/10 – 80/12 | Microtex | Prevents snag lines that show on shiny surfaces |
| Wool (suiting, coating) | 80/12 – 90/14 | Universal | Wool fiber is forgiving; universal handles most weights |
Knit and Stretch Fabrics
| Fabric | Size | Type | Why |
|---|---|---|---|
| Fine jersey, t-shirt knit | 75/11 | Stretch/Ballpoint | Ballpoint slides between loops without breaking fibers |
| Medium jersey, interlock | 80/12 | Stretch/Ballpoint | Common choice for most knit garments |
| Lycra, spandex, swimwear | 75/11 – 80/12 | Stretch | Deeper scarf prevents skipped stitches on high-stretch |
| Fleece, sweatshirt knit | 80/12 – 90/14 | Stretch or Universal | Thicker structure needs slightly larger needle |
| Rib knit, waistbands | 80/12 | Stretch/Ballpoint | Standard; ballpoint essential for consistent loops |
| Performance knit (athletic) | 75/11 – 80/12 | Stretch | Technical fabrics behave like spandex under tension |
Specialty and Technical Fabrics
| Fabric | Size | Type | Notes |
|---|---|---|---|
| Genuine leather (light) | 80/12 – 90/14 | Leather/Wedge | Wedge point cuts clean slot; never re-sew, leaves holes |
| Genuine leather (heavy) | 100/16 – 110/18 | Leather/Wedge | Larger wedge needed to penetrate thick hide |
| Vinyl, faux leather | 90/14 | Leather or Universal | Leather needle works; universal acceptable on lighter vinyl |
| Velvet, velveteen | 80/12 | Universal or Sharp | Sharp to minimize crushing pile; sew slowly |
| Metallic fabric, lamé | 80/12 | Metallic or Microtex | Metallic needle’s coated eye prevents shredding metallic weft |
| Tulle, netting | 65/9 – 70/10 | Universal | Open structure forgives needle size; go fine to avoid snags |
| Bamboo/modal knit | 75/11 – 80/12 | Stretch | Silky drape requires ballpoint; prone to skipped stitches |
| Waxed canvas, oilskin | 100/16 | Denim/Jeans | Dense coating resists penetration; stiff needle needed |
Not sure which category your fabric falls into? Press a fingernail into the surface. If it leaves a mark easily — it’s delicate (go fine). If it resists significantly — it’s heavy (go larger). If it stretches or moves under pressure — it’s a knit (go ballpoint). This 5-second test can point you to the right section of the chart above.

Organ Needles HAx1 Assortment (100 Pack)
Japanese-manufactured needles known for exceptional sharpness and point consistency. Popular with professional seamstresses and tailors. Compatible with most home machines.
Check Price on Amazon →Thread and Needle Pairing: The Often-Overlooked Relationship
Fabric isn’t the only thing your needle needs to be matched to — thread weight is equally critical. The needle’s eye size and groove depth must accommodate the thread’s diameter. When thread is too thick for the needle’s groove, friction generates heat, weakens the thread, and causes mid-stitch breakage. When thread is too fine for the eye, it moves around inside the eye, creating inconsistent tension and looping stitches.
Thread Weight Explained
Thread weight is measured in one of two systems: the weight designation (wt) or tex. In the weight system, higher numbers mean finer thread — counterintuitively. A 60 wt thread is finer than a 30 wt thread. In the tex system, higher numbers mean thicker thread. For everyday home sewing, you’ll mostly encounter the wt system.
| Thread Weight (wt) | Thread Description | Recommended Needle | Ideal For |
|---|---|---|---|
| 100 wt | Ultra-fine (silk, polyester) | 60/8 – 70/10 | Invisible appliqué, hand-look quilting |
| 80–60 wt | Very fine (silk, cotton) | 60/8 – 75/11 | Fine garments, heirloom, bobbin thread |
| 50 wt | Fine (standard cotton) | 70/10 – 80/12 | Quilting, piecing, general sewing |
| 40 wt | Medium (all-purpose polyester) | 80/12 – 90/14 | General construction, knits |
| 30 wt | Medium-heavy | 90/14 – 100/16 | Topstitching, decorative stitching |
| 12 wt | Heavy (topstitch, jeans) | 100/16 – 110/18 | Denim topstitch, bold decorative lines |
The Groove Test
Here’s a simple physical check that master tailors use: lay your thread in the needle’s groove without threading it through the eye. The thread should rest inside the groove and not protrude visibly above the needle surface. If thread rides up above the groove line, the thread is too thick for that needle and you need a larger size. If the thread sits loosely and shifts around, it’s too fine and you should size down.
Thread Type Considerations
Polyester thread is the most forgiving — its consistent diameter and smooth surface work well in a wide range of needle sizes. Standard 40 wt polyester and a size 80/12 universal needle is the combination that ships pre-set in most factory machines for good reason.
Cotton thread has a slightly hairier, more fibrous texture. It generates more friction than polyester, which means the needle’s groove needs to be a good match. With quilting-weight 50 wt cotton, an 80/12 needle is standard. Drop to 70/10 for finer cotton thread.
Metallic thread requires a metallic needle specifically — it’s non-negotiable. The metallic coating is fragile, and without a coated elongated eye, the metallic film peels apart. Slow your machine speed down by 20–30% as well, since metallic thread generates heat quickly.
Embroidery thread at 40 wt typically works well in an embroidery needle (75/11–90/14). The enlarged eye accommodates the slight irregularity in embroidery thread texture. For rayon embroidery thread specifically, a 40 wt embroidery needle is almost mandatory to prevent the characteristic “shredding at the eye” failure mode.
When changing thread type significantly (from fine cotton to thick topstitch, for example), always change the needle too — even if the current needle is new. The needle-thread relationship matters as much as the needle-fabric relationship.
Needle Selection for Special Sewing Techniques
Beyond straightforward garment sewing, certain techniques have very specific needle requirements that go beyond simple size-and-type selection. Here’s what the pros know about each major specialty application.
Quilting: Piecing vs. Machine Quilting
Quilting has two distinct phases with different needle needs. During piecing (sewing patches together), you’re sewing through two layers of quilting cotton. A standard 75/11 or 80/12 universal or microtex needle is ideal — fine enough to produce a small hole that won’t show in the finished quilt top. During machine quilting (stitching through top-batting-backing sandwich), you need a quilting needle (75/11–90/14), specifically designed with a tapered point that navigates multiple layers without deflection.
Free-motion quilting additionally stresses the needle from every angle as you move the fabric freely under a dropped feed dog. A 75/11 or 80/12 quilting needle is the right choice here — strong enough not to deflect, fine enough not to damage the quilt top.
Embroidery: Machine vs. Stabilized
Machine embroidery is extreme on needles. High-speed stitching (often 400–800 stitches per minute) creates significant heat through friction. Embroidery needles are specifically engineered to minimize this heat through their eye shape and groove geometry. Replace machine embroidery needles after every 4–6 hours of embroidery time, or after every project — they dull faster than any other needle type at machine embroidery speeds.
For stabilized embroidery work on stiff cutaway or tearaway backing, size up slightly if you’re having trouble with your needle deflecting into the dense stitching.
Buttonholes and Buttons
Sewing buttonholes is one of the most needle-stressing operations on a domestic machine. The side-to-side zig-zag motion combined with dense satin stitch creates tremendous heat and wear. Use a sharp or microtex needle, one size smaller than you’d normally use for the fabric — this keeps holes clean and prevents the hole edges from being stretched by a blunt or oversized needle. You can also learn how to sew a buttonhole without a buttonhole foot for greater control over needle position.
Serging / Overlocking
Serger machines use different needles than conventional sewing machines — typically EL×705 or EL×705 CR types, which have a shorter shank than domestic 15×1 needles. Never use a standard domestic needle in a serger without verifying compatibility. Using the wrong shank length in a serger can cause catastrophic timing damage to the looper mechanism.
Twin Needle Work (Decorative and Hemming)
Twin needles are designated by two numbers: the gap between needles in millimeters, and the size of each individual needle. “2.0/80” means a 2.0 mm gap between two 80/12 needles. Choosing the right gap depends on your machine’s needle aperture and the effect you want. Narrower gaps (1.6–2.0 mm) for subtle pintucks on fine fabric. Wider gaps (4.0–6.0 mm) for bold hemming effects on jersey. Always check your machine manual for maximum twin needle width — using a gap wider than your needle plate opening breaks both needles instantly.
Free-Motion Work
When you drop the feed dogs and move fabric manually under the presser foot (for free-motion quilting, darning, or free-motion embroidery), you’re moving the fabric in unpredictable directions at high speed. This places lateral stress on the needle that straight-line sewing never encounters. A stronger, slightly larger needle (80/12–90/14) is better here than going too fine. For free-motion on knit fabrics specifically, use a stretch needle to prevent the deflection-and-skip-stitch problem that plagues free-motion knit work.
Never use a wing needle, double wing, or leather needle on your machine without specifically verifying your machine is designed for it. Wing needles can damage needle plate openings not designed for their extra width. Leather wedge needles will permanently cut thread fibers in a woven fabric — they are not general-purpose.

Schmetz Stretch Needles 130/705 H-S (5-Pack)
The best stretch needle for jersey, knit, and lycra fabrics. Deep scarf prevents skipped stitches. Sizes 75/11 and 90/14 available. A must-have for any sewist working with knit fabrics.
Check Price on Amazon →Troubleshooting Needle-Related Sewing Problems
The single most useful diagnostic skill a sewer can develop is the ability to recognize when a problem is needle-related rather than tension-, threading-, or machine-related. Here’s a systematic guide to the most common needle-caused problems, with both the diagnosis and the cure.
For broader machine troubleshooting that may involve more than just the needle, visit this comprehensive sewing machine needle problems guide for additional diagnostic steps.
| Symptom | Likely Needle Cause | Solution |
|---|---|---|
| Skipped stitches on knit fabric | Using universal/sharp on knit fabric — needle pierces loops instead of deflecting | Switch to ballpoint/stretch needle |
| Thread breaking at needle | Thread too thick for needle groove; needle eye too small | Use larger needle or switch to topstitch/embroidery needle |
| Thread shredding or fraying | Burr on needle eye (damaged needle) or metallic thread without metallic needle | Replace needle; use metallic needle for metallic thread |
| Fabric puckering at seam | Needle too large for fabric weight; forcing too-large hole | Size down to a finer needle |
| Holes visible in fabric after sewing | Needle too large for fabric density; wrong point type | Size down; use microtex/sharp for fine wovens |
| Needle breaking | Needle too fine for fabric weight; hitting presser foot or needle plate | Size up; check needle is fully seated and clamp is tight |
| Thumping or thudding noise | Blunt or slightly bent needle striking the fabric and resisting penetration | Replace needle immediately — a dull needle sounds different |
| Loops on underside of seam | Often confused for tension problems; can be caused by wrong needle size for thread | Try matching needle size to thread weight before adjusting tension |
| Pulled or snagged threads in fabric | Damaged needle tip (micro-burr) or wrong point type (sharp on knit) | Replace needle; use ballpoint for knits |
| Needle deflecting sideways | Needle too fine for thick/dense fabric; fabric resistance bending needle | Size up; use denim needle for dense fabrics |
How to Detect a Damaged Needle Without a Microscope
A damaged needle is rarely visibly bent to the naked eye — the damage that causes problems is micro-scale: a tiny burr on the eye, a microscopic bend in the shaft, a slightly blunted point. These changes are invisible without magnification, but you can detect them through feel and sound.
The Thumbnail Test
Draw the needle point slowly across your thumbnail. A sharp needle glides. A dull needle catches or drags against the nail surface. This works because your thumbnail surface is smooth enough to detect microscopic irregularities in the point.
The Listen Test
A sharp needle entering fabric makes a clean, almost silent “snick.” A dull needle produces an audible pop or thud as it forces through the fibers. If your machine suddenly sounds different mid-project, the needle has dulled or was nicked by a pin.
The Magnification Check
Hold the needle under a bright light with a 10× loupe (or the macro mode on your phone camera). Look at the very tip and the inside of the eye. The tip should be perfectly symmetric. The eye should have no sharp edges or metal chips. Any irregularity means discard.
The Rotation Check
Hold the needle vertically at eye level and rotate it slowly between your fingers. A straight needle shows no wobble or eccentricity in the shaft as it rotates. A bent needle will visibly shift from center as it turns — even a 0.1 mm bend is detectable this way.
When to Change Your Sewing Machine Needle
This is probably the most ignored piece of sewing advice that exists: change your needle more often than you think you need to. Most professional sewers change needles after every 6–8 hours of sewing, or after every major project change. Most home sewers use the same needle for months or years. The gap between these practices is where most stitch-quality problems live.
Industry Guidelines for Needle Replacement
✅ Change When…
- Switching to a different fabric type or weight
- After every 6–8 hours of continuous sewing
- After hitting a pin (even once)
- When you hear a popping or thumping sound
- When stitches start skipping for no apparent reason
- After any embroidery project over 2 hours
- When changing from woven to knit fabric
- When starting any project where stitch quality is critical
❌ Signs You Waited Too Long
- Thread fraying or breaking at needle
- Audible popping or thumping noise
- Visible snags in fabric surface
- Seams puckering despite correct tension
- Skipped stitches appearing randomly
- Stitches looser or less consistent
- The needle looks visibly different under magnification
A needle travels through fabric at 400–900 stitches per minute on a home machine. In a single hour of quilting at moderate speed, your needle penetrates fabric approximately 36,000 times. After 8 hours, that’s 288,000 penetrations. The point that enters a fabric warp and weft thread 288,000 times is not the same point that went in clean. It’s time for a new needle — and needles cost less than $1 each.
The Correct Way to Insert and Seat a Needle
A surprising number of needle problems are caused not by the wrong needle, but by a correctly chosen needle that’s not properly installed. Incorrect needle seating is one of the most common causes of timing problems, skipped stitches, and needle breakage.
Orient the Needle Correctly
The flat side of the shank faces toward the back of the machine (away from you on most machines, but verify with your manual). The long groove on the blade faces the front. The scarf is at the back. If the needle is inserted backwards, stitches will not form at all — the hook cannot catch the thread loop.
Push Fully Up Into the Clamp
With most machines, you push the needle up into the clamp as far as it will go — until it stops. Some machines have a ledge inside the clamp that physically prevents the needle from going in too far. Others rely on the user to push fully. An under-seated needle will sit too low, causing the hook to pass below the needle eye level and miss the thread loop entirely.
Tighten the Clamp Screw Firmly
The needle clamp screw must be tightened firmly — not finger-tight, firmly tight with the screwdriver. A loose needle migrates during sewing, changing its position mid-stitch and causing everything from skipped stitches to needle breakage when the shaft contacts the needle plate.
Sewing Machine Needle Brands: What to Buy and Why
Not all needles are created equal. The manufacturing tolerance on a cheap needle can vary by 0.05 mm or more in blade diameter — enough to cause stitching problems that are impossible to diagnose because the needle technically looks correct. Here’s the honest breakdown of the major brands.
Schmetz (Germany) — The Gold Standard
Schmetz needles are manufactured in Germany to extremely tight tolerances and are widely regarded as the best available for home sewing machines. Every needle is machine-honed to a precise point geometry, and quality control is exceptionally rigorous. The chrome-nickel plating resists corrosion and reduces friction. Schmetz produces needles in every type and size imaginable, and their packs are clearly labeled with type, size, and system designation. If you can only buy one brand, buy Schmetz.
✅ Schmetz Pros
- Tightest manufacturing tolerances available
- Full range of types and sizes
- Clear, accurate packaging information
- Consistent point sharpness across production batches
- Available worldwide, widely stocked
❌ Schmetz Cons
- Higher price than generic alternatives
- Overkill for very occasional sewers
- Some specialty types harder to find in stores
Organ (Japan) — Professional’s Choice
Organ Needle Co. is a Japanese manufacturer supplying needles to many of the world’s major industrial sewing machine brands (including Juki, Brother, and JUKI industrial). Their home-machine needles are equally precise and are often preferred by professional seamstresses for their slightly different point geometry. Organ HAx1 needles are particularly popular in Asia and among quilters. Available in bulk packs of 100 at excellent value.
Groz-Beckert (Germany) — Industrial Heritage
Groz-Beckert is primarily an industrial needle supplier, but their home machine needle line is available through specialty retailers. Their tolerances are designed for industrial precision — meaning they’re accurate to within fractions of what’s required for home use. Expensive, but essentially the ceiling of needle quality.
Dritz / Singer (Budget Tier)
Dritz and Singer both produce budget-priced needles commonly found at big-box fabric stores. They work fine for most everyday sewing on standard fabrics. The issue is consistency — quality control varies more than premium brands, and you occasionally get a needle from a subpar production batch. For occasional sewers doing basic projects, they’re perfectly adequate. For regular sewers doing detailed work or working with delicate fabrics, invest in Schmetz or Organ.
Knowing If Your Needles Are Compatible
Most modern domestic sewing machines use the 15×1 needle system (also called 130/705 H). This is the near-universal standard used by Brother, Singer, Janome, Juki, Bernina, Elna, and virtually all other home machine brands. The “15×1” on needle packaging confirms compatibility. Serger machines use different systems — typically EL×705 — and should always have their own designated needles.
If you’re curious about whether needles are truly universal across brands, there’s an in-depth answer at are sewing machine needles universal? — because the answer is more nuanced than a simple yes or no.

Schmetz Denim/Jeans Needles 130/705 H-J (5-Pack)
Reinforced shaft, extra-sharp point engineered for thick denim, canvas, and heavy twill. Sizes 90/14 and 100/16. The needle that stops hem-jumping dead.
Check Price on Amazon →Pro-Level Needle Tips, Secrets, and Best Practices
This final content section collects the hard-won advice that experienced sewers discover through years of frustration and experimentation. These are the things that don’t appear in machine manuals.
Test Stitch Before Committing
Always sew a 4–6 inch test seam on scrap from your actual project fabric before sewing your first real seam. Use the same thread, the same tension settings, and the same needle you plan to use for the project. This costs 30 seconds and can save an entire project from being ruined by needle-related stitch problems that would be visible but irreparable on actual fabric.
Store Needles Properly
Needles are susceptible to two types of invisible damage: micro-rust from humidity (which creates surface abrasion) and physical vibration damage from storage in a loose pile. Store needles in their original packaging (which protects tips from contact) or in a dedicated needle case with foam inserts. Keep them away from humidity — a silica gel packet in your needle storage box is worth adding.
Mark Used Needles
When you remove a needle that’s still in good condition (because you’re switching fabric, not because it’s worn out), mark it with a fine Sharpie dot on the flat back of the shank to indicate it has been used. A factory-fresh needle and a 4-hour needle look identical, but they perform differently. Your mark tells you which is which.
The Magnetized Pincushion Trick
Sewing machine needles are magnetized during manufacturing to aid in pick-and-place assembly on production lines. This means they attract metallic particles — iron filings, metal dust, even some synthetic fibers with metallic content. Needles in open storage gradually accumulate micro-particles on the shaft and eye. Wipe needles down with a clean cloth before inserting them, especially if they’ve been stored in proximity to metal tools.
Never Sew Over Pins
This deserves explicit mention because it’s extremely common and extremely damaging. Sewing over a pin — even if the needle clears the pin head by a hair — subjects the needle to a sudden sideways impact that creates invisible micro-bends and point damage. One pin strike can ruin an otherwise good needle silently. Remove pins as you approach them, or use sewing clips instead of pins for a workflow that eliminates this risk entirely.
Consider Your Machine’s RPM When Sizing Needles
Higher-speed sewing generates more heat through friction, which accelerates needle wear and increases thread abrasion risk. If you routinely sew at maximum speed, consider using a needle one size larger than the minimum needed — the slightly larger groove gives thread a bit more protection at high speed. If you prefer slow, controlled sewing, you can use the minimum correct size and benefit from smaller holes in fabric.
Understanding Machine Compatibility
Even with the right needle, your machine’s settings matter enormously. If you’re learning how to use a sewing machine for the first time, pairing the right needle with understanding your machine’s stitch settings and tension dials creates the foundation for consistently excellent results. The needle doesn’t work in isolation — it’s part of a system.
The Needle Change Routine
Establish a ritual for needle changes that happens automatically and consistently. A simple routine: every time you finish a project, remove the needle, check it against your thumbnail, note its type and size on a small tag, and either file it in “used but good” storage or discard it. Install a fresh needle at the start of every new project. This single habit eliminates 80% of needle-related sewing problems before they can occur.
Lighting Changes Everything
Thread a needle under good task lighting and you’ll do it in 5 seconds. Thread a needle in dim lighting and you’ll spend 3 minutes squinting. But lighting matters beyond threading — proper light lets you see needle damage, thread fraying inside the eye, and stitch quality issues before they compound into major problems. A dedicated sewing lamp with color-accurate LED lighting is worth every penny.
The Golden Needle Rule: When in doubt, change the needle first. A new needle costs less than a dollar and installs in 30 seconds. If the problem you’re experiencing is needle-related (which is extremely likely), you’ve just fixed it. If the problem persists after a fresh needle, you’ve at least eliminated the most common cause and can move on to diagnosing other things with confidence.
Frequently Asked Questions About Sewing Machine Needle Sizes
Sewing machine needles are labeled with a dual number such as 80/12. The first number (80) is the European metric designation representing the blade diameter in hundredths of a millimeter — an 80 needle has a 0.80 mm blade. The second number (12) is the American Singer system, an arbitrary scale that correlates with the European number. Both numbers identify the same needle; the notation exists because different markets historically used different systems, and modern packaging shows both for universal clarity.
For beginners, start with a size 80/12 universal needle. This size covers medium-weight fabrics including quilting cotton, broadcloth, shirting, and lightweight linen — the fabrics most beginners start with. Universal needles have a slightly rounded point that works on both wovens and light knits without requiring you to switch needle types for every fabric. As you expand to heavier fabrics (like denim) or stretch fabrics (like jersey), you’ll add a 90/14 denim and a 75/11 ballpoint to your kit.
Skipped stitches on knit or stretch fabric are most commonly caused by using a universal or sharp needle instead of a ballpoint/stretch needle. The pointed tip pierces individual fibers in the knit loops rather than deflecting around them, disrupting the loop formation that the hook needs to catch. On woven fabrics, skipped stitches can indicate a needle that’s inserted incorrectly (not pushed fully up into the clamp), a dull or bent needle, or a needle that is too fine for the fabric weight and deflecting under pressure. Try a fresh stretch needle and ensure it’s fully seated before adjusting tension.
The professional recommendation is to change your needle after every 6–8 hours of sewing, or after each major project — whichever comes first. Always change after hitting a pin (even once), when switching from one fabric type to another, or at the first sign of a popping or thumping sound during sewing. For machine embroidery at high speed, change after every 4–6 hours of work. Needles are inexpensive (often under $1 each) and a dull or damaged needle causes far more expensive problems than the cost of a fresh one.
For denim, use a denim/jeans needle. The size depends on the denim weight: use a 90/14 denim needle for lighter denim (under 10 oz), a 100/16 for standard denim (10–12 oz), and a 110/18 for heavy denim (12 oz and above). Denim needles have a reinforced shaft that resists bending and an extra-acute sharp point that punches cleanly through the tight twill weave. For topstitching denim with thick jeans thread, combine your denim needle with a topstitch needle designation — or use a topstitch needle (90/14–100/16) that accommodates heavy thread while still penetrating denim effectively.
Yes — almost all modern domestic sewing machines use the 15×1 needle system (also designated 130/705 H), which is a near-universal standard across Brother, Singer, Janome, Juki, Bernina, Elna, Husqvarna Viking, and most other home sewing machine brands. Schmetz, Organ, and other manufacturers’ needles labeled 130/705 H will work in any of these machines. The important exceptions are serger/overlock machines (which use different shank lengths like EL×705), industrial machines (which use thicker shanks entirely), and a small number of vintage or specialty machines. Always verify your machine’s needle system in the manual if you’re unsure.
Both ballpoint and stretch needles are designed for knit fabrics, but there’s a meaningful engineering difference. A ballpoint needle has a rounded tip that pushes fibers aside rather than piercing them — it’s optimized for stable knit fabrics like interlock, ponte, and jersey. A stretch needle additionally has a deeper scarf (the notch above the eye) that allows the rotary hook to pass closer to the needle on every stitch, creating more reliable loop formation on highly elastic fabrics like spandex, lycra, and four-way stretch material. For everyday jersey sewing, a ballpoint works well. For highly elastic fabrics that tend to cause skipped stitches even with a ballpoint, upgrade to a stretch needle.
Thread breakage at the needle has several potential needle-related causes. First: the needle eye may be too small for the thread — using a 40 wt all-purpose thread in a needle sized for 60 wt thread causes the thread to bind in the groove, heat up, and snap. Upsize the needle. Second: the needle may be damaged — a micro-burr on the eye’s edge cuts the thread on every stroke. Replace the needle. Third: using metallic or embroidery thread in a universal needle instead of a dedicated metallic or embroidery needle causes the thread’s delicate surface coating to shred against the eye. Match specialty thread to its matching specialty needle. Fourth: the needle may be installed backwards — check the flat back orientation.
For quilting, the best choice is a dedicated quilting needle in size 75/11 for piecing fine fabrics, or 80/12 for general piecing and machine quilting. Quilting needles have a tapered, slightly acute point designed to penetrate multiple fabric layers (top, batting, and backing) cleanly without the point deflecting between layers. For free-motion quilting specifically, an 80/12 quilting needle offers the best balance of penetrating power and fine hole size. For machine embroidery on quilts, switch to an embroidery needle in 75/11 or 80/12 when running dense decorative stitching over batting.
The most reliable test for a dull needle is the thumbnail test: draw the needle tip slowly across your thumbnail. A sharp needle glides silently. A dull needle snags or drags noticeably. For a bent needle, hold it vertically at eye level and rotate it slowly between your fingers — a bent shaft will visibly wobble from center as it rotates, even with a bend as small as 0.1 mm. The auditory test also works well: a sharp needle entering fabric makes a soft “snick.” A dull or damaged needle produces a popping or thumping sound as it forces through fibers. If you’re hearing that sound mid-project, stop and replace the needle immediately.
Fabric puckering despite correct tension is frequently caused by using a needle that’s too large for the fabric weight. When the needle’s blade diameter is too wide, it forces an oversized hole through the weave, and the surrounding fabric threads contract slightly to fill the gap — creating the puckered appearance. Switch to a finer needle (size down by one or two steps) and test again before adjusting tension. For very fine fabrics like chiffon or organza, a 60/8 or 65/9 microtex needle often resolves puckering that 80/12 universals cause. A slightly dull needle can also cause puckering on lightweight fabrics — the blunt point drags fibers rather than piercing cleanly, bunching them ahead of the needle.
Conclusion: The Right Needle Is the Foundation of Every Great Seam
After thousands of words covering numbering systems, anatomy, fabric-matching charts, thread pairings, troubleshooting guides, brand comparisons, and pro tips, the central truth of sewing machine needle selection reduces to a few simple principles.
First: size is diameter. The metric number tells you exactly how thick the blade is in hundredths of a millimeter. Match the diameter to your fabric weight — finer fabrics need smaller diameters, heavier fabrics need larger.
Second: type is point geometry. The point shape determines how your needle interacts with the fabric’s fiber structure. Wovens need a sharp or universal. Knits need a ballpoint. Leather needs a wedge. This is non-negotiable — using the wrong point type on the wrong fabric causes problems that no amount of tension adjustment will fix.
Third: change the needle first. When problems appear — skipped stitches, thread breakage, fabric damage, mysterious puckering — the needle is the most likely cause and the cheapest, fastest fix. Before you touch any other settings, put in a fresh needle matched to your fabric.
Fourth: needles are consumables. They dull, they bend, they accumulate micro-damage. Change them proactively at every project change and every 6–8 hours. This single habit eliminates most sewing problems before they start.
Whether you’re learning to use a sewing machine for the first time or you’ve been sewing for decades, needle knowledge is the kind of fundamental expertise that pays forward into every single project you’ll ever make. Now you have it in full. Go sew something beautiful.
Ready to Build Your Needle Kit?
A complete basic needle kit costs under $20 and covers 95% of all sewing projects. Shop the top-rated needle assortments used by professional sewers and quilters worldwide.
Shop Needle Assortments on Amazon → Needle Troubleshooting Guide →