How to Sew a Zipper: Complete Guide to Invisible, Exposed, and Fly Front Zippers
1. Why Learning to Sew a Zipper Changes Everything
There is a moment in almost every sewer’s journey when a project stops and waits at the zipper step. You have the dress finished, the fabric pressed, the pattern pieces lined up beautifully — and then you stare at a slim strip of plastic teeth and wonder if you should just sew a buttonhole instead. You are not alone. Zippers intimidate more beginners than any other single technique, and yet, once you understand how the three main types actually work, they become one of the most satisfying skills to own.
This guide exists to carry you all the way from curious beginner to confident zipper-installer. You will not just learn which buttons to press on your machine. You will understand why an invisible zipper stays invisible, why an exposed zipper looks so crisp on a moto jacket, and why a properly sewn fly front lies flat on a pair of jeans instead of buckling at the hip.
The three zipper techniques covered here — invisible, exposed, and fly front — represent roughly 90% of all the zippers you will encounter in garment sewing. Master these three, and you can tackle nearly any commercial pattern that lands on your sewing table.
2. Zipper Anatomy and the Main Types You’ll Encounter
A zipper seems like a single object, but it’s actually a small assembly of parts that all affect how you sew it in. Knowing the vocabulary will save you hours of confused reading when you hit your first tricky pattern instruction.
The Six Parts of a Zipper
- Teeth (or coils): The interlocking elements that close the zipper.
- Tape: The fabric strip on either side of the teeth.
- Slider (pull tab): The moving part that joins or separates the teeth.
- Top stops: Small pieces at the top preventing the slider from coming off.
- Bottom stop: The piece at the bottom that stops the slider.
- Box & pin (separating zippers only): Allow the zipper to come apart completely.
The Five Most Common Zipper Types
| Zipper Type | Best Use | Material | Difficulty |
|---|---|---|---|
| Invisible (concealed) | Dresses, skirts, formalwear | Nylon coil | Medium |
| Centered (regular) | Cushions, bags, back of bodices | Polyester or metal | Easy |
| Exposed | Jackets, bags, decorative design | Metal or chunky plastic | Medium |
| Lapped | Side seams on trousers | Polyester coil | Medium |
| Fly front (jean) | Jeans, trousers, shorts | Metal (brass/nickel) | Advanced |

YKK Zipper Variety Pack (Invisible + Coil + Jean)
A reliable multi-pack that covers every project in this guide. YKK is the industry benchmark — what 95% of ready-to-wear garments use.
Check Price on Amazon3. The Essential Toolkit for Sewing Any Zipper
You don’t need a $400 presser foot set to sew a great zipper. You do need the right handful of basic tools.
The Non-Negotiables
- A sewing machine that can do a straight stitch.
- A regular zipper foot — included with nearly every machine.
- An invisible zipper foot if you plan to sew invisible zippers.
- Thread that matches your fabric.
- Sharp fabric scissors or small snips.
- Sewing pins or clips.
- An iron. Not optional.
- A seam ripper. Assume you will need it.
Choosing the Right Needle
| Fabric | Needle Size | Needle Type |
|---|---|---|
| Silk, chiffon, fine wool | 70/10 | Microtex (sharp) |
| Cotton, linen, mid-weight | 80/12 | Universal |
| Denim (jean zipper) | 90/14 or 100/16 | Jeans/denim |
| Knits and jerseys | 75/11 | Ballpoint or stretch |
| Leather or vinyl | 90/14 | Leather |

Universal Invisible Zipper Foot Set
Snap-on and screw-on options that fit Brother, Singer, Janome, and most low-shank machines.
View on Amazon4. Preparing Your Fabric Before You Touch the Zipper
Ninety percent of zipper problems start before the zipper is anywhere near the machine. They start with fabric that shifts, stretches, or wasn’t pressed properly.
Pre-Wash Your Fabric
If your fabric will ever be washed in its finished form, wash it now, before cutting. Cotton and linen shrink 3–5% on the first wash, and a zipper installed before that shrinkage will warp the seam when the garment is cleaned for the first time.
Press — Don’t Iron — Your Fabric
Pressing is lifting the iron up, placing it down on a new spot, and lifting again. Every seam allowance around a zipper should be pressed, not ironed.
Stabilize Delicate or Stretchy Fabric
If you’re installing a zipper in anything lightweight (silk, chiffon, rayon) or stretchy (jersey, ponte, knit), fuse strips of lightweight fusible interfacing about 1 inch wide to the wrong side of each seam allowance along the zipper opening.
5. The Invisible Zipper: Step-by-Step Tutorial
The invisible zipper is the zipper that made zippers feel elegant. When installed correctly, you should not be able to spot it from the outside — you see only a clean seam, and the zipper disappears into the fold of the fabric.
Finish the Raw Edges
Serge or zigzag the two seam edges where the zipper will go. This prevents fraying and cleanly separates the zipper zone from the rest of the seam.
Press the Zipper Coils Flat
Open the zipper fully. Place it face-up on your ironing board. Using a cool-to-warm iron (never hot — nylon melts), press the coils gently so they flip up and lie flat against the tape.
Mark Your Seam Line
With chalk or a disappearing pen, draw a light line along the 5/8-inch seam line on the right side of both fabric pieces, within the zipper opening zone.
Pin the First Side
Lay one fabric piece flat, right side up. Place the zipper face-down on top, with the teeth directly on your chalk line. The top of the zipper should be 1/4 inch below the top raw edge. Pin the zipper tape to the fabric — never the teeth.
Stitch the First Side
Snap on the invisible zipper foot. Position the left groove over the coil. Stitch down, stopping 1/2 inch before the slider blocks your path. The stitching should run directly next to the coils.
Close and Align the Second Side
Close the zipper briefly to check alignment. Open it back up, then take the second fabric piece and lay it right side up next to the first. Flip the unstitched zipper tape face-down onto the second piece, aligning the coil to your chalk line. Pin in place.
Stitch the Second Side
Use the right groove of the invisible zipper foot this time. Stitch from the top down, again stopping where the slider gets in the way. Backstitch.
Close the Seam Below the Zipper
Switch to your regular zipper foot. Drop the needle slightly above where your zipper stitching ended. Stitch the remainder of the seam closed, using your normal seam allowance.
Anchor the Zipper Tape
Tuck the loose ends of the zipper tape to one side and stitch them down to the seam allowance only — not to the garment itself. This keeps the tape from flopping around inside the garment.
Press and Inspect
Close the zipper. From the right side, give the seam one final press. If done correctly, you should see only a line — the zipper has disappeared.
Pros of Invisible Zippers
- Nearly undetectable from outside
- Clean, elegant look on dresses
- Lightweight — no bulk
- Huge color selection
Cons of Invisible Zippers
- Requires specialty foot
- Less durable than metal
- Can catch on delicate fabric
- Harder to repair if broken
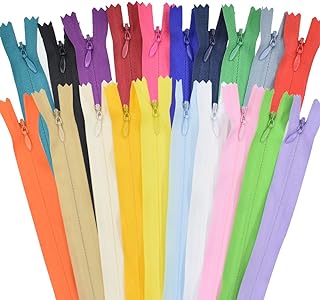
24-Pack Invisible Zippers (Multiple Lengths)
Assorted 9″–22″ invisible zippers in rainbow colors.
Get It on Amazon6. The Exposed Zipper: Step-by-Step Tutorial
Where the invisible zipper hides, the exposed zipper brags. This is the zipper you see on motorcycle jackets, pencil skirts, leather clutches, and contemporary designer pieces.
Mark the Zipper Opening
On the wrong side of your fabric, draw a rectangle where the zipper will go. The rectangle’s length equals the zipper teeth length. The width should be slightly less than the zipper teeth width — usually 3/8 inch (1cm).
Apply Fusible Interfacing
Cut a rectangle of lightweight fusible interfacing about 1 inch larger than your zipper rectangle on all sides. Fuse it to the wrong side of the fabric, centered over your marked rectangle.
Stitch Around the Rectangle
Using a short stitch length (2.0mm), stitch completely around your marked rectangle. Pivot at each corner. This stitch line is both a guide and a reinforcement.
Cut the Opening
Cut down the center of the rectangle, stopping about 1/2 inch before each short end. Then cut diagonally into each corner, right up to (but not through) the stitching.
Push the Fabric Through
Push all four edges of the rectangle to the wrong side of the fabric, turning the opening inside out. Press firmly. You should now have a clean rectangular hole in your fabric with crisp edges.
Position the Zipper
From the wrong side, place the zipper behind the opening so that the teeth are perfectly centered in the window. The zipper should be closed. Pin from the right side.
Topstitch Around All Four Sides
Topstitch around all four sides of the rectangle, about 1/8 inch from the edge of the opening. Go slowly. Pivot at the corners with the needle down.
Secure the Zipper Tape
From the wrong side, trim away excess zipper tape extending beyond the topstitching. Tack the corners of the zipper tape down with a small hand stitch to the seam allowance.
Pros of Exposed Zippers
- Strong design statement
- No seam alignment needed
- Easier to repair later
- Works in unusual placements
Cons of Exposed Zippers
- Cutting mistakes are permanent
- Topstitching must be flawless
- Requires interfacing always
- Not appropriate for formalwear

Brass Metal Exposed Zippers — 10 Pack
Chunky, heavy-duty zippers ideal for jackets, bags, and statement design pieces.
Shop on Amazon7. The Fly Front Zipper: Step-by-Step Tutorial
Welcome to the most intricate zipper installation in everyday garment sewing. The fly front lives on every pair of jeans and trousers you’ve ever owned.
Interface Both Fly Extensions
Cut fusible interfacing to match the fly extension shape and apply it to the wrong side. This stops the fly from warping after washing.
Sew the Center Front Crotch Seam
Place the two pant fronts right sides together. Stitch the crotch seam from the bottom of the zipper opening down to the inseam. Backstitch at the top where the seam meets the fly notch — the seam above this point stays open for the zipper.
Press the Left Fly Under
On the left front (the overlap side), fold the fly extension back along the center front line and press. This creates a clean edge that will sit on top of the right fly during finishing.
Attach the Zipper to the Right Underlap First
Lay the right fly extension flat, right side up. Place one side of the zipper tape face-down on the extension, aligning the teeth close to (but not on) the raw edge. Stitch close to the teeth. This is the underlap side — stitch to the extension only, not the main pant body.
Fold and Topstitch the Underlap
Fold the right extension back under along the stitching line so the zipper now lies face-up with the extension behind it. Topstitch 1/8 inch from the folded edge.
Close the Zipper and Position the Left Overlap
Close the zipper. Bring the left pant front over the right so the pressed fold sits directly over the center front line of the pants. Pin from the right side, capturing the zipper tape underneath.
Stitch the Left Zipper Tape to the Left Fly Extension
Flip the pants open to see the wrong side. Carefully stitch the free side of the zipper tape to the left fly extension only — do not catch the main pant front fabric.
Mark and Topstitch the Signature J-Curve
From the right side, mark the J-shaped topstitching line. It runs straight down from the waistband, about 1 to 1.5 inches from center front, then curves gracefully toward the inseam at the bottom.
Prepare the Fly Shield
Take the fly shield piece, fold it in half lengthwise with right sides together, stitch the bottom edge, turn right side out, and press. You now have a folded rectangle with a clean edge.
Attach the Fly Shield
Pin the raw edge of the fly shield to the underlap side, sandwiching it against the zipper tape. Stitch through all layers along the existing zipper stitching line.
Bartack the Base
At the bottom of the fly where the topstitching ends, sew a bartack (a dense zigzag or programmed bartack stitch) through all layers. This is the structural anchor that keeps the fly from ripping open under stress.
Pros of Fly Fronts
- Professional finish on pants
- Incredibly durable with bartack
- Classic menswear tailoring skill
- Metal zipper lasts a decade
Cons of Fly Fronts
- Most steps of all three types
- Requires precise pressing
- Specialty zipper needed
- Not beginner-friendly

YKK Brass Jean Zippers — 6″ & 7″ Set
The real deal — the exact metal zippers used by denim manufacturers.
Buy on Amazon8. Side-by-Side: How the Three Types Stack Up
| Feature | Invisible | Exposed | Fly Front |
|---|---|---|---|
| Visibility from outside | None (hidden) | High (intentional) | None (covered) |
| Installation time (beginner) | 30–45 min | 45–60 min | 75–120 min |
| Special foot required | Yes (invisible foot) | Regular zipper foot | Regular zipper foot |
| Stabilizer needed | Delicate fabric only | Always | Always |
| Best on | Dresses, skirts | Jackets, bags | Pants, trousers |
| Difficulty level | Intermediate | Intermediate | Advanced |
| Topstitching visible? | No | Yes (decorative) | Yes (J-curve) |
9. Troubleshooting: When Things Go Wrong
Problem: The Zipper Teeth Show on an Invisible Zipper
Cause: You didn’t press the coils flat enough, or you stitched too far from the teeth. Fix: press again with a warm iron, then re-stitch closer.
Problem: The Fabric Puckers Along the Zipper
Cause: Tension too tight, no stabilizer, or you pulled the fabric through. Fix: ease up on tension, fuse interfacing strips, let feed dogs do the work.
Problem: The Fly J-Curve Looks Crooked
Cause: You sewed it freehand. Fix: always mark the curve with chalk first, using a coffee mug or French curve for the radius.
Problem: Skipped Stitches Along the Zipper
Cause: A dull needle or wrong needle type. Fix: swap to a fresh needle appropriate for your fabric. This is the single most underrated fix in all of sewing.
10. Pro Techniques That Elevate Your Work
Trick #1: Baste Before You Sew
Before final stitching, run a long basting stitch to hold the zipper in place. Once confirmed, sew over the basting with your permanent stitch.
Trick #2: Change Stitch Length Strategically
Shorten to 1.5mm for the first and last half-inch. This reinforces the critical stress points. Use 2.5mm for the middle.
Trick #3: Pre-Shrink the Zipper Tape
Drop your zipper into a bowl of warm water for five minutes and air-dry. This pre-shrinks the tape so it doesn’t warp after the first wash.
Trick #4: Press Between Every Step
After every stitching step, press. The iron is not a separate tool — it’s part of the seam. Unpressed zippers always look lumpy.
Trick #5: Sew From the Top Down
Always stitch from the top of the zipper downward. This pulls the fabric in the direction gravity wants it to go.

Dritz Zipper Installation Kit
Includes tape, chalk, a needle variety pack, and a fly shield pattern.
View on Amazon11. Zipper Foot vs. Invisible Zipper Foot: What You Actually Need
The Regular Zipper Foot
This narrow foot comes with every machine. It has notches on the sides so the needle can stitch right next to the zipper teeth. Use it for centered, exposed, and fly front zippers.
The Invisible Zipper Foot
This foot has two grooves on the underside. These grooves fit over the coils and hold them up while the needle stitches directly next to them. Use it only for invisible zippers.
12. Practice Projects That Build Real Skill
Project 1: Zippered Pouch (Centered Zipper)
A small rectangular makeup pouch is the classic first zipper project. Use a 9-inch zipper and two 9×6 inch fabric rectangles. Total time: under an hour.
Project 2: Throw Pillow Cover (Invisible Zipper)
A 16-inch square pillow with an invisible zipper along one side. Use a 14-inch invisible zipper. Low stakes — if the zipper is slightly visible, fluff the pillow and hide it behind decor.
Project 3: Simple A-Line Skirt (Invisible Zipper)
Your first garment-grade invisible zipper application. Start with a mid-weight cotton like twill, then graduate to fancier fabrics once you’ve nailed the technique twice.
Project 4: Cosmetic Bag with Exposed Zipper
A flat cosmetic bag with an exposed zipper panel on the front face teaches you the rectangular cutting technique with very little waste.
Project 5: Your First Pair of Shorts (Fly Front)
Pick a simple woven shorts pattern. Don’t start with jeans — use a lightweight twill or canvas first. Once you’ve done it in twill, denim becomes much easier.
| Level | Project | Zipper Type | Time |
|---|---|---|---|
| Beginner | Zippered pouch | Centered | 45 min |
| Beginner+ | Pillow cover | Invisible | 60 min |
| Intermediate | A-line skirt | Invisible | 3–4 hours |
| Intermediate | Cosmetic bag | Exposed | 90 min |
| Advanced | Twill shorts | Fly front | 5–6 hours |
| Advanced+ | Denim jeans | Fly front | 8–10 hours |

Quilting Fabric Bundle — 10 Fat Quarters
Coordinated cotton prints perfect for pouches, pillow covers, and bag practice.
See on AmazonFrequently Asked Questions
What is the easiest type of zipper to sew for beginners?
Do I need a special foot to sew an invisible zipper?
Should I stitch the seam before or after the invisible zipper?
Why do my zipper teeth show even after pressing?
What length zipper should I buy for my project?
Can I sew a zipper by hand without a sewing machine?
How do I shorten a zipper that is too long?
What is the difference between a zipper foot and an invisible zipper foot?
Why does my fly front zipper keep puckering?
Can I use a regular polyester zipper for jeans?
What needle should I use when sewing a zipper?
How close should I stitch to the zipper teeth?
Final Thoughts & Your Next Step
Sewing a zipper is one of those skills that feels impossibly complicated right up until the moment it clicks. And once it clicks, it stays clicked. You don’t need a perfect first zipper — you need three imperfect zippers in a row, because by the fourth one your hands will know what to do before your brain catches up.
Start with a pouch. Move to a pillow. Sew a skirt. Then, when you’re ready, tackle a pair of shorts with a fly front. The most important advice in this entire guide: slow down. Sewing is not a race. It’s a craft.
⬆ Back to Top