Why Fabric Stabilizer Is the Foundation of Every Great Embroidery Design
Ask any embroidery professional what separates a polished, professional design from a puckered, distorted disappointment, and the answer is almost always the same: stabilizer. The thread. The hoop tension. The needle choice. All of these matter — but the stabilizer underneath (and sometimes on top of) your fabric is the invisible architecture that holds every stitch in place, prevents the fabric from shifting, and ensures the design looks exactly the way the digitizer intended.
Yet stabilizer is one of the most misunderstood and underestimated supplies in the craft. Walk into any online forum populated by embroiderers struggling with puckering, thread breaks, or design distortion, and you will find that in the vast majority of cases, the stabilizer choice was wrong, the weight was insufficient, or the application method was flawed.
This guide was written to end that confusion completely. Whether you are setting up your very first embroidery machine or you are a seasoned professional looking to optimize your stabilizer system for a new fabric category, the following 20,000+ words of structured, field-tested advice will give you the full picture — from the fundamental science of why fabric moves during embroidery to the specific product recommendations for 2025 that represent the best the market has to offer.
If you are brand new to machine embroidery and haven’t yet selected a machine, our sewing machine buying guide is an excellent starting point. Understanding your machine’s capabilities will help you choose the right stabilizer weight and type. Once you’re comfortable with your machine, learning about thread types like rayon vs. polyester will further refine your embroidery results.
The Physics of Embroidery Distortion
When an embroidery needle penetrates fabric and forms a stitch, it is not just laying thread on a surface — it is anchoring that thread to the fabric weave by pulling loops of bobbin thread up through the material with significant mechanical force. A dense satin stitch column, for example, may penetrate a fabric 1,500 times in just a few square centimeters. Each penetration pushes fabric fibers aside, and the accumulated tension of all those stitches wants to draw the fabric inward.
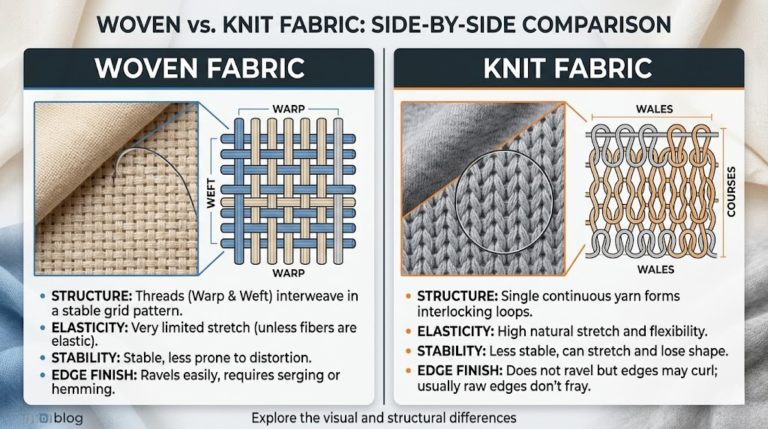
This inward pull — called “stitch pull” or “push-pull distortion” — is the primary enemy of clean embroidery. It causes puckering, tunneling in satin columns, letter gaps in text, and overall design shrinkage. On stable woven fabrics like tightly-woven cotton, the weave structure itself provides some resistance. But on knits, loosely-woven fabrics, silks, or any material with natural stretch or movement, stitch pull rapidly overwhelms the fabric’s own resistance, and distortion becomes severe without external support.
Stabilizer provides that external support. By anchoring the fabric’s underside (and sometimes its surface) to a dimensionally stable substrate, stabilizer transforms the effective stiffness of the entire system — fabric + stabilizer — so that the accumulated tension of thousands of stitches has nowhere to go except into the stitch itself, rather than into distorting the surrounding fabric.
What Happens Without Stabilizer
Embroidering without any stabilizer on most fabrics produces predictably bad results: puckering around dense stitch areas, letter gaps as the fabric shifts between design elements, uneven pull across the hoop that causes one side of the design to register differently from the other, and bobbin thread showing on the fabric surface where tension has been thrown off by fabric movement. For stretchy knit fabrics, the results can be catastrophic — the design simply pulls the fabric into a gathered, distorted mess that looks nothing like the preview.
Even experienced embroiderers occasionally try to skip stabilizer on what seems like a stable, firm fabric, and almost always regret it. The only fabrics that can sometimes support very light, open-stitch designs without stabilizer are extremely heavy, dense canvas or thick leather — and even then, professional embroiderers nearly always use at least a lightweight tearaway for additional insurance.
The Four Jobs of a Stabilizer
A good stabilizer performs four distinct functions simultaneously. Understanding these functions helps you evaluate why a given stabilizer excels for certain applications and fails at others.
1. Dimensional Stability: Prevents the fabric from moving in any direction (including the Z-axis, or depth) during stitching. This is the primary function. A stabilizer fails its first job if the fabric can shift, stretch, or warp during embroidery.
2. Needle Penetration Support: Provides resistance against the needle’s piercing force so that stitches form cleanly and consistently. Without this, stitches on very soft or loosely-woven fabrics form inconsistently, leading to thread breaks and uneven stitch formation.
3. Pushback Against Stitch Tension: Resists the inward pull of accumulated stitch tension to prevent puckering, tunneling, and design shrinkage. This is where stabilizer weight becomes critical — a too-light stabilizer provides stability but insufficient pushback.
4. Surface Smoothing (for topping): When used as a topping, stabilizer bridges the surface of textured or pile fabrics so that stitches sit on top of the surface rather than sinking into it. This is a completely different function, performed by a different product category (topping stabilizers), but equally important for certain fabric types.
Stabilizer choice is not just about the fabric — it is equally about the design. A light, open cross-stitch design on the same cotton fabric requires far less stabilization than a dense satin-fill logo. Always evaluate the design density alongside the fabric type when choosing stabilizer weight.
The Five Major Types of Embroidery Stabilizer Explained
The stabilizer market can be initially overwhelming — there are dozens of brands, sub-categories, weights, and specialty formulations on the market. But every stabilizer product falls into one of five fundamental categories, and understanding these categories is the essential first step in making the right choice for any project. Once you have internalized these five types, the rest of the stabilizer decision-making process becomes straightforward.
1. Cutaway Stabilizer — The Permanent Foundation
Cutaway stabilizer is the most durable and supportive of all stabilizer types. Unlike tearaway, it is not designed to be removed after embroidery — instead, you cut away the excess stabilizer from around the edges of the design with scissors or snips, leaving the portion of the stabilizer directly beneath the stitching permanently attached to the fabric.
This permanent attachment is what makes cutaway the gold standard for stretchy and unstable fabrics. The stabilizer becomes a permanent structural layer that prevents the embroidery from distorting not just during the stitching process, but for the entire life of the garment — through repeated washing, wearing, and stretching.
Cutaway stabilizers are available in a range of weights from ultra-light (appropriate for sheer fabrics and very open stitch patterns) to extra-heavy (used for dense fills on thick, bulky materials). They also come in two primary forms: woven (which has a more fabric-like drape and tear resistance in both directions) and non-woven (which has a more paper-like texture and is less expensive, making it the most common commercial choice).
Some cutaway stabilizers are white, which can show through light-colored or sheer fabrics. For these applications, black cutaway or “charcoal” versions are available. A relatively recent innovation is the “soft cutaway” — a non-woven cutaway that has been treated to feel softer against the skin, making it ideal for baby clothing, T-shirts, and any garment where the stabilizer lies against sensitive skin.
- Maximum dimensional stability — essential for knits and stretchy fabrics
- Permanent support prevents long-term design distortion
- Excellent for dense fills and high-stitch-count designs
- Wide weight range covers nearly all fabric types
- Most widely available and affordable stabilizer type
- Washes reliably without deteriorating
- Backing remains visible on the wrong side of fabric
- Can feel stiff if wrong weight is chosen
- White versions may show through light fabrics
- Requires scissors to trim — adds finishing time
- Not suitable for freestanding lace or designs needing full removal
Best used for: T-shirts, polo shirts, sweatshirts, hoodies, athletic wear, baby clothing, fleece garments, any knit or stretchy fabric, and any project where long-term dimensional stability is a priority.
2. Tearaway Stabilizer — The Versatile Workhorse
Tearaway stabilizer is exactly what the name implies — after embroidery is complete, you tear it away from the fabric. A clean score around the perimeter of the design with your fingernail or a pointed tool, followed by a firm, controlled tear in each direction, removes most of the stabilizer. Small residual fragments caught beneath dense stitching can be left in place or carefully teased out with tweezers.
The key limitation of tearaway is that it does not work for stretchy fabrics. When you tear a tearaway stabilizer, you apply force to the fabric — force that can distort knits, pull at loosely-woven materials, and damage delicate silks. And even if the tearing process goes smoothly, the design is left without any permanent backing, which means the first time the T-shirt gets stretched over someone’s head, the unstabilized stitches can distort.
For stable woven fabrics — cotton broadcloth, denim, canvas, felt, and similar materials — tearaway is a perfectly appropriate choice that results in a clean finish on the wrong side of the garment without the permanence or visual presence of cutaway backing.
Tearaway comes in light, medium, and heavy weights, and also in a “crisp” or “firm” formulation that is preferred for dense machine embroidery on particularly challenging wovens, and in a “soft” formulation that tears more easily and cleanly for lighter designs. Some professional embroiderers prefer a mid-weight tearaway for most cotton projects — it provides enough stability without leaving a thick, stiff residue if small fragments remain.
- Clean finish — minimal visible backing on wrong side
- Easy and fast to remove after embroidery
- Excellent for woven fabrics where permanent backing isn’t needed
- Very cost-effective — among the least expensive stabilizer types
- Available in wide weight and crisp/soft spectrum
- Not suitable for knits or stretchy fabrics
- Tearing can distort delicate fabrics
- No permanent support after removal
- Residue fragments under dense stitching can be difficult to remove
- Heavy designs may need multiple layers
Best used for: Cotton shirts, denim jackets, tote bags, canvas, felt, linen, and other stable, non-stretchy woven fabrics. Also excellent for embroidery on items that are rigid and unlikely to stretch in use.
3. Water-Soluble Stabilizer — For the Cleanest Possible Finish
Water-soluble stabilizer — often abbreviated WSS — is made from a film of polyvinyl alcohol (PVA) that dissolves completely in water. It has two completely different but equally important applications in embroidery.
As a backing: WSS is used underneath very delicate fabrics — fine linen, silk, organza, and similar materials — where even the lightest tearaway would cause distortion when removed. After embroidery, the item is rinsed in cool water and the stabilizer dissolves completely, leaving no residue whatsoever on the wrong side of the fabric. This produces the cleanest possible finish — invaluable for heirloom embroidery, lingerie, and garments where the wrong side will be visible.
As a backing for freestanding lace (FSL): When embroidering freestanding lace designs, the WSS is the only substrate — there is no fabric. The lace design is stitched entirely onto the WSS, which is then dissolved, leaving only the interlocked thread structure of the lace itself. This is one of the most technically demanding applications in embroidery, and selecting the right weight of WSS (heavier films provide more stability during stitching) is essential for clean lace results.
Water-soluble stabilizer also comes in a “cold water” and “hot water” formulation — the former is more suitable for temperature-sensitive fabrics and embroideries. Some brands also produce a heavy-duty WSS film specifically for FSL and 3D embroidery that is significantly thicker and more stable than the standard film used for fabric backing.
For freestanding lace, use two or three layers of heavy-duty water-soluble stabilizer sandwiched together to prevent the needle from pulling the film off-grain during stitching. Mark a color-coded dot on the top layer before hooping so you can orient the design correctly after removing from the hoop.
4. Heat-Away Stabilizer — When Water Isn’t an Option
Heat-away stabilizer behaves much like water-soluble — it disappears completely after use — but instead of dissolving in water, it is removed with the heat of a dry iron or heat gun. Exposure to heat causes the stabilizer to char into a fine, brittle powder or ash, which can be brushed away from the fabric surface after cooling.
The use case for heat-away is narrow but extremely specific: fabrics that cannot be wetted and where no permanent backing should remain. This includes velvet, some specialty silks, beaded and sequined garments, some art fabrics, and 3D embroidery designs on items that cannot be immersed in water. It is also sometimes used for freestanding lace when the embroiderer does not want to deal with water.
Heat-away must be used with a dry iron only — steam causes the stabilizer to begin dissolving before heat treatment. The iron temperature should also be carefully controlled; overheating can scorch delicate fabrics. Always practice on a sample before applying heat to the finished project.
Heat-away stabilizer produces a fine ash or powder when heated. Always work in a well-ventilated area, avoid inhaling any dust, and never use steam with a heat-away stabilizer. Test iron temperature on a separate piece before applying to your finished embroidery.
5. Topping Stabilizer — The Surface Layer for Pile Fabrics
Topping stabilizer occupies a completely different position in the embroidery system than all other stabilizer types — it goes on top of the fabric, not underneath it, and its purpose is entirely different. While backing stabilizers prevent the fabric from moving during stitching, topping stabilizer prevents the fabric’s surface texture from interfering with the stitch formation.
This matters enormously with pile fabrics: fleece, terry cloth (towels), velvet, velour, plush fabrics, and high-pile sportswear. When a needle pierces a pile fabric and forms a stitch, the stitch naturally wants to sink down into the pile rather than standing proud on the surface. The result, without topping, is embroidery that looks sunken, flat, and poorly defined — particularly text and fine-detail designs become nearly illegible because the letters are buried in the pile.
A layer of water-soluble topping (such as Sulky Solvy, OESD AquaMesh, or Floriani Water-Soluble Topper) laid on top of the fabric bridges the pile surface with a smooth, stable film. The needle pierces through both the topping and the fabric, and the stitches are held in position on the topping surface during embroidery. After stitching, the topping is torn away in large sections (the water-soluble film tears reasonably easily by hand), and the remaining fragments are dissolved by rinsing in water.
Non-soluble tear-away toppers (such as certain tissue-weight tearaway products) are also used, particularly on fabrics that cannot be wetted. These are torn away as cleanly as possible after embroidery, with any residual fragments carefully removed with tweezers.
The weight of topping to use depends on the pile height of the fabric. Tall, dense pile (like a thick towel or shag fleece) needs a heavier topping film to fully bridge the surface. Low-pile fabrics like jersey fleece can use standard-weight topping. Using topping that is too thin for a high-pile fabric results in it being pushed into the pile by needle penetration, which defeats the purpose.

Sulky Solvy — Most Popular Water-Soluble Topping
The industry standard for water-soluble topping on pile fabrics. Tears cleanly, dissolves without residue, and holds stitches perfectly above any pile surface.
Check Price on AmazonStabilizer Weight Guide: Matching Ounces to Your Design
Stabilizer type tells you the category of product to use. Stabilizer weight tells you how much of it to use. Weight is measured in ounces per square yard (oz/yd²), and the range available on the market spans from roughly 0.5 oz (ultra-light, tissue-thin tearaway) to 3.5 oz and above (heavy-duty cutaway for dense commercial work).
The weight decision is governed by two factors working together: the fabric weight and the design density. A lightweight fabric with a dense design may need more stabilizer than a heavier fabric with an open, low-stitch-count design. Think of it as a system rather than a single-variable decision.
| Weight | oz/yd² | Best Fabric Types | Best Design Types | Common Products |
|---|---|---|---|---|
| Ultra-Light | 0.5–0.8 | Organza, chiffon, silk, fine linen, voile | Light fill, outlines, small text, heirloom | Sulky Soft ‘n Sheer, OESD Ultra Clean & Tear Light |
| Light | 1.0–1.5 | Quilting cotton, thin wovens, lightweight knits | Moderate fill, small logos, names, monograms | Pellon Tear-Away Light, Madeira Avalon Tearaway |
| Medium | 2.0–2.5 | T-shirts, polos, sweatshirts, denim, mid-knits | Dense fills, logos, lettering, most standard designs | Pellon Stick-N-Wash, OESD StabilStick, Sulky Cut-Away Plus |
| Heavy | 3.0–3.5 | Canvas, heavy fleece, terry cloth, caps, bags | Very dense fills, large designs, commercial embroidery | OESD Firm Hold Cutaway, Floriani FUSE-N-TEAR Heavy |
| Extra Heavy | 4.0+ | Heavy canvas, leather, very thick fleece | Maximum stitch count, commercial applications | OESD Heavy Weight Cutaway, commercial backing sheets |
Professional embroiderers use a simple mental matrix: identify your fabric weight (light/medium/heavy) and your design density (low/medium/high), then match these to the corresponding stabilizer weight using the table above. When fabric weight and design density are both “high,” it is often better to use a medium-weight stabilizer with an extra layer rather than a single extra-heavy layer — two layers of medium-weight tend to produce cleaner stitch formation than a single overweight layer.
The Definitive Fabric-to-Stabilizer Matching Guide
One of the most practical questions embroiderers ask is: “What stabilizer should I use for this specific fabric?” The following comprehensive breakdown addresses every major fabric category, from the most stable wovens to the most challenging knits and specialty materials. Note that within each category, there is usually a “primary recommendation” and one or two “alternatives” for when specific factors change the calculus.
Before we dive in, it is worth noting that machine selection matters alongside stabilizer choice. If you are using a machine that struggles with thick layers, a lighter-weight stabilizer approach might be necessary even if a heavier weight is theoretically optimal for the design. Our resource on best sewing machines for intermediate sewers includes embroidery-capable machines that handle stabilizer layers without issue.
| Fabric Type | Stabilizer Type | Weight | Topping? | Notes |
|---|---|---|---|---|
| Cotton (quilting) | Tearaway or light cutaway | 1.5–2.0 oz | No | Very stable; tearaway sufficient for most designs |
| Denim (light–mid) | Tearaway medium | 2.0–2.5 oz | No | Firm tearaway recommended for dense thread counts |
| Denim (heavy) | Cutaway medium | 2.5–3.0 oz | No | Especially for thick jacket back designs |
| T-shirt / Jersey Knit | Cutaway (non-woven or soft) | 2.0–2.5 oz | No | Never use tearaway alone on knits |
| Athletic / Stretch Knit | Cutaway soft | 2.0 oz | No | Soft cutaway critical — against skin all day |
| Fleece (low pile) | Cutaway medium | 2.0–2.5 oz | Yes (light WSS) | Topping prevents stitch sinking into pile |
| Fleece (high pile) | Cutaway heavy | 3.0 oz | Yes (heavy WSS) | May need a sticky-back stabilizer to hold fleece |
| Terry Cloth / Towels | Cutaway heavy | 2.5–3.5 oz | Yes (essential) | Topping is non-negotiable for terry; use 2 layers of WSS |
| Velvet / Velour | Cutaway medium | 2.0 oz | Yes (WSS or tissue tearaway) | Careful needle — avoid crushing pile outside design |
| Canvas / Duck Cloth | Tearaway heavy or cutaway | 2.5–3.0 oz | No | Very stable; heavy tearaway usually sufficient |
| Silk | Water-soluble or ultra-light cutaway | 0.5–1.0 oz | Optional (tissue topping) | WSS for heirloom; ultra-light cutaway for wearable silk |
| Organza / Chiffon | Water-soluble | Light WSS film | No | Even lightest tearaway can distort these fabrics |
| Linen (medium) | Tearaway or cutaway light | 1.5–2.0 oz | No | Linen is stable; tearaway fine for most designs |
| Nylon / Polyester Woven | Tearaway or light cutaway | 1.5–2.0 oz | No | Avoid heavy tearaway that tears unevenly on slippery nylon |
| Hats / Caps | Cutaway heavy (or cap-specific) | 2.5–3.5 oz | No | Use cap hoop; sticky stabilizer helps with alignment |
| Leather / Faux Leather | Tearaway (removed fully) or no stabilizer | 2.0 oz | No | Use temporary spray to hold; do not hoop leather directly |
| Baby Items / Onesies | Soft cutaway | 2.0 oz | No | Soft cutaway essential — next to baby’s skin |
| Felt | Tearaway light | 1.0–1.5 oz | No | Felt is naturally stable; very light tearaway often sufficient |
| Sweatshirts / Hoodies | Cutaway medium–heavy | 2.0–2.5 oz | No | Fleece-backed sweatshirts may need topping |
Always prewash your fabric before embroidering — fabric shrinkage after embroidery can pull and distort the design. Our detailed prewash vs. no-prewash guide explains exactly which fabrics need prewashing and by how much they shrink. Getting this right before you even choose a stabilizer sets the entire project up for success.
Best Cutaway Stabilizers for Machine Embroidery (2025 Reviews)
Cutaway stabilizers are the backbone of professional machine embroidery. The following products represent the best available in 2025, selected based on dimensional stability, consistency across production batches, availability in multiple weights, and performance on the widest range of knit and woven fabrics. For a point of reference on embroidery thread compatibility with these stabilizers, see our rayon vs. polyester embroidery thread comparison.
1. OESD StabilStick Cut-Away Best Overall
OESD (Oklahoma Embroidery Supply and Design) has built one of the most trusted stabilizer lines in North America, and the StabilStick Cut-Away stands as the flagship product of their lineup. Available in 1.5 oz, 2.0 oz, and 3.0 oz weights, it covers the full range of embroidery applications from light woven fabrics through heavy fleece.
What distinguishes the StabilStick line from comparable products is the consistency of its fiber bonding. Cheaper non-woven cutaway products occasionally have areas of weaker fiber bonding that can cause the stabilizer to pull apart during tearing of the excess, which — even when trimming rather than tearing — can result in the stabilizer delaminating and releasing from the stitching. OESD’s manufacturing process produces extremely consistent fiber bonding throughout the sheet.
The 2.0 oz weight is the one most embroiderers reach for daily. It handles T-shirts, polos, moderate-weight knits, and standard-weight wovens without imposing unnecessary stiffness. The finish is slightly softer than some competitors, making it more comfortable against skin.

OESD StabilStick Cut-Away — 2.0 oz
The professional’s daily driver. Available in multiple weights. Consistent fiber bonding, excellent stability on knits, comfortable against skin.
Check Price on Amazon2. Sulky Cut-Away Plus
Sulky has been one of the most recognized names in embroidery supplies for decades, and their Cut-Away Plus stabilizer is a long-standing favorite in the home embroidery community. The “Plus” formulation is slightly softer than standard non-woven cutaway, making it more comfortable for garments worn directly against the skin — an important consideration for baby clothing, athletic wear, and T-shirts.
The Sulky Cut-Away Plus comes in white and black, which is particularly helpful for embroiderers working with very light or very dark fabrics. The black version prevents backing from showing through pale or transparent areas of light-colored fabrics — a detail that the budget alternatives rarely address.
It is available in 2.0 oz and 3.0 oz weights, both in roll and pre-cut sheet formats. The roll format is more economical for high-volume embroiderers; the pre-cut sheets are convenient for home embroiderers who work on individual projects.
- Softer than most non-woven cutaway — skin-friendly
- Available in white and black versions
- Trusted, consistent quality from a major brand
- Roll and sheet formats available
- Slightly more expensive than budget options
- Only two weight options
- White version can show through very light fabrics

Sulky Cut-Away Plus — 2.0 oz White or Black
A home-embroidery classic. Softer formulation for skin comfort, available in black for dark fabrics, consistent quality batch after batch.
Check Price on Amazon3. Pellon Stick-N-Wash Best Budget
For embroiderers who want solid cutaway performance at the lowest possible price point, Pellon’s Stick-N-Wash is the go-to recommendation. Pellon is better known for its interfacing products, but the stabilizer line is genuinely good — particularly impressive given the price differential from specialty embroidery brands.
The Stick-N-Wash earns its name from the self-adhesive (sticky) version, which includes a peel-back paper cover over a pressure-sensitive adhesive coating. This makes it especially useful for hard-to-hoop items — the stabilizer is hooped alone, the paper is scored and peeled back, and the item is pressed onto the sticky surface. For embroiderers who frequently work with items that cannot be conventionally hooped (pocket areas, cuffs, baby bibs), the sticky format is a genuine timesaver.
Performance-wise, the Pellon Stick-N-Wash holds up well on T-shirts and polos, though it is slightly stiffer than the Sulky or OESD equivalents. For garments where stiffness isn’t a primary concern — bags, structured items, rigid garment areas — this distinction is irrelevant and the price advantage makes it the obvious choice.

Pellon Stick-N-Wash — Self-Adhesive Cutaway
Budget-friendly without sacrificing performance. Self-adhesive version makes hooping difficult items effortless. Ideal for high-volume home embroiderers.
Check Price on Amazon4. Floriani Total Stable Best for T-Shirts
Floriani has built a passionate following among machine embroiderers, and the Total Stable cutaway is their most versatile product. Available in a standard non-woven formulation and a “stretch” version that moves with highly elastic fabrics without distorting the design boundary, Total Stable addresses one of the most common failure modes in T-shirt embroidery.
The “stretch” version deserves particular mention: it uses a woven construction with a slight built-in stretch, unlike most cutaway products which are non-woven and have zero stretch. This means it can absorb some of the stretch of athletic knits without fighting the fabric, resulting in better long-term design stability on performance wear and stretch garments.
The standard (non-stretch) Total Stable is also excellent, with a softness level that rivals the Sulky Cut-Away Plus at a competitive price point. Floriani products are slightly less available in generic retail than Sulky or Pellon, but they are stocked at most dedicated embroidery supply shops and readily available online.

Floriani Total Stable — Standard & Stretch Versions
The stretch version is a game-changer for athletic and performance knits. Soft, consistent, and available in both regular and stretch formulations.
Check Price on Amazon5. Madeira Heavy Duty Cutaway
Madeira is best known for their premium embroidery threads, but their stabilizer line is equally worth knowing. The Heavy Duty Cutaway is specifically formulated for commercial embroidery applications — dense fills, high-stitch-count designs, and heavy fabrics including canvas, thick fleece, and structured caps and hats.
At 3.0 oz, it provides the structural rigidity that dense commercial embroidery demands, and the fiber bonding quality matches Madeira’s thread quality standards — excellent consistency with no weak spots. For home embroiderers working on bags, structured items, or particularly dense designs, the Madeira Heavy Duty is a step up that visibly improves results on these demanding projects.
Best Tearaway Stabilizers for Woven Fabrics
Tearaway stabilizer selection is somewhat simpler than cutaway because the performance differences between brands are less dramatic — the key variables are weight, crispness versus softness of the tear, and consistency of tear direction. Here are the standout products for 2025.

OESD Ultra Clean & Tear
Available in light, medium, and heavy. Exceptionally clean tear in all directions, minimal residue under dense stitching. The go-to choice for professional embroiderers using tearaway daily.
Check on Amazon
Sulky Tear-Easy
Tear-Easy is specially designed for one of the softest, cleanest tears available in stabilizer products. It is especially valuable for beginners who find conventional tearaway difficult to remove cleanly from dense designs.
Check on Amazon
Floriani FUSE-N-TEAR
A unique iron-on tearaway that bonds temporarily to the wrong side of fabric with heat, eliminating the need for spray adhesive or hoop distortion. Particularly useful for cotton shirt pockets and small hoop areas.
Check on Amazon
Madeira Avalon Tearaway
Madeira Avalon Tearaway uses a fine tissue paper construction that tears very cleanly and leaves almost no residue under dense stitching — particularly impressive on the heavy-weight version for canvas and denim.
Check on AmazonCrisp vs. Soft Tearaway: Which Do You Need?
Tearaway stabilizers fall into two distinct texture categories that feel noticeably different when you handle them. Crisp (or firm) tearaway has a more paper-like texture and provides somewhat more rigidity during stitching — this can be an advantage for very dense fills where the stabilizer needs to stay completely flat in the hoop. However, crisp tearaway can be slightly harder to remove from around dense stitching without disturbing the design.
Soft tearaway has a more cloth-like texture and tears more easily in all directions. It is generally preferred for smaller designs, text, and any application where the design is not extremely dense. For beginners, soft tearaway is typically the better starting point because it is more forgiving to remove and causes fewer problems if removal technique is imperfect.
To remove tearaway cleanly from around dense embroidery, use a seam ripper or pointed stylus to score the stabilizer right at the design edge before tearing. The score line creates a controlled tear path that prevents you from accidentally pulling at the stitching. Hold the embroidered section of the design firmly while tearing — never use the design itself as a handle for the tearing force.

OESD Ultra Clean & Tear — Multi-Weight Pack
Stock your stabilizer drawer with the full range: light, medium, and heavy tearaway for every woven fabric situation. Professional-grade quality at home embroidery pricing.
Check Price on AmazonBest Water-Soluble Stabilizers for Delicate Fabrics & Freestanding Lace
Water-soluble stabilizer products are divided into two distinct subcategories based on construction: film-type (a thin, plastic-like sheet of PVA) and mesh-type (a loosely-woven water-soluble fabric). Film-type is most common and provides superior surface smoothness. Mesh-type is stronger during stitching and preferred for dense, complex freestanding lace designs that need maximum stability during embroidery.
| Product | Type | Weight | Best For | Rating |
|---|---|---|---|---|
| Sulky Solvy | Film | Light | Backing delicate fabrics, light topping | ★★★★½ |
| Sulky Super Solvy | Film | Medium–Heavy | FSL, 3D embroidery, heavier topping | ★★★★★ |
| OESD AquaMesh Plus | Mesh | Medium | Complex FSL, multi-color lace, heavy designs | ★★★★★ |
| Vilene Soluvlies | Mesh | Medium | European-standard FSL, mixed media embroidery | ★★★★ |
| Floriani Water-Soluble Topper | Film | Light–Medium | Topping on pile fabrics, terry, fleece | ★★★★½ |
| Badgemaster Aqua Film | Film | Light | Badge-making, backing sheer fabrics | ★★★★ |
Sulky Super Solvy — The FSL Standard
For freestanding lace embroidery, Sulky Super Solvy is the product more embroiderers reach for than any other. The heavier film weight (compared to standard Solvy) stays rigid during needle penetration on complex, dense lace designs without the film shifting off-grain. For most FSL work, two to three layers of Super Solvy sandwiched together provide the ideal stability-to-thickness balance.
When the embroidery is complete, soaking the finished piece in cool water for approximately five minutes begins the dissolution process. A second rinse in fresh water and gentle agitation completes it. The resulting freestanding lace is fully self-supporting once dry, with no stabilizer residue.

Sulky Super Solvy — Heavy-Weight Water Soluble Film
The gold standard for freestanding lace. Heavy film stays stable through complex FSL designs and dissolves cleanly without residue in cool water.
Check Price on AmazonOESD AquaMesh Plus — Best Mesh-Type WSS
Where film-type water-soluble stabilizers can sometimes pull off-grain on very dense designs (the needle friction on a complex FSL pattern can accumulate enough force to shift a thin film), the woven mesh construction of AquaMesh Plus provides inherent resistance to distortion. It is the preferred choice for professional FSL production where consistent registration across very dense designs is required.
AquaMesh Plus is also superior as a topping on extremely high-pile fabrics. Its woven structure distributes the needle’s piercing force more evenly across the topping surface, preventing the concentrated needle pressure from pushing the topping into the pile on the first few stitches — a common failure with thin film toppers on very tall pile fabrics.
Best Topping Stabilizers for Pile Fabrics — Towels, Fleece, Velvet & More
The topping stabilizer category is smaller than the backing stabilizer market but just as critically important for embroiderers who work regularly on terry cloth, fleece, velvet, and high-pile sport fabrics. Using the right topping transforms embroidery on these challenging surfaces from barely legible to crisp, professional, and beautifully defined.
The most common mistake embroiderers make with topping is using too thin a layer on high-pile fabrics. A single layer of light-weight Solvy on a dense towel pile will be pushed into the pile by the needle on the first pass, providing almost no bridging benefit. Two layers of heavy-weight film, or a single layer of mesh-type topper, are the appropriate approach for high-pile terry cloth.
Sulky Solvy (as Topping)
When used as a topping on low-pile fleece and light terry, Solvy provides excellent stitch definition and tears away cleanly after embroidery, with remaining fragments dissolving in water.
Check on Amazon
OESD AquaMesh Plus (as Topping)
The mesh construction bridges even the tallest terry pile without sinking. Essential for high-stitch-count designs on thick towels where film toppers would fail.
Check on Amazon
Floriani Water-Soluble Topper
Excellent mid-range topping option for fleece and medium-pile fabrics. Good balance of bridging ability and dissolution speed. Often available in larger roll quantities at competitive pricing.
Check on AmazonTissue Tearaway Topping — The Non-Water Option
Some fabrics cannot be wetted after embroidery — velvet, some specialty silks, structured bags with water-sensitive interfacing, and certain heirloom pieces. For these, a tissue-weight non-woven tearaway (the lightest available tearaway weight) can be used as a topping and simply torn away after embroidery. The results are not quite as clean as water-soluble topping, but they are significantly better than no topping at all on pile fabrics.
When using tearaway as a topping on velvet, score the topping very carefully at the design edge after embroidery. Velvet is easily crushed by the stress of tearing too vigorously, so use blunt-tipped scissors for the final removal of any remaining fragments rather than attempting to tear everything away manually.
Specialty Stabilizers: Sticky, Self-Adhesive, Fusible & More
Beyond the five fundamental categories, the stabilizer market includes several specialty products that solve specific problems encountered in professional and advanced home embroidery. These products are not replacements for the fundamental types — they are additive solutions for situations where conventional stabilizer application methods are inadequate.
Self-Adhesive / Sticky Stabilizers
Self-adhesive stabilizers (also called “sticky-back” or “sticky” stabilizers) have a pressure-sensitive adhesive coating protected by a paper backing. The stabilizer is hooped alone, the paper is scored and peeled back, and the fabric or item is pressed onto the exposed adhesive surface. This approach is essential for several specific applications.
Items that cannot be conventionally hooped are the primary use case: garment pockets (where the pocket alone, not the entire garment front, needs to be embroidered), finished-edge items like towels and pre-hemmed shirts, caps and hats in a cap hoop, and very small items that would require unusually small hoops. Self-adhesive stabilizer eliminates the risk of hoop marks on these items while maintaining perfect alignment between the item and the stabilizer.
Sticky stabilizers are available in both cutaway and tearaway versions, and in multiple weights. The adhesive strength varies by brand — some are aggressively sticky (useful for very light, slippery fabrics) while others have a more gentle hold (better for delicate fabrics where aggressive adhesive could mark the surface).
When using sticky stabilizer for embroidering along the edge of a towel or finished piece, lay the item down flat and use a brayer (a small rolling tool) to press out any air bubbles between the item and the adhesive surface. Even small air pockets can allow micro-movement during dense embroidery, especially near the edges of the design.
Fusible Cutaway
Fusible cutaway stabilizer has a heat-activated adhesive on one side that bonds to the fabric when ironed. Unlike self-adhesive sticky stabilizer, fusible bonds create a more permanent attachment to the fabric before embroidery begins — the stabilizer is essentially fused to the wrong side of the fabric and then the combined piece is hooped. This is particularly useful for lightweight, slippery fabrics that are difficult to hoop correctly without distortion.
Fusible cutaway is also used in appliqué embroidery as a combined fusible-plus-stabilizer product, replacing both the separate fusible webbing and the backing stabilizer in a single product. This approach is popular in commercial production where efficiency matters.
Foam Stabilizer / Puff Embroidery Backing
Foam stabilizer is a specialty product specifically for 3D or “puff” embroidery — the distinctive raised, dimensional effect seen on many cap logos and certain sportswear designs. A thin layer of foam is placed on top of the fabric and beneath the final satin stitch layer of the design; the needle perforates the foam with each stitch, and the satin stitches bridge across the foam surface, creating a domed, three-dimensional appearance.
Foam stabilizer is used as a topping, not a backing, and is combined with a conventional cutaway backing for the fabric itself. Available in multiple thicknesses (ranging from 1mm to 6mm or more), the thickness of the foam directly controls the height of the puff effect. The foam itself burns away cleanly around the design edges under light heat, producing a crisp edge to the puff embroidery.
Temporary Spray Adhesive — The Positioning Aid
Technically not a stabilizer, temporary spray adhesive is an essential complementary product for many embroidery applications. Products like Sulky KK 2000 or Odif 505 are sprayed onto the back of a fabric piece or onto a conventional stabilizer to provide temporary positioning hold that keeps the fabric from shifting within the hoop without permanent adhesion.
Spray adhesive is used when hooping conventionally would damage the fabric (velvet, sequined fabrics, pile surfaces), when multiple layers of stabilizer need to be held together for FSL work, and when pre-cut fabric appliqués need to be positioned precisely before stitching down. The adhesive evaporates or washes out completely, leaving no residue on either the fabric or the stabilizer.

Sulky KK 2000 Temporary Spray Adhesive
The most widely-used temporary adhesive in machine embroidery. No residue, repositionable, fabric-safe. Essential for any embroiderer working with items that cannot be conventionally hooped.
Check Price on AmazonHow to Hoop & Use Stabilizer: Step-by-Step
Having the right stabilizer is only half of the equation — applying it correctly makes the difference between a design that registers perfectly and one that shifts mid-embroidery. The hooping and application process is one of the most consequential skills in machine embroidery. If you are still learning the basics of your machine, our guide on how to use a sewing machine provides foundational knowledge that applies equally to embroidery machines.
1 Choose Your Stabilizer Type and Weight
Based on the fabric type and design density described in Sections 3 and 4, select the stabilizer type (cutaway, tearaway, WSS, heat-away, or topping combination) and the correct weight. Cut a piece of stabilizer that is at least one inch larger on all sides than your embroidery hoop. This extra margin allows the hoop to grip the stabilizer securely without the hoop edge being too close to the design area.
2 Place Stabilizer in the Outer Hoop Ring
Loosen the hoop screw until the inner and outer rings separate easily. Lay the outer ring flat on your work surface. Place the stabilizer sheet over the outer ring, centered. Then press the inner ring down through the stabilizer into the outer ring — the stabilizer should now be gripped between the two rings with uniform tension. Tighten the screw moderately, but do not overtighten before adding the fabric.
3 Place and Align the Fabric
Place your fabric on top of the stabilizer already in the hoop, centering the intended embroidery area over the center of the hoop. If using spray adhesive, lightly mist the stabilizer surface before placing the fabric. Press the fabric flat with your palm, smoothing out any wrinkles from the center outward. The fabric grain should be parallel to the hoop edges — misaligned grain is a common cause of design distortion that no stabilizer can fix.
4 Tighten the Hoop — Drum Tight
Once the fabric is positioned, tighten the hoop screw fully. The combination of fabric and stabilizer in the hoop should feel “drum tight” — when you tap it with a finger, it should have minimal give, like the head of a drum. Loose hooping is one of the most common causes of design registration problems and stitching inconsistency. Use the hoop tightening tool if your hoop came with one. Never over-hoop delicate fabrics to the point of distorting the weave — but on standard knits and wovens, firm tension is essential.
5 Apply Topping (If Required)
For pile fabrics, cut a piece of water-soluble topping slightly larger than the design area and lay it on top of the fabric within the hoop. Use a very small piece of tape at each corner of the topping — just outside the design area — to keep it from shifting before the first stitches anchor it in place. Many embroiderers also use a small piece of water-soluble tape to tack the topping down on two sides. The first stitches of the design will lock the topping in position.
6 Remove Stabilizer After Embroidery
After the design is complete, remove the hoop from the machine and carefully slide the fabric off without distorting the design. For tearaway, score around the design perimeter and tear firmly but controlled. For cutaway, use embroidery scissors to trim within approximately 3mm of the design edge on all sides. For water-soluble, tear away as much as possible by hand, then rinse in cool water until fully dissolved. Always allow the finished embroidery to air dry flat.
Even perfect stabilization can’t compensate for wrong thread choices. If your machine is set up with embroidery thread being used in the bobbin incorrectly, or if you’re unsure about whether to use rayon or polyester embroidery thread, the combination of poor thread choice and good stabilizer still won’t produce optimal results. The system works best when thread, stabilizer, needle, and design density are all matched correctly.
Stabilizer Troubleshooting Guide — When Things Go Wrong
Even with the right stabilizer and correct application technique, embroidery problems occasionally appear. The following troubleshooting guide addresses the most common stabilizer-related issues and their specific causes and fixes. For machine-specific issues that may compound stabilizer problems, the sewing machine troubleshooting guide and thread jamming causes cover additional variables.
| Problem | Most Likely Stabilizer Cause | Fix |
|---|---|---|
| Puckering around design | Stabilizer weight too light for design density; loose hooping | Increase stabilizer weight; re-hoop drum-tight; add a second layer |
| Stitches sinking into fabric surface | No topping on pile fabric; topping too thin for pile height | Add water-soluble topping; use heavier or double-layered topping |
| Design stretches or distorts on knit | Tearaway used instead of cutaway on knit fabric | Replace tearaway with medium-weight cutaway; re-embroider |
| Stabilizer residue visible on right side | Tearaway or WSS not fully removed; fragments remain | Moisten remaining fragments of tearaway; rinse WSS thoroughly |
| Needle breaking frequently | Too many layers of stabilizer; wrong needle for stabilizer type | Reduce to one layer; use a heavier needle (size 80/12 or 90/14) |
| Thread breaking at design start | Stabilizer too light — fabric shifting causes thread tension spikes | Increase stabilizer weight; check hooping tension |
| Fabric hoop marks after removal | Over-tightened hoop on delicate fabric; no stabilizer buffer | Use sticky stabilizer — hoop stabilizer only; fabric adhered without hoop pressure |
| Design misregisters (elements don’t align) | Fabric shifting mid-design due to insufficient hooping or wrong stabilizer | Re-hoop with appropriate stabilizer; ensure drum-tight tension |
| Bobbin thread showing on top | Fabric/stabilizer combination too thick for needle penetration; tension off | Reduce stabilizer layers; adjust upper tension; check thread nesting guide |
| Stiff, cardboard-like feel after embroidery | Stabilizer weight too heavy for fabric and design; too many layers | Reduce to a lighter weight; use soft cutaway formula |
| WSS not fully dissolving | Water too cold; not rinsed thoroughly; product piled too thick under stitching | Use lukewarm water; two full rinses; agitate gently while rinsing |
| Puff embroidery collapsing | Foam stabilizer too thin for design; outer satin stitches not covering foam edge | Use thicker foam; ensure satin columns fully bridge foam on all sides |
Sometimes what looks like a stabilizer problem is actually a combination issue. Thread tension, needle type, digitizing quality, and machine calibration all interact with stabilizer performance. If you have tried multiple stabilizer adjustments and problems persist, review your machine’s thread path using our threading guide, and check whether your needle is the right type for your fabric — our needle types guide explains the differences that matter for embroidery.
Master Comparison Table: All Stabilizer Types at a Glance
The following master table consolidates everything covered in this guide into a single, at-a-glance reference. Return to this table whenever you are starting a new project and need to quickly identify the right stabilizer type, weight, and removal method for your fabric and design combination.
| Type | Placement | Removal | Permanent? | Best Fabrics | Best Designs | Common Weights | Price Point |
|---|---|---|---|---|---|---|---|
| Cutaway | Under fabric | Trim with scissors | ✓ YES | Knits, T-shirts, stretch, fleece | Any density; dense fills recommended | 1.5–3.5 oz | Low–Medium |
| Tearaway | Under fabric | Tear away by hand | ✗ NO | Woven cotton, denim, linen, canvas | Light to medium density | 0.8–2.5 oz | Lowest |
| Water-Soluble | Under fabric or as topping | Dissolves in water | ✗ NO | Silk, organza, chiffon; also topping for pile | Freestanding lace; heirloom; pile fabrics (topping) | Light–Heavy film | Medium |
| Heat-Away | Under fabric or freestanding | Dry iron / heat gun | ✗ NO | Items that can’t be wetted: velvet, specialty silks, bags | Freestanding lace; delicate specialty work | Single weight | High |
| Topping (WSS) | ON TOP of fabric | Tear + dissolve in water | ✗ NO | Fleece, terry, velvet, velour, plush | Any design on pile surfaces | Light–Heavy film/mesh | Medium |
| Sticky/Self-Adhesive | Under fabric (hooped alone) | Trim or tear (depends on base) | Depends on base type | Hard-to-hoop items, pockets, cuffs, caps | Any design on items that can’t be conventionally hooped | Various | Medium |
| Foam (Puff) | ON TOP of fabric (final satin layer over it) | Trim/burn away edges with heat | ✓ YES | Caps, structured bags, any stable fabric | Specifically puff/3D embroidery satin designs | 1mm–6mm | Medium |
The Three Rules Every Embroiderer Should Memorize
Rule 1: Knit fabric = cutaway. No exceptions. Tearaway alone on any knit will result in a distorted design after the first stretch or wash.
Rule 2: Pile fabric = topping. If you are embroidering on fleece, terry, velvet, or any fabric with surface texture that could cause stitches to sink, a topping layer is non-negotiable for professional results.
Rule 3: When in doubt, go heavier. A slightly over-stabilized design may feel stiffer than ideal, but it will not pucker. A slightly under-stabilized design will almost always pucker. The consequences of going too light are always worse than going too heavy.
It is also worth noting that stabilizer selection interacts with your choice of cotton threads vs. polyester threads — cotton threads tend to be slightly less tensioned than polyester, which can affect how much stabilizer-driven resistance you need. For most polyester thread embroidery, the standard weight recommendations in this guide apply directly.

Build Your Stabilizer Starter Kit
New to embroidery? Start with a variety pack that includes cutaway (2.0 oz), tearaway (medium), and water-soluble film — these three products will cover 90% of your projects for the first year.
Shop Stabilizer Variety Packs on AmazonFrequently Asked Questions About Fabric Stabilizer for Embroidery
For stretchy and knit fabrics, a cutaway stabilizer is almost always the best choice. Products like Pellon Stick-N-Wash, OESD StabilStick Cutaway, or Floriani Total Stable Stretch provide permanent support that keeps the design from distorting over time. Pair the cutaway with a layer of Solvy water-soluble topping if you are working on fleece or any pile knit to prevent stitches from sinking into the fabric surface.
Cutaway stabilizer remains permanently attached to the fabric after embroidery — you trim the excess around the design with scissors. Tearaway stabilizer is removed after embroidery by tearing it away from the stitching. Cutaway is used for stretchy, delicate, and knit fabrics where permanent support is needed. Tearaway is best for stable woven fabrics like cotton and denim where no permanent backing is required.
Yes, denim still needs stabilization even though it is a sturdy woven fabric. A medium-weight tearaway or a light cutaway stabilizer works well for most denim embroidery. For very dense, large designs on thick denim — like a jacket back — a firm tearaway or even a layer of cutaway provides better support and prevents puckering around the design edges. Never skip stabilizer on denim just because the fabric feels rigid; the stitch pull from dense embroidery still requires external support.
Topping stabilizer (also called “topper”) is placed on top of the fabric — not underneath — before embroidering. It is especially valuable on plush fabrics like fleece, velvet, and terry cloth to prevent stitches from sinking into the pile. Without it, text and fine detail elements on these surfaces become almost illegible. Water-soluble topping like Sulky Solvy dissolves completely in water after embroidery, leaving no residue. For terry cloth towels in particular, topping is non-negotiable.
Printer paper and dryer sheets are sometimes used as emergency substitutes for tearaway stabilizer on light designs. However, they are not reliable substitutes. Printer paper can cause needle deflection and breakage, especially on dense designs. Dryer sheets are too flimsy for most embroidery. Purpose-built stabilizers are always the better investment for consistent, professional results — a roll of light tearaway is inexpensive and lasts for dozens of projects.
For most projects, a single layer of the correct stabilizer type and weight is sufficient. You may need two layers for very dense, large designs, very lightweight fabrics, or highly unstable knits. Always start with one layer and test on a sample before doubling up — too much stabilizer can make the embroidery area stiff, add to needle wear, and even cause needle breakage on thinner needles. Use a heavier single layer before resorting to doubling up.
Heat-away stabilizer disappears when exposed to heat from a dry iron or heat gun. It is used for delicate fabrics that cannot be wet (making water-soluble a poor choice) and for freestanding lace and 3D embroidery designs where no backing should remain. It is also used for embroidery on items like structured bags that cannot be immersed in water. Always use with a dry iron only — never steam, which begins dissolving the stabilizer prematurely.
Light-weight stabilizers (1.0–1.5 oz) suit lightweight fabrics like organza, chiffon, and thin quilting cotton. Medium-weight (2.0–2.5 oz) is the most versatile and works for standard cotton, linen, and light knits — this is the weight most embroiderers use for T-shirt embroidery. Heavy-weight (3.0 oz and above) is for dense designs, heavy fleece, thick terry cloth, and canvas. Match the stabilizer weight to the fabric weight and design density simultaneously.
For cutaway and most tearaway stabilizers, you hoop both the fabric and the stabilizer together as a single unit. The stabilizer goes in the hoop first, then the fabric is placed on top and both are hooped together. For sticky or self-adhesive stabilizers, the stabilizer is hooped alone, the paper backing is scored and removed, and the fabric is adhered directly to the sticky surface — ideal for items like towel borders and garment pockets that cannot be hooped normally.
Caps and hats require a firm, dense cutaway stabilizer — typically 2.5 oz or heavier. Many professional embroiderers prefer pre-cut cap backing or cap-specific tearaway backing that is shaped to fit standard cap hoop sizes. A sticky or self-adhesive stabilizer helps align the cap panel correctly on a cap hoop before stitching begins. Avoid floppy, lightweight tearaway for hats — the curved surface and dense hat fabric demand serious, firm support.
Tear away as much of the water-soluble stabilizer as possible before washing — this reduces the volume that needs to dissolve in water. Then rinse the embroidered item in lukewarm or cool water — very hot water can distort the design and some embroidery thread colors. Gently agitate or rub the stabilizer area to help it dissolve. For thick stabilizer or multiple layers, a second rinse in fresh water ensures complete removal. Allow the item to air dry flat to preserve the embroidery shape.
Yes — stabilizers are used not just in embroidery machines but also with regular sewing machines for tasks like sewing buttonholes, satin stitch appliqué, and free-motion embroidery. Tearaway and water-soluble stabilizers are especially useful under satin stitching on a standard machine to prevent fabric tunneling and puckering. Understanding how to use your sewing machine well includes knowing when and how to stabilize your fabric — even for non-embroidery tasks.
Conclusion: The Right Stabilizer Transforms Every Design
Embroidery is one of the most technically demanding textile crafts — and stabilizer is the technical foundation that makes it possible to achieve consistently beautiful, durable results on the full range of fabrics that embroiderers encounter. After reading this guide, you now have a comprehensive understanding of why stabilizer matters, how to distinguish between the five fundamental types, how to match stabilizer weight to your specific fabric and design combination, and which specific products stand out in each category in 2025.
The key takeaways are worth repeating one final time. Use cutaway for any stretchy or knit fabric, because only a permanent backing prevents long-term embroidery distortion on materials that flex and stretch in use. Use tearaway for stable woven fabrics where a clean finish without permanent backing is desired. Turn to water-soluble for delicate fabrics that cannot tolerate even the lightest tearaway, and for the magical technique of freestanding lace embroidery. Use heat-away when the project cannot be wetted. And never forget the topping — that layer above the fabric that transforms pile surfaces from a jumbled, sunken mess of stitching into crisp, clean, professional-quality embroidery.
From a product standpoint, the OESD StabilStick Cut-Away remains the best all-around cutaway choice, Sulky Super Solvy leads the water-soluble category for freestanding lace, and OESD AquaMesh Plus is the preferred topping for the most demanding pile surfaces. These are the products that professional embroiderers reach for repeatedly because they deliver consistent results project after project.
As you continue developing your embroidery skills, remember that stabilizer knowledge compounds with experience. Each project where you pay attention to the stabilizer choice — why you selected it, how it performed, and what you would change next time — adds to a growing personal database of what works for your specific fabrics, designs, and machine. Over time, the right stabilizer choice becomes instinctive, and you will find that your designs consistently emerge from the hoop looking exactly as the digitizer intended.
For further reading on building out your complete embroidery and sewing workspace, explore our guides on best sewing tables for embroidery setups, proper lighting for precision work, and the best embroidery machine deals if you are still in the market for a dedicated embroidery machine. The right tools, the right supplies, and the knowledge to use them together — that is the complete embroidery foundation.
Ready to Stock Your Stabilizer Drawer?
Start with the essential trio — medium-weight cutaway, medium tearaway, and water-soluble film — and you will be equipped for the vast majority of embroidery projects. As your project range expands, add specialty products as needed. The Amazon links throughout this guide use the affiliate tag sewingbible-20, which helps support the research and writing that goes into guides like this one at no additional cost to you.
Shop All Embroidery Stabilizers on Amazon