The Complete Guide to Oiling Your Sewing Machine — Step by Step
A drop of oil in the right place takes thirty seconds. The skip-oiled machine it saves you from — the one grinding itself to a shuddering halt mid-seam — takes three hundred dollars and a fortnight to fix. That math is why oiling is the single most impactful maintenance task every sewist should own.
Yet despite being simple, oiling a sewing machine is surrounded by more mythology than almost any other sewing topic. Is it one drop or three? Does my computerized machine need oil at all? Can I use WD-40 in a pinch? (No. Absolutely not. We’ll get there.) This guide cuts through the noise with clear, step-by-step instructions built around how these machines actually work — the mechanics of metal on metal, where friction accumulates, and how proper lubrication extends the precision your machine was engineered to deliver.
Whether you’ve just unboxed your first machine after reading through a solid beginner’s guide to using a sewing machine or you’re a seasoned intermediate sewist who wants to stop skipping the maintenance chapter, this walkthrough covers everything: which oil to buy, where every drop goes, how to clean before you oil, how often to repeat the process, and how oiling practices shift for different machine types — mechanical, computerized, serger, and more.
Let’s start with understanding why your machine needs oil in the first place, because knowing the “why” makes every subsequent step click into place.
Why Oiling Your Sewing Machine Matters More Than You Think
A sewing machine is a symphony of moving parts. At full speed, the needle bar reciprocates up and down hundreds of times per minute. The hook assembly rotates continuously to catch your thread. The feed dogs cycle through their oval travel path with every stitch. The handwheel drives a crankshaft. Cam systems engage for decorative stitches. All of these parts are metal — and all of them create friction where they meet.
Oil is the intermediary that prevents metal-to-metal contact. It creates a thin film between bearing surfaces so that instead of two steel components grinding directly against each other, they glide against each other’s oil film. That distinction — grinding vs. gliding — is the difference between a machine that hums quietly and a machine that skips stitches, runs hot, seizes up, or eventually cracks a timing component.
What Happens When You Don’t Oil
Neglected lubrication produces a predictable sequence of symptoms. The first signs are subtle: a slightly rougher sound, stitches that feel less consistent, a faint resistance when turning the handwheel. As friction continues to accumulate, the symptoms escalate. You may notice:
- Thread breakage increases — tension fluctuates when mechanical resistance is inconsistent.
- Skipped stitches — the hook assembly timing can drift when components run hot from friction.
- A grinding or squeaking noise — direct metal contact producing audible wear.
- The handwheel stiffens — resistance in the crankshaft bearings becomes palpable.
- The machine jams under thick fabric — already-stressed mechanisms can’t push through resistance.
- Overheating — the motor compensates for mechanical drag, drawing more current and running hotter.
If you’ve been searching for why your machine is giving you trouble, this deep-dive into sewing machine problems addresses many symptoms that trace back to inadequate lubrication. And jamming issues specifically often improve dramatically after a proper clean-and-oil session.
Left long enough, un-oiled machines develop permanent damage: scratched bearing surfaces that no amount of oil can fully restore, cracked plastic components from mechanical overload, and in extreme cases, bent or broken timing hooks. Professional repair for these issues commonly runs $150–$350. A bottle of sewing machine oil costs under $10 and lasts years.
Oiling Is Not the Same as General Maintenance
It’s important to distinguish oiling from the broader category of sewing machine maintenance. Oiling addresses friction at bearing surfaces. It does not address lint accumulation in the feed dog mechanism (which requires cleaning), thread path issues (which require inspection), needle wear (which requires replacement), or tension calibration (which is a separate adjustment). A complete maintenance session combines cleaning and oiling — but they serve different functions, and doing one without the other only solves half the problem.
Choosing the Right Sewing Machine Oil
The choice of oil is not optional or interchangeable. Using the wrong lubricant is in some cases worse than using no lubricant at all — it can attract lint, gum up internal mechanisms, degrade rubber gaskets, or leave residue that hardens over time. Here is exactly what you need to know.
The Only Correct Choice: Pure, Clear Sewing Machine Oil
Dedicated sewing machine oil is a highly refined, low-viscosity mineral oil. It is clear (or very faintly blue-tinted in some formulations), nearly odorless, and engineered specifically for the lightweight precision mechanisms found in domestic sewing machines. The key properties that make it correct for the task are:
- Low viscosity — thin enough to penetrate tight tolerances without pooling.
- Chemically neutral — won’t react with the metals, plastics, or rubber components it contacts.
- Non-gumming — doesn’t polymerize or become tacky when it dries, unlike many cooking and household oils.
- White fabric safe — if a small excess contacts your fabric, it won’t stain permanently (though wiping excess before sewing is always best practice).
- Lint-resistant — its surface tension doesn’t encourage lint adhesion the way thicker oils do.
For a comprehensive look at the top-rated products, our complete guide to the best sewing machine oils walks through the leading brands with performance comparisons.
What NOT to Use
WD-40, 3-in-1 oil, cooking oil (olive, vegetable, coconut), petroleum jelly, motor oil, silicone spray (unless specified by the manufacturer), baby oil, and any colored or scented oil. WD-40 is a water-displacing solvent, not a lubricant — it will strip existing lubrication and leave your machine drier than before.
| Oil Type | Safe to Use? | Why / Why Not |
|---|---|---|
| Clear sewing machine oil | ✓ Yes | Purpose-built, correct viscosity, non-gumming |
| WD-40 | ✗ No | Solvent, not a lubricant — strips oil films |
| 3-in-1 Oil | ✗ No | Too thick, gums up, attracts lint aggressively |
| Olive / vegetable oil | ✗ No | Oxidizes and polymerizes; turns to varnish in mechanisms |
| Baby oil (mineral oil) | ⚠ Avoid | May work in a pinch but contains additives; not ideal |
| Sewing machine grease | ⚠ Specific use | For cam stacks only in some machines — not a general lubricant |
| Silicone spray | ⚠ Manufacturer-specific | Some modern machines specify silicone; check your manual first |
| Motor oil / automotive | ✗ No | Far too heavy; designed for high-temperature, high-load engines |
Grease vs. Oil: Knowing the Difference
Some sewing machines — particularly older models and industrial machines — have areas that call for grease rather than oil. Grease is a thicker lubricant that stays in place better for slow-moving, high-load parts like cam stacks and large gears. Oil is for fast-moving, precision parts like the hook race and needle bar. Using oil where grease is specified (and vice versa) will cause problems. Always cross-reference your machine’s manual. For most modern domestic machines under normal home use, oil is the only lubricant you’ll ever apply.

Recommended: Pure Sewing Machine Oil
Clear, non-staining, precision-formulated for all domestic machines. Includes a fine applicator tip for pinpoint accuracy.
Tools and Supplies You’ll Need Before You Begin
One of the easiest maintenance sessions in sewing is oiling — you need very little equipment. Gathering everything before you start means you won’t be rummaging through drawers mid-task with oily fingers.
- Sewing machine oil — the purpose-built, clear mineral oil described above. A bottle with a precision-tip applicator is ideal.
- Lint brush or small soft-bristle brush — most machines include one in the accessory box. A clean, dry paint brush (1/4″ width) also works well.
- Small screwdriver — usually Phillips or flathead, matching your machine’s needle plate screws. Many machines include this.
- Clean, lint-free cloths or cotton swabs — for wiping up excess oil and cleaning surfaces before application.
- Your machine’s manual — critical for locating manufacturer-specified oil points, which vary by model. If you’ve lost your manual, search “[Brand] + [Model Number] + manual PDF” to find a digital copy.
- Good lighting — a task lamp or positioning near a window helps enormously when locating small oil points inside the machine. For a list of excellent options, see our sewing lamp recommendations.
- A clean white cloth for the test run — after oiling, you’ll run the machine briefly over scrap fabric to absorb any excess oil before it reaches your project fabric.
Before You Start: Safety and Preparation
A handful of preparatory steps will make the entire oiling process smoother, safer, and more effective. Don’t skip this section — it takes two minutes and prevents several common mistakes.
- Unplug the machine. This is non-negotiable. You’ll be working with screwdrivers near moving mechanisms; the machine must be completely powered off and unplugged from the wall, not just switched off at the machine’s own power button.
- Remove the thread. Both the upper thread spool and the bobbin should be removed. Thread tangled in moving parts during a cleaning or oiling session can cause unexpected damage, and thread fibers picking up oil will stain your next project.
- Remove the presser foot and needle. The needle creates a puncture risk when you’re working inside the machine. Remove it using the thumbscrew or needle clamp screw. Set it safely aside.
- Work on a covered, flat surface. A light-colored cloth underneath your machine makes dropped screws and components visible. It also catches any oil drips before they reach your work surface.
- Consult your manual for oil points. Open your manual to the maintenance section. Mark or memorize the specific locations it specifies for lubrication. These vary by manufacturer — a Brother and a Janome have different internal architectures, and their oil points are in different places.
- Give yourself 30–60 minutes of unhurried time. The actual oiling takes 10–15 minutes. The preparation, cleaning, and post-oil test run bring it to 30–60 minutes total. Rushing produces over-oiling, missed cleaning steps, and reassembly errors.
Step 1: Thoroughly Clean the Machine Before Oiling
Clean the Exterior, Throat Plate Area, and Feed Dogs
Oil applied to a dirty machine creates an abrasive slurry of lint and oil that accelerates wear rather than preventing it. The cleaning step is the foundation of effective lubrication.
Begin by using your lint brush to clear all visible debris from the top surface, around the presser foot bar, along the thread path, and around the needle bar. Pay particular attention to the area around the feed dogs (those serrated metal teeth visible through the needle plate opening) — this is where lint accumulates most aggressively.
Use a cotton swab dipped lightly in rubbing alcohol to clean the thread tension discs on the front of the machine (the external tension assembly), removing any old, hardened lint or thread residue. Allow it to dry completely before proceeding.
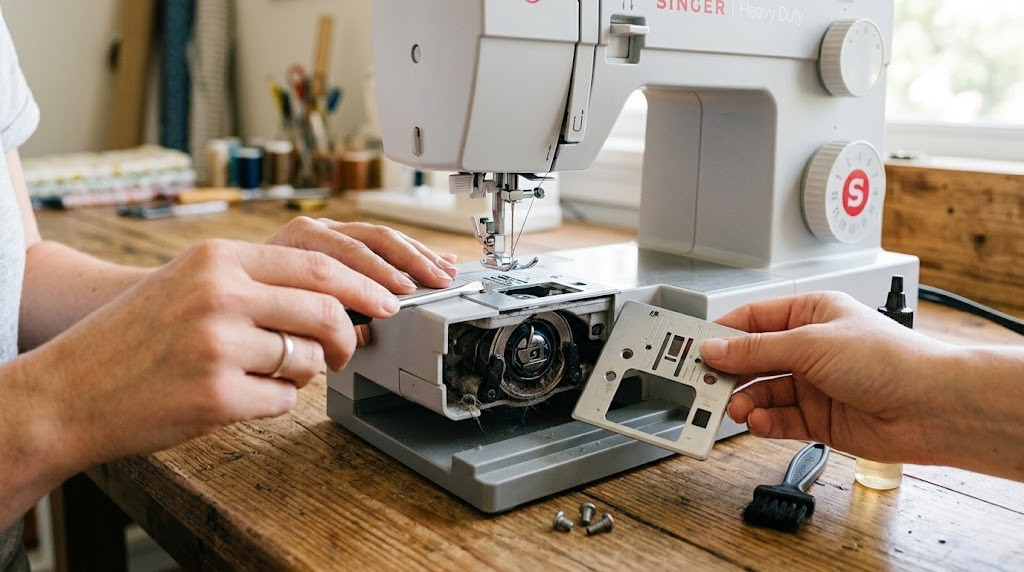
Step 2: Remove the Needle Plate (Throat Plate)
Access the Bobbin Compartment by Removing the Needle Plate
The needle plate is the flat metal piece that sits beneath the needle, with the slot through which the needle passes and the markings that guide your seam allowance. Removing it gives you access to the bobbin case and hook assembly — the most critical areas for oiling in most domestic machines.
On most machines, the needle plate is held in place by one or two small screws (typically Phillips head). Some modern machines have a sliding plate that can be removed without tools. Use your small screwdriver to remove the screws, setting them in a small dish or on a piece of tape so they don’t roll away.
Lift the needle plate clear and set it aside. You’ll see the bobbin case, the hook race (the circular assembly that rotates to catch thread and form each stitch), and the underside of the feed dog mechanism.
Step 3: Deep-Clean the Bobbin Compartment
Remove the Bobbin Case and Clear All Lint from the Hook Race
With the needle plate removed, take out the bobbin and bobbin case. On front-loading machines, the bobbin case latches out with a small metal clip. On top-loading machines, the bobbin simply lifts out, followed by the bobbin case (which may also lift out, or may be fixed in place depending on the model).
Now use your lint brush to thoroughly clean every corner of the bobbin compartment. Pay close attention to the groove around the hook race (the circular channel where the rotating hook travels) — lint packs densely into this groove and is the number-one location for both thread jams and the need for lubrication. Work the bristles into the groove with short, firm strokes.
Use a cotton swab to remove any compacted lint the brush can’t dislodge. If there is hardened residue (from old oil combined with lint), a cotton swab lightly dampened with rubbing alcohol will dissolve it. Let it dry completely before oiling.
Once clean, inspect the hook race groove visually. It should be smooth and free of debris. If you see scratches or rough metal, that’s a sign the machine may need professional service — oil won’t fix mechanical damage.

Complete Machine Maintenance Kit
Includes precision oil, lint brushes, cotton swabs, and a screwdriver set — everything needed for a full service session.
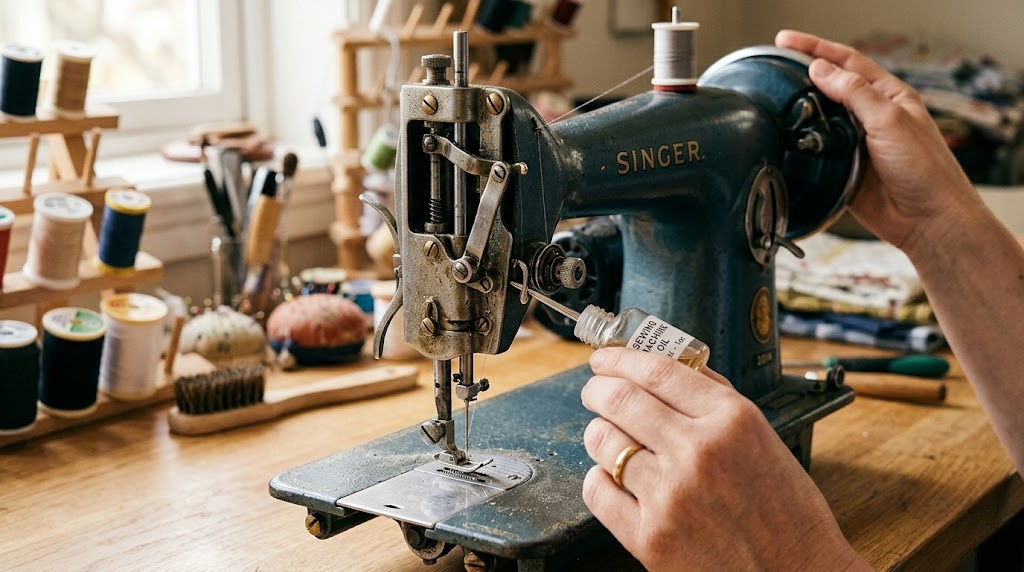
Step 4: Apply Oil to the Hook Race
Place One Drop of Oil in the Hook Race Groove
The hook race is the highest-priority oil point on virtually every domestic sewing machine. This is where the hook assembly rotates at high speed to catch your upper thread loop and interlock it with the bobbin thread on every stitch. The combination of high rotational speed and tight tolerances makes this the most friction-intensive point in the machine.
Using your precision-tip oil applicator, apply exactly one small drop of sewing machine oil into the hook race groove — the channel in which the hook assembly rotates. That’s it. One drop. The instinct to add more “for good measure” is the most common over-oiling mistake, and it results in oil contaminating your bobbin thread and staining your next project.
After applying the drop, use your finger (protected with a cloth) to gently rotate the machine by the handwheel several times. This distributes the oil around the full circumference of the hook race groove. You should see the oil spread into a thin, even film.
Other Primary Oil Points (Machine-Specific)
Depending on your machine model, there may be additional specified oil points beyond the hook race. Common locations include:
- Needle bar — The vertical rod that drives the needle up and down. Many machines have a small oil hole at the top of the needle bar guide. One tiny drop here.
- Take-up lever pivot — The arm that draws thread up on each stitch. If your manual specifies this point, apply a micro-drop to the pivot point.
- Handwheel axle — Some machines have an accessible oil point at the rear of the handwheel. If specified, apply one small drop.
- Feed dog cam/eccentric — On some mechanical machines, the mechanism that drives the feed dogs has an accessible pivot. Apply only if the manual specifies.
Step 5: Lubricate the Upper Mechanism Moving Parts
Access and Oil the Needle Bar, Thread Guides, and Moving Levers
The upper portion of the sewing machine contains several other metal-on-metal contact points that benefit from periodic lubrication. Access to these varies significantly by machine design. On some machines, the top cover panel is removable (check your manual) to reveal the needle bar assembly, the take-up lever mechanism, and various pivot points. On other machines — particularly many modern computerized models — the upper mechanism is sealed and inaccessible to the user.
If your machine’s upper arm is accessible, look for the needle bar itself (the metal rod the needle is clamped to) and apply the thinnest possible film of oil where it passes through its guide bushing. Similarly, if there is a pivot point visible for the take-up lever, apply a micro-drop. These are secondary to the hook race, but they do contribute to overall smoothness.
Use cotton swabs to remove any oil that strays onto surfaces it shouldn’t be — particularly any plastic components, rubber parts, or the needle clamp area where contact with thread could transfer oil to your fabric.
For machines where the upper mechanism is sealed, you’ll typically find oil access holes (small circular holes in the casing, sometimes marked with an oil can symbol or red dots). These are your oil points — apply one drop per hole and nothing more.
Step 6: Reassemble, Run a Test, and Verify
Reassemble the Machine and Run a Break-In Test on Scrap Fabric
Reassembly is the reverse of disassembly, but take your time. Rushing reassembly after a careful maintenance session is where most damage occurs — dropped screws, cross-threaded fittings, or incorrectly seated bobbin cases can cause immediate problems when the machine runs.
Replace the bobbin case first, ensuring it seats and latches correctly. Replace the bobbin. Reattach the needle plate, finger-tightening the screws before final tightening with the screwdriver (this prevents cross-threading). Replace the needle and presser foot. Re-thread the machine completely, including the bobbin.
Now the critical test: take two or three layers of scrap fabric (or a folded piece of white cotton) and run the machine over them at medium speed for about 30 seconds before sewing on anything you care about. This serves two purposes — it seats the oil in the mechanism, and it absorbs any small amount of excess oil that might otherwise transfer to your project fabric. If the scrap fabric shows any oil marks, wipe the excess from the hook race area with a clean swab and repeat the test. Continue until the test fabric comes out clean.
Signs That the Oiling Was Successful
- The handwheel turns more smoothly with noticeably less resistance.
- The machine’s running sound deepens slightly — the high-pitched friction noise is gone.
- Stitch formation becomes more consistent; the needle pulls through fabric without hesitation.
- The machine runs cooler (less heat from friction) over extended sewing sessions.

Precision Tip Oil Applicator Bottle
Needle-tip applicator lets you place a single drop exactly where it needs to go — perfect for the hook race and needle bar guide.
How Often Should You Oil Your Sewing Machine?
This is one of the most commonly asked questions in sewing machine maintenance — and the answer is: it depends on how much you sew, what you sew, and what type of machine you have. “Every three months” is the advice you’ll often hear, but for a heavy daily user that’s nowhere near enough, while for an occasional hobbyist it may be too frequent (though over-oiling a machine is much less damaging than under-oiling, provided you run the oil-absorption test on scrap fabric).
A more useful framework is usage-based:
| Usage Level | Typical Hours/Week | Recommended Oil Interval | Notes |
|---|---|---|---|
| Light / Occasional | < 2 hours/week | Every 3–6 months | Also oil if stored for > 3 months without use |
| Moderate / Hobby | 2–5 hours/week | Every 8–10 bobbin changes | Convenient to integrate with bobbin reloads |
| Regular / Frequent | 5–10 hours/week | Every 4–6 bobbins, or monthly | Especially important with denim, canvas, or upholstery |
| Heavy / Near-Daily | 10+ hours/week | Every 2–4 bobbin changes | Consider a professional service every 6–12 months |
| Professional / Industrial | Daily production use | Daily oiling before first use | Follow manufacturer’s industrial service schedule strictly |
The Bobbin-Change Method: The Easiest Oiling Habit
Professional sewists and machine technicians commonly recommend tying oiling to bobbin changes. The logic is elegant: when you change a bobbin, the machine is already threaded down and you’re in the right mindset for a brief maintenance pause. A bobbin change for a moderate sewist happens every 30–90 minutes of sewing — which happens to be a natural maintenance interval for domestic machines. Adopt the habit of cleaning and applying one drop to the hook race every 8–10 bobbins, and your machine will run indefinitely without friction-related deterioration.
Oil After Long Storage Periods
If your machine has been stored for more than three months without use, oil it before its next session regardless of the calendar interval. Stored machines lose their protective oil film as the oil slowly drains or evaporates from bearing surfaces over time. A machine run dry after a long storage period will experience metal-on-metal contact from the very first stitch.
Sewing Machine Oil Comparison: Top Products Compared
Not all bottles labeled “sewing machine oil” are equal in application precision, purity, or value. Here’s how the leading products compare on the factors that matter most for home sewists:
| Product | Viscosity | Applicator | Volume | Best For | Notes |
|---|---|---|---|---|---|
| Singer 2131E All Purpose Oil | Light | Precision needle tip | 4 fl oz | General use, all brands | Most widely available; very consistent quality |
| Zoom-Spout Oiler | Light | Long precision spout | 4 fl oz | Machines with deep oil channels | Long spout reaches deep hook race areas |
| Liberty Oil | Extra light | Precision needle tip | 4 fl oz | Vintage machines, small parts | Thinner than most; excellent for tight tolerances |
| Juki Sewing Machine Oil | Medium-light | Standard tip | 1 liter | Heavy-use / industrial | Professional grade; excellent for high-use machines |
| Sewline Sewing Machine Oil | Light | Standard tip | 100ml | Beginner-friendly | Small bottle limits over-application risk |
- Extends machine life significantly — decades vs. years
- Reduces operating noise to a smooth hum
- Improves stitch consistency and tension stability
- Prevents costly friction-based mechanical failures
- Keeps the handwheel turning smoothly under load
- Protects against rust in humid environments
- Excess oil transfers to fabric, causing staining
- Oil-soaked lint creates abrasive buildup
- Dripping oil can contact electrical components
- Excess at the hook race causes bobbin thread contamination
- Over-oiling can require full professional cleaning to correct
Oiling by Machine Type: Mechanical vs. Computerized vs. Serger
The oiling approach differs meaningfully across machine types. What works for a vintage mechanical machine may be inappropriate — or even damaging — for a modern computerized model. Here’s how to approach each type.
Mechanical Sewing Machines
Traditional mechanical sewing machines are the most oil-friendly category. Most mechanical machines have accessible oil points and are designed with the expectation of regular user maintenance. The full hook race + needle bar + manual-specified points approach described in this guide applies directly to most mechanical machines. Older machines from the 1970s–1990s are often especially dependent on regular oiling — they have more exposed metal-on-metal contact points than modern machines and should be oiled at the lower end of any usage-based interval.
Vintage machines deserve particular attention. If you’ve acquired a used machine that hasn’t been oiled in an unknown period, a full cleaning and thorough oiling session (perhaps followed by a professional tune-up) is the starting point before any serious sewing. The precision and longevity of vintage machines when properly maintained is remarkable.
Computerized Sewing Machines
Modern computerized sewing machines present a more nuanced picture. Many contemporary computerized models are factory-lubricated with specialized long-life lubricants and are specifically designed not to require user oiling. Applying oil to a “self-lubricating” machine can actually cause problems by disrupting the factory lubricant or attracting lint into sealed bearings.
The rule here is absolute: consult your manual before applying any oil to a computerized machine. If the manual says no user oiling is required, take it at its word and have the machine serviced professionally on the schedule the manufacturer recommends (typically every 12–24 months for home use). If the manual specifies oil points, follow them exactly.
Serger / Overlock Machines
Sergers are more complex than standard sewing machines — they have multiple loopers, knives, and thread paths — and they run at considerably higher speeds. This makes regular oiling even more important for sergers than for standard machines. Most sergers have several clearly marked oil points, and many manufacturers recommend oiling before each major sewing session for heavy use.
The general approach is the same — clean before oiling, one drop per marked point, test on scrap — but the locations differ. Consult your serger’s manual carefully, as loopers and their pivot points have specific lubrication requirements that standard machine guides won’t address.
Industrial Machines
Industrial machines typically have automatic oiling systems (oil reservoirs that continuously lubricate the mechanism during operation) or require daily pre-session oiling. The principles are the same but the scale and frequency differ dramatically. If you’re using an industrial machine for professional production work, follow the manufacturer’s industrial maintenance schedule exactly — these machines are not designed to be forgiving of maintenance lapses the way domestic machines sometimes are.
The Most Common Oiling Mistakes — and How to Avoid Them
Understanding what not to do is just as important as knowing the correct technique. These are the most frequently encountered errors in sewing machine lubrication, ranked roughly by how often they appear and how much damage they cause.
Mistake 1: Skipping the Pre-Clean
Applying oil to a lint-filled machine is the single most common error. Oil acts as a binder — it holds lint particles in place and suspends them in a mobile abrasive paste that circulates through your mechanism. Always clean before you oil, without exception.
Mistake 2: Using the Wrong Oil
Refer back to the oil comparison table. WD-40 deserves a special mention here because its name and spray can suggest it’s a general lubricant — it is not. It’s a penetrating solvent and water displacer. Applying it to a sewing machine strips the existing lubrication and leaves the mechanism dry within hours. The immediate result (things moving freely because the solvent is acting) is falsely reassuring; the lasting result is an unlubricated machine running with solvent residue.
Mistake 3: Too Much Oil
The second most common error, especially among first-time oilers. “More oil = more protection” is an intuitive but wrong principle for precision mechanisms. Excess oil doesn’t stay in the bearing it was applied to — it migrates via capillary action and the motion of the mechanism, ending up on your bobbin, your thread, and eventually your fabric. Apply one small drop per point. If oil is visibly pooling, you’ve already used too much — use a cotton swab to absorb the excess immediately.
Mistake 4: Not Testing on Scrap Fabric
Even when oiling was done correctly, some excess may be present in the mechanism. Running the first post-oil sewing on your actual project is a gamble. The scrap fabric test run described in Step 6 is mandatory, not optional. Run scrap until no oil transfers — then, and only then, move on to your actual project.
Mistake 5: Oiling a Computerized Machine That Doesn’t Need It
As discussed in the machine types section, many computerized machines are factory-lubricated and sealed. Applying user oil to these machines is at best unnecessary and at worst counterproductive. Check the manual before touching any computerized machine with an oil bottle.
Mistake 6: Oiling the Wrong Points
Applying oil to plastic components, rubber seals, timing belts, or electrical connections causes damage. Oil should go only to metal-on-metal contact points specifically identified in your manual. If you’re unsure whether a surface is an oil point, leave it alone.
Mistake 7: Neglecting the Machine for Years, Then Over-Oiling to Compensate
A machine that’s been neglected for years doesn’t benefit from being flooded with oil in one session. Heavy over-oiling of a dirty machine creates significant cleanup problems. The correct approach for a long-neglected machine is a careful, thorough cleaning, a single proper oiling session, and then a professional service assessment if the machine’s performance is still compromised.
Beyond Oiling: A Complete Machine Care Routine
Oiling is one pillar of sewing machine maintenance. For a machine that performs at its best year after year, integrate oiling into a broader care routine that includes the following practices.
Regular Needle Changes
A dull or bent needle causes significantly more mechanical stress than a sharp one. The extra resistance a damaged needle creates is directly transferred to the needle bar, the hook timing, and ultimately the motor. Change your needle every 6–8 hours of sewing time, or when you start a new project. It costs cents and prevents dollar-value mechanical wear. For more on needles and compatibility, our guide on sewing machine needle universality is a helpful reference.
Thread Quality
Low-quality thread sheds an enormous amount of lint as it passes through the machine’s thread path. That lint accumulates in the bobbin area, feed dogs, tension discs, and hook race — exactly the places you’re working to keep clean. Using quality thread doesn’t eliminate lint entirely, but it significantly reduces accumulation between cleanings.
Cover Your Machine
Dust is an underrated maintenance problem. A sewing machine left uncovered accumulates dust in all the same places that lint accumulates — and dust mixed with oil is just as abrasive as lint mixed with oil. Keep a dust cover on your machine when it’s not in use. If your machine didn’t come with one, soft covers are inexpensive and widely available.
Professional Servicing
Home maintenance addresses friction and cleanliness. It doesn’t address timing adjustments, tension calibration, drive belt condition, electrical connections, or structural issues. Even a well-maintained home machine benefits from professional servicing every 12–24 months if used regularly, or every 3–5 years for light occasional use. A professional service session typically costs $80–$150 and includes adjustments that home maintenance cannot replicate.
Schmetz Universal Needle Assortment Pack
Mixed sizes (70/10–100/16) for everyday fabrics. Genuine German engineering — the benchmark for domestic sewing.
When Oiling Doesn’t Solve the Problem
If you’ve completed a thorough clean-and-oil session and the machine still isn’t running smoothly, the issue may be mechanical rather than lubrication-based. Common non-lubrication causes of rough running include: worn drive belt, incorrect hook timing, a damaged hook tip, bent needle bar, misaligned presser foot bar, or motor issues. These require professional assessment. A clean, properly oiled machine that still runs rough or skips stitches needs a technician, not more oil.
Sewing Machine Oiling: Quick Reference Summary
| Task | Frequency | Key Point |
|---|---|---|
| Clean bobbin area / feed dogs | Every 2–3 bobbin changes | Lint brush + cotton swab |
| Oil hook race | Every 8–10 bobbins (moderate use) | One drop only; clean first |
| Oil needle bar / additional points | Same as hook race | Manual-specified points only |
| Scrap fabric break-in test | After every oiling session | Until no oil marks on fabric |
| Change needle | Every 6–8 hours or new project | Prevents mechanical wear |
| Professional service | Every 12–24 months (active use) | Timing, tension, electrical |
Sewing Machine Oiling — Your Questions Answered
Can I use WD-40 to oil my sewing machine? ›
No — WD-40 should never be used on a sewing machine. It is a penetrating solvent and water-displacer, not a lubricant. Applying WD-40 strips the existing oil films from bearing surfaces and leaves the mechanism dry. Although it may briefly make moving parts feel freer (because the solvent acts as a temporary friction reducer), this effect is short-lived. Within a day or two, the mechanism is left with less lubrication than before, plus a solvent residue that attracts lint. Use only purpose-built, clear sewing machine oil.
How do I know if I’ve used too much oil? ›
The most reliable sign of over-oiling is oil stains on the fabric during the post-oil test run. If your scrap fabric shows any oily marks after running the machine, excess oil is migrating from the hook race (or another oil point) onto the thread and then the fabric. Remove the bobbin case, use cotton swabs to absorb visible excess oil from the hook race groove and surrounding area, then replace and re-test. A properly oiled machine will leave the scrap fabric completely clean within two to three runs. Visible oil pooling in the bobbin area when the needle plate is removed is also a clear sign of over-application.
My machine came pre-oiled from the factory. Do I still need to oil it? ›
Yes — factory lubrication is designed to get the machine from production to initial use, not to last for the machine’s lifetime. After the break-in period (which varies by manufacturer but is typically indicated in the manual), you should establish a regular oiling schedule based on your usage level. For most home machines used a few hours per week, oiling every 8–10 bobbin changes is a sound baseline. The exception is certain computerized machines specified as “self-lubricating” by the manufacturer — check your manual to confirm which category your machine falls into.
What happens if I never oil my sewing machine? ›
The consequences of never oiling progress in stages. Early signs include increased operating noise (a rougher or higher-pitched hum), slight handwheel stiffness, and occasional skipped stitches as hook timing drifts from friction-induced component stress. Over months to years without oiling, wear deepens: bearing surfaces develop microscopic scratches that no amount of subsequent oil can fully reverse, thread breaks more frequently as tension fluctuates from mechanical inconsistency, and eventually the machine may seize under load, jam repeatedly, or develop cracked timing components. Professional repair for advanced friction damage commonly costs $150–$350 or more — far exceeding the cost of a regular $8 bottle of oil used over several years.
Does my computerized sewing machine need oiling? ›
It depends entirely on the specific model. Many modern computerized machines — particularly those from Brother and Janome — are factory-sealed with long-life lubricants and explicitly do not require user oiling. Their manuals will state this directly. Others still have accessible oil points specified in the manual. The rule is simple: open your manual’s maintenance section before applying any oil to a computerized machine. If the manual is silent on user oiling, call the manufacturer’s service line or have the machine professionally serviced rather than assuming oil is needed. Applying oil to a machine not designed for user lubrication can void the warranty and cause maintenance problems.
Can I oil my sewing machine while it’s plugged in? ›
No. Always unplug the machine before any maintenance, including oiling. The risk is not primarily electrical (the voltages inside a domestic machine are not as immediately dangerous as some assume) — it’s mechanical. A sewing machine that starts unexpectedly while your hands are inside the mechanism can cause serious injury from the needle bar, hook assembly, or handwheel. There is no maintenance scenario that justifies leaving a machine plugged in during internal work. Unplug, complete your maintenance, then plug in for the test run — in that order, every time.
Is there a difference between oiling a front-load and top-load bobbin machine? ›
The oil application principle is identical — one drop in the hook race groove — but the access route differs. On a front-loading machine, you open the front door of the lower arm to access the bobbin case and hook assembly. On a top-loading (drop-in) machine, you remove the needle plate to access the hook race. Top-loading machines generally provide somewhat easier access to the hook race, making it visible from directly above when the needle plate is removed. Both types benefit from the same cleaning-before-oiling approach; just follow the appropriate access path for your machine type.
How long after oiling should I wait before using the machine? ›
You don’t need to wait — but you do need to complete the scrap fabric test run before sewing on your actual project. Reassemble the machine, re-thread it completely, and immediately run it over two or three layers of white scrap fabric for 30–45 seconds at medium speed. Inspect the scrap for any oily marks. If clean, you can proceed directly to your project. If there are oil marks, wipe excess and repeat until the scrap runs clean. The total time from oiling to sewing on a real project is typically 5–10 minutes including the test run.
Can oiling fix a machine that’s already jamming or skipping stitches? ›
Sometimes — but not always. If the jamming or skipping is caused by friction-related issues (a rough hook race, sticky needle bar guide, or stiff mechanism from lack of lubrication), a clean-and-oil session may resolve it entirely. However, jamming can also result from incorrectly wound bobbins, incorrect threading, a damaged hook tip, timing problems, or needle issues — none of which oiling will address. Our detailed guide on why sewing machines jam covers the diagnostic process. Try the clean-and-oil approach first; if the problem persists, work through the full diagnostic checklist.
Where exactly is the hook race on my machine? ›
The hook race is the circular rotating assembly located beneath the needle plate in the lower arm of the machine. On top-loading machines, remove the needle plate and look directly down — you’ll see the circular outer ring of the hook race surrounding the bobbin area. On front-loading machines, the hook race is visible when you open the front compartment door and remove the bobbin case. The hook race groove is the channel (approximately 3–5mm wide) that runs around the circumference of the hook race’s outer ring. This is where your single drop of oil goes. The inner rotating hook tip (which catches the thread) is visible within this assembly — do not oil the hook tip itself, only the groove track.
Your Machine Deserves 10 Minutes Every Month
Learning to oil your sewing machine properly is one of the highest-return skills in a sewist’s toolkit. The investment is tiny — one drop of oil, once a month or every several bobbins, on a clean machine — and the return is a machine that runs smoothly, stitches consistently, and lasts decades rather than years. The steps are simple: unplug, remove the needle plate, clean the hook race, apply one drop, reassemble, test on scrap. That’s the whole process.
If you’re ready to take your machine care further, dive into a complete maintenance approach — from full troubleshooting to setup best practices. And if you’re still choosing between machines, our curated guide to the best intermediate-level machines covers the models that reward proper maintenance with exceptional longevity.
Read Our Full Sewing Machine Oil Review Guide →