How to Sew a Buttonhole Without a Buttonhole Foot: Every Method Explained
You’re halfway through a shirt, a coat, or a pair of handmade trousers, and then it hits you — you don’t have a buttonhole foot. Maybe it never came with your machine, maybe it’s sitting in a drawer somewhere, or maybe your machine doesn’t support one at all. Whatever the reason, you need buttonholes and you need them now.
Here’s something the sewing world doesn’t advertise loudly enough: the buttonhole foot is a convenience, not a requirement. Tailors have been crafting flawless buttonholes for centuries without specialized attachments. With the right technique, patience, and a clear understanding of how a buttonhole actually works structurally, you can produce results that look every bit as professional — or even more so — than the ones your machine’s automatic setting would give you.
This guide covers every viable method for sewing a buttonhole without a buttonhole foot, from the quick-and-practical zigzag stitch approach to the luxurious hand-sewn buttonhole used in bespoke tailoring. Each method includes step-by-step instructions, illustrated SVG diagrams, and honest guidance on when to use which technique. Whether you’re working on cotton voile, heavy denim, or a delicate silk blouse, there’s a method here that will serve you beautifully.
⚡ Quick Answer: Can You Sew a Buttonhole Without a Buttonhole Foot?
Yes — absolutely. You can sew a buttonhole using your regular zigzag foot and a measured, four-step zigzag process; using a straight stitch outline and seam ripper; entirely by hand using a buttonhole stitch; or through a bound buttonhole technique that requires no specialized attachment at all. Each method suits different fabrics and skill levels.
Why You Might Not Have — or Want — a Buttonhole Foot
Before we get into the how, it’s worth understanding the why. Knowing the reasons behind skipping the buttonhole foot will help you select the right alternative technique.
The Most Common Reasons Sewers Skip the Foot
- Your machine didn’t include one. Many entry-level sewing machines — including popular models under $150 — ship with limited presser foot sets. The buttonhole foot, especially the sliding sensor variety, is often sold separately.
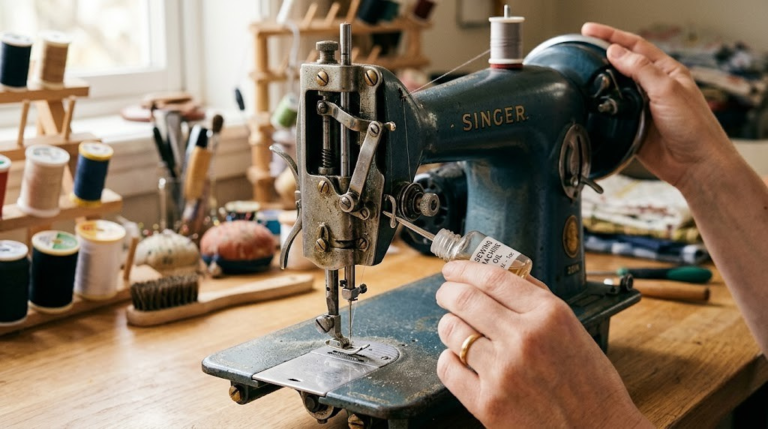
- You’re on a vintage or mechanical machine. Older machines, particularly treadle-style or early electric models, weren’t designed with modern buttonhole attachments in mind. If you’re curious about how these machines differ from modern options, our guide on what is a mechanical sewing machine gives excellent context.
- The automatic function produces inconsistent results. If your machine’s feed dogs or tension are slightly off — a common issue explored in our sewing machine troubleshooting guide — the automatic buttonhole can end up uneven, puckered, or skipped entirely.
- Bespoke and couture sewing traditions call for handwork. Many tailors deliberately avoid machine buttonholes for fine garments because hand-worked buttonholes offer superior durability and a level of finish that no machine can replicate.
- The buttonhole foot is broken, lost, or incompatible. Presser feet are not always universal — a foot designed for one machine may not snap onto another. Our resource on are sewing machine needles universal touches on similar compatibility issues across machine components.
Whatever your reason, rest assured: the buttonhole foot is simply a tool, not a gatekeeper. The techniques below bypass it entirely, giving you complete control over the process.

Dritz Buttonhole Cutter & Block Kit
The essential tool for clean, precise buttonhole cutting across all fabric types. Works with machine and hand-sewn buttonholes.
View on Amazon →Tools & Materials You’ll Need
Before beginning any of the methods below, gather your materials. Being prepared saves time and prevents mid-project frustration that leads to mistakes.
Universal Tools (All Methods)
- Sharp fabric marking pen or tailor’s chalk — for precise buttonhole outlines
- Ruler or seam gauge — to measure button diameter plus seam allowance
- Small, sharp embroidery scissors or appliqué scissors — for cutting the opening cleanly
- Buttonhole cutter and wooden block — the single most useful tool for creating a clean opening without fraying
- Interfacing — to stabilize fabric behind the buttonhole
- Pins or sewing clips — to secure stabilizer and fabric layers
- Seam ripper — for opening the buttonhole after stitching
- Your actual button — always size the buttonhole from the real button, not a measurement you remembered
Machine Methods
- Sewing machine with zigzag capability (most standard machines)
- Standard zigzag/utility presser foot
- Thread in a closely matching color, or contrasting if decorative
- Stabilizer or tearaway for stretch/knit fabrics
Hand-Sewing Methods
- Buttonhole twist thread or strong 100% cotton thread (silk for fine garments)
- Sharp hand-sewing needle sized to your thread
- Beeswax or thread conditioner to prevent knotting
- Thimble (strongly recommended)
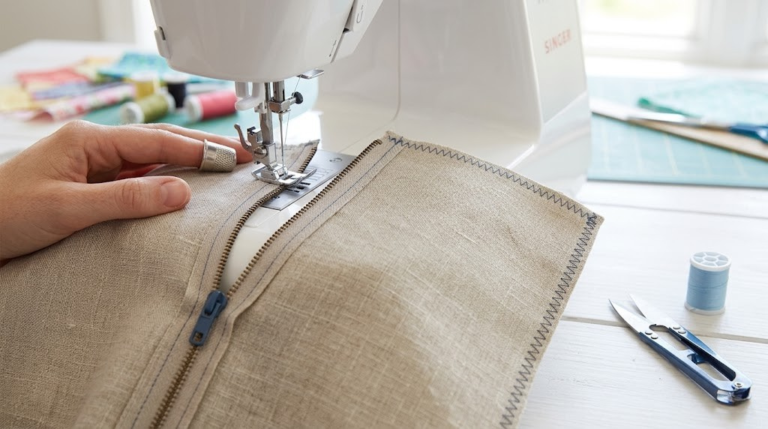
The Zigzag Stitch Buttonhole (Using a Standard Presser Foot)
This is the most practical machine method for sewers without a buttonhole foot. It uses your machine’s standard zigzag foot and requires you to manually guide the fabric through four distinct segments — two satin-stitch columns and two bar tacks at each end. While it demands more attention than the automatic function, it gives you precise control over every dimension.
This method works beautifully on medium-weight woven fabrics — cotton shirting, linen, denim, canvas, and stable knits with interfacing.
Mark and Interface the Buttonhole Area
Measure your button’s diameter. Add 3mm (⅛”) for ease. This is your buttonhole length. Mark the buttonhole on the right side of fabric with a marking pen — draw a center line and two short perpendicular marks at each end to define the boundaries precisely.
Fuse lightweight interfacing to the wrong side of the fabric, centered behind the marked area. Press firmly with a hot iron for 10–15 seconds.
Stitch the First Side Column (Satin Stitch)
Set your machine to zigzag: stitch width 3.0–3.5mm, stitch length 0.4–0.5mm (nearly zero, creating a dense satin stitch). Position the presser foot so the left edge of the zigzag lands just outside the left boundary of your center line. Stitch the full length of the buttonhole from bottom to top. Keep the pace slow and steady — this is where most beginners rush and lose control.
Sew the Top Bar Tack
Without removing the fabric from the machine, increase your zigzag width to 5.0–5.5mm and set the stitch length to 0.5mm. Sew 4–5 stitches across the top end of the buttonhole to create the bar tack — a dense horizontal satin stitch that reinforces the end and prevents tearing.
Stitch the Second Column and Bottom Bar Tack
Return the zigzag width to 3.0–3.5mm and length to 0.4mm. Stitch the second column down the right side of the buttonhole opening, traveling the same length as the first. At the bottom, widen to 5.0–5.5mm again and sew the closing bar tack. Lock off the thread with a few backstitches or tie off the ends by hand. Clip thread tails close.
Cut Open the Buttonhole
Place the fabric right-side-up on a hard surface with a wooden block underneath. Insert a buttonhole cutter (or very sharp seam ripper) at the exact center of the opening. Cut from the center toward each bar tack — never cut through the bar tack itself. If using a seam ripper, insert a pin at each bar tack end before cutting to prevent accidentally slicing through them.

Singer Heavy Duty 4423 Sewing Machine
A reliable machine with zigzag capability, perfect for creating manual buttonholes across cotton, denim, and blended fabrics.
View on Amazon →Method 2
The Straight Stitch Method (For Machines Without Zigzag)
Some vintage machines, particularly straight-stitch-only models, don’t offer zigzag capability. You can still produce a functional buttonhole using straight stitching — the result is less visually dense than a satin-stitch version but perfectly durable for casual garments, heavy fabrics, or instances where you want a more minimalist look.
Mark, Interface, and Outline Stitch the Rectangle
Mark the buttonhole with a precise rectangle using tailor’s chalk. The rectangle width should be slightly wider than your eventual satin-stitch columns — about 3mm each side. Apply interfacing as described in Method 1. Then set your machine to straight stitch with a very short stitch length (1.5–2.0mm). Stitch all four sides of the rectangle, beginning at a corner and overlapping 3–4 stitches when you return to the start. This stitched rectangle is your reinforcement framework.
Stitch a Second Pass and Add Horizontal End Lines
Stitch the rectangle a second time, directly on top of the first, to double the reinforcement. Then, manually sew 6–8 straight stitches across each short end (top and bottom), pivoting to form a dense horizontal reinforcement — this is your makeshift bar tack using straight stitch.
You can also stitch a third rectangle layer for high-stress buttonholes on coats or jackets. The more layers of straight stitch reinforcement, the stronger the buttonhole.
Cut Open and Press
Cut open with a buttonhole cutter or sharp seam ripper as described in Method 1, Step 5. Press the finished buttonhole with a pressing cloth to set the stitches and flatten any puckering. On woven fabrics, a damp press cloth and a firm iron can tighten the stitching significantly.
Method 3
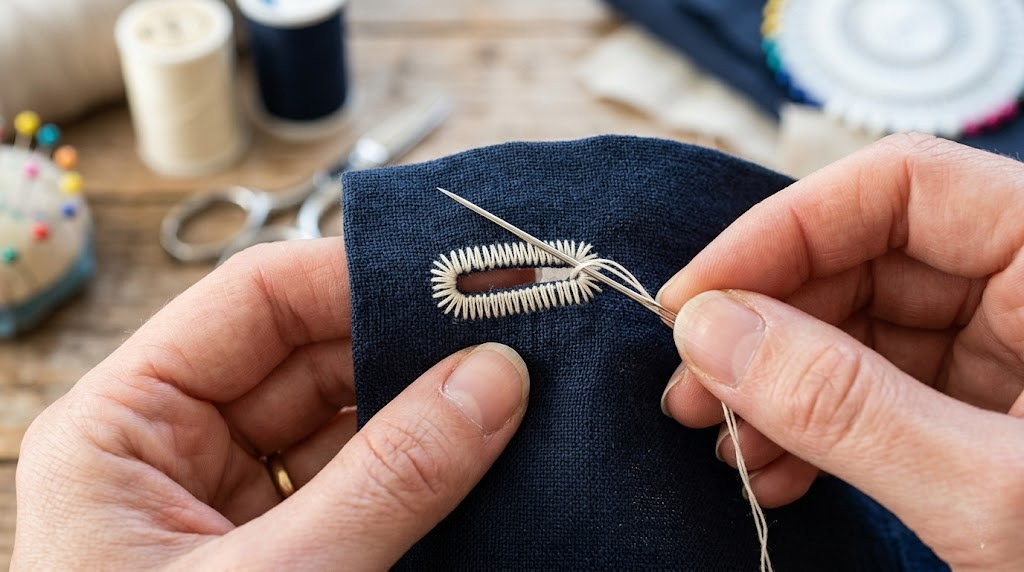
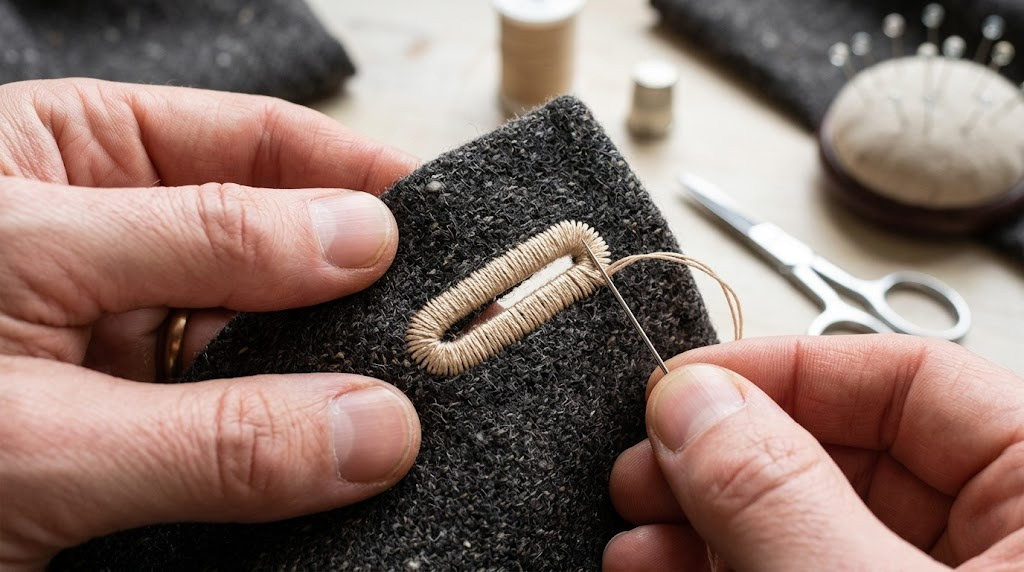
The Hand-Sewn Buttonhole: The Couture Classic
Among all the methods in this guide, the hand-sewn buttonhole holds the highest status in the sewing world. It is the technique used by bespoke tailors on Savile Row, by skilled dressmakers crafting heirloom garments, and by artisans who understand that the slowest method often produces the most enduring result. A hand-worked buttonhole is not just functional — it’s beautiful in its own right, with a texture and precision that machine stitching simply cannot replicate.
Don’t be intimidated. The technique is repetitive, not complex. After ten minutes of practice on a scrap, your hands will find the rhythm.
Mark, Interface, and Baste the Buttonhole Area
Mark the buttonhole as described in Method 1. Interface the wrong side. Then, using a contrasting thread and a running stitch, baste a rectangle around the marked buttonhole — about 3mm outside the marked line on all four sides. This basting rectangle serves as a stitching guide and prevents the fabric from shifting as you work. If you want to understand basting stitch principles more deeply, our article on what is a basting stitch explains the technique thoroughly.
Cut the Buttonhole Opening
For hand-sewn buttonholes, cut the opening before stitching (the opposite order from machine buttonholes). Use small, very sharp embroidery scissors. Cut along the center line only — do not cut into the end marks. The opening should be clean and precise with no fraying whiskers sticking out.
If the fabric frays easily, apply a tiny amount of seam sealant along the cut edges and allow it to dry completely before beginning the buttonhole stitch.
Work the Buttonhole Stitch Along Each Side
Thread your needle with a 40–50cm length of buttonhole twist or strong thread. Wax it with beeswax. Anchor the thread inside the fabric layers at one end. Bring the needle up through the fabric from the wrong side, very close to the cut edge — about 2mm away. Loop the thread around the needle before pulling through, creating a knot that locks onto the edge. This is the classic buttonhole stitch (also called blanket stitch when worked at the edge).
Work consistently: same distance from the cut edge, same depth of stitch, same spacing between stitches. The stitches should sit shoulder-to-shoulder with their knot ridges all forming a neat line along the cut edge.
Work the Bar Tacks and Fan Stitch at the Ends
At each end of the buttonhole, instead of a straight bar tack, work a fan or rounded cluster of stitches that radiate around the end. These are called the “round end” or “fan end” and give the buttonhole both strength and a classical tailored appearance. Work 5–7 stitches around the curve of each end, keeping them evenly spaced.
Alternatively, work a straight bar tack at each end by laying 3–4 straight threads across the width and covering them with closely-spaced blanket stitches — the same knot-ridge technique used along the sides.
Finish and Press
Fasten off the thread securely by weaving it back through the stitches on the wrong side for at least 2cm before clipping. Remove the basting stitches. Cover the finished buttonhole with a damp pressing cloth and press firmly with a hot iron — this is called “setting” the stitches and it beds them into the fabric beautifully, creating a smooth, professional surface.
✅ Hand Buttonhole Pros
- Superior durability — outlasts machine buttonholes
- No special equipment needed beyond needle and thread
- Beautiful on fine fabrics like silk, wool, and linen
- Completely customizable in size and density
- A true hand-craft skill that improves with practice
❌ Hand Buttonhole Cons
- Time-intensive: 20–40 minutes per buttonhole
- Requires consistent technique to look even
- Strong thread (buttonhole twist) costs more than regular thread
- Not ideal for thick or heavily woven fabrics

Gutermann Hand Quilting & Buttonhole Thread
Strong, waxed thread ideal for hand-sewn buttonholes. Resists tangling and knotting during long stitching sessions.
View on Amazon →Method 4
The Keyhole Buttonhole Variation
The keyhole buttonhole is a variation used primarily on tailored jackets, coats, and trousers. Unlike the standard rectangular buttonhole, the keyhole has a circular or teardrop-shaped hole at one end that accommodates a shank button, reducing wear and allowing the button to sit more naturally on the fabric.
You can create this variation using either the hand-sewn technique described in Method 3, or by using your machine’s zigzag function from Method 1 with a modified end treatment.
Creating the Keyhole Opening
Mark the buttonhole as normal. At the end of the buttonhole nearest the garment edge, use a small awl or stiletto tool to punch a circular hole about 3–4mm in diameter. A leather hole punch at its smallest setting also works perfectly for this. Then cut the straight slit from the circular hole toward the other end.
Finishing the Keyhole
Work the buttonhole stitch around the entire perimeter — down one long side, around the circular end (spacing stitches slightly wider to accommodate the curve), up the other long side, and across the top bar tack. The round end can be worked with fan stitches radiating outward from the center of the circle.
Method 5
The Bound Buttonhole: A Fabric-Covered Luxury
Bound buttonholes are the most sophisticated variation — instead of thread stitching around the opening, small strips of matching fabric are folded and applied to frame the buttonhole, creating a neat window-like finish. They’re common on tailored coats, luxury blazers, and structured handbags. They require no specialized foot and no special machine capability — just a ruler, your regular presser foot, and patience.
Cut the Fabric Lips
For each buttonhole, cut two strips of fabric (called “lips” or “welts”) on the bias or straight grain. Each strip should be: length = buttonhole length + 20mm, width = approximately 40mm. These will be folded to create two narrow fabric welts that frame the opening. Press each strip in half lengthwise, wrong sides together.
Baste Lips to the Right Side of the Garment
Place both folded lip strips on the right side of the garment, raw edges meeting at the center line of the marked buttonhole. The folded edges face outward. Baste or pin each strip securely in position, then machine-stitch each one 3–4mm from the center line — one above, one below. Both stitch lines should be exactly the same length as your buttonhole.
Cut Through All Layers and Turn
From the wrong side of the fabric, carefully cut along the center line between the two rows of stitching, stopping 6–8mm from each end and then cutting diagonally into the corners (a “Y” cut or “V” cut at the ends). This creates small triangular flaps at each end. Pull the two fabric lips through to the wrong side through the opening. Press firmly so the lips form a neat rectangular window from the right side, each lip forming exactly half the opening.
Secure the Triangle Ends and Finish
Fold back the garment fabric at each end to reveal the small triangular flaps. Stitch across each triangle, catching all the fabric layers — this secures the ends of the bound buttonhole and prevents it from pulling open. From the right side, slip-stitch the facing closed behind the buttonhole once the garment facing is applied. Press thoroughly with a pressing cloth.

Clover Seam Ripper Deluxe & Stiletto Set
Sharp seam rippers and a precision stiletto for opening bound buttonholes cleanly. An essential toolkit for any buttonhole method.
View on Amazon →Sizing Your Buttonhole Correctly Every Time
Regardless of method, getting the size right is the single most important factor. A buttonhole that’s too small is frustrating to use; one that’s too large looks sloppy and causes the garment to gap.
The Universal Formula
Buttonhole length = button diameter + button thickness + 3mm ease
For flat buttons: diameter + 3mm. For thick or dome buttons: measure the button standing on its edge and use that measurement plus 2mm. For toggle and unusual buttons: wrap a strip of paper around the widest circumference, fold it in half, and use that as your template.
| Button Size | Button Diameter | Buttonhole Length | Typical Garment Use |
|---|---|---|---|
| 14L | 9mm | 12mm | Fine blouses, lingerie |
| 18L | 11.5mm | 14–15mm | Dress shirts, children’s wear |
| 22L | 14mm | 17mm | Casual shirts, light jackets |
| 28L | 18mm | 21mm | Skirts, trousers, dresses |
| 36L | 23mm | 26mm | Coats, jackets, bags |
| 45L | 28.5mm | 32mm | Outerwear, decorative buttons |
Buttonhole Placement Guidelines
- Center front placement: The center of the buttonhole sits directly on the center front line. The button, when fastened, pulls the two halves into alignment.
- Distance from edge: Horizontal buttonholes — the inner end sits 3mm past the center front line toward the edge. Vertical buttonholes — center directly on the center front line.
- Spacing between buttonholes: Typically equal to the width of the fabric between buttonhole rows. For fitted garments, closer spacing (4–5cm) at stress points (bust, waist).
- The bust button rule: Always place a buttonhole directly at the fullest part of the bust — this prevents gaping at that point.
Interfacing & Stabilizing: The Step You Can’t Skip
If you’ve ever had a buttonhole pucker, spread at the edges, or look distorted after washing, missing or wrong interfacing is almost always the cause. Every buttonhole — regardless of method — benefits from having interfacing applied behind it. For some fabrics, additional stabilization is required.
Interfacing by Fabric Type
| Fabric Type | Interfacing Weight | Application Method | Additional Stabilizer? |
|---|---|---|---|
| Cotton shirting, quilting cotton | Lightweight woven or non-woven | Iron-on fusible | No |
| Denim, canvas, heavy cotton | Medium weight woven | Sew-in or fusible | No |
| Silk, chiffon, voile | Ultra-lightweight silk organza | Sew-in (never iron-on) | Yes — tearaway under the stitch area |
| Stretch knit, jersey | Knit interfacing or tricot | Iron-on fusible | Yes — water-soluble stabilizer on top |
| Wool suiting, coating | Tailor’s canvas or medium sew-in | Sew-in | No |
| Leather, vinyl, faux suede | No interfacing required | N/A | Yes — tissue paper underneath while stitching |
Pressing Is Non-Negotiable
Press your interfacing with a hot iron (appropriate for the fabric) before marking. Press after marking. Press after stitching. Press after cutting open. And press one final time after finishing. Pressing at every stage sets the work and catches any puckering before it becomes permanent. A good iron is one of the most overlooked tools in a sewer’s kit — our guide to the best steam irons for sewing and quilting covers your options in detail.
Common Buttonhole Mistakes and How to Fix Them
Even experienced sewers run into buttonhole problems. Here are the most frequent issues — and exactly how to solve them.
Problem: Uneven Column Width
Cause: Inconsistent presser foot positioning or uneven hand pressure on the fabric while stitching. Fix: Use a piece of tape on your machine’s throat plate as a guide mark. Sew at the slowest possible speed. If using Method 1 (zigzag), never push or pull the fabric — let the feed dogs do the work. Our resource on sewing machine features can help you understand how your machine’s tension and speed controls work together.
Problem: Buttonhole Puckers or Tunnels
Cause: Stitch density too high for the fabric weight, tension too tight, or missing stabilizer on fine fabrics. Fix: Reduce stitch density (increase stitch length slightly from 0.4mm to 0.6mm), lower needle tension by 0.5–1 step, and add a tearaway stabilizer. Test on three or four scrap pieces first.
Problem: Fraying at the Cut Edges
Cause: Scissors too dull, cutting through the stitching at the bar tacks, or no seam sealant on fraying fabrics. Fix: Use a dedicated buttonhole cutter on a wooden block — it produces the cleanest cut. If seam sealant isn’t available, a tiny amount of clear nail polish applied along the cut edge and allowed to dry fully will prevent fraying on most fabrics.
Problem: Machine Skipping Stitches During Buttonhole
Cause: Wrong needle type or size for the fabric, needle is dull, or the machine needs cleaning. Skipped stitches are a common symptom of several machine issues — our guide to why is my sewing machine not sewing covers the full range of diagnostic steps. Fix: Change to a fresh needle. On knit fabrics, use a ball-point or stretch needle. On leather, use a leather needle. Make sure the needle is properly seated all the way up into the needle bar clamp.
Problem: Buttonhole Is Slightly Too Small or Too Large
Cause: Incorrect measurement formula or cutting too conservatively (or aggressively). Fix: There is no fix for a completed buttonhole that’s wrong — always make a full test buttonhole on scrap fabric cut from the same piece and washed the same way before touching the garment. If slightly too small, re-cut the opening 1–2mm further toward each bar tack with sharp scissors, being extremely careful not to cut the stitching itself.
Problem: Buttonhole Looks Flat and Unfinished After Sewing
Cause: Insufficient pressing. Fix: Cover the buttonhole with a barely damp pressing cloth and hold a hot iron on it for 15–20 seconds. For stubborn puckering, use a point presser or seam roll underneath to prevent the iron from flattening surrounding fabric. The difference a thorough press makes is remarkable.

Pellon 906F Fusible Sheerweight Interfacing
The go-to interfacing for buttonholes on light to medium weight fabrics. Prevents puckering, stabilizes the stitch area, and irons on easily.
View on Amazon →Method Comparison: Which Technique Is Right for You?
Use this table to quickly identify which buttonhole method suits your fabric, project, and skill level. All methods work without a buttonhole foot.
| Method | Equipment | Time Per BH | Best Fabric | Skill Level | Durability | Visual Quality |
|---|---|---|---|---|---|---|
| Zigzag Machine | Machine + zigzag foot | 5–10 min | Wovens, stable knits | Beginner+ | High | Good |
| Straight Stitch | Machine + straight foot | 8–12 min | Heavy wovens, canvas | Beginner | Medium | Minimal |
| Hand-Sewn | Needle + thread only | 20–40 min | Fine fabrics, wool, silk | Intermediate | Excellent | Excellent |
| Keyhole | Needle/machine + awl | 25–45 min | Tailoring weight | Intermediate | Excellent | Excellent |
| Bound | Machine + presser foot | 30–60 min | Medium–heavy wovens | Advanced | Excellent | Superior |
By Garment Type: Quick Recommendations
| Garment | Recommended Method | Why |
|---|---|---|
| Cotton dress shirt | Zigzag Machine (Method 1) | Fast, clean, appropriate finish for the garment type |
| Linen summer blouse | Hand-Sewn (Method 3) | Linen accepts hand stitching beautifully; pressed result is elegant |
| Denim jacket | Zigzag Machine or Straight Stitch | Heavy fabric suits dense machine stitching; interface with medium fusible |
| Tailored wool coat | Hand-Sewn Keyhole (Method 4) | Couture finish appropriate to the garment investment |
| Structured handbag | Bound (Method 5) | Leather or matching fabric lips are functional and beautiful |
| Children’s cotton play clothes | Zigzag Machine | Durable, quick, and appropriate for garments that see hard use |
| Silk evening dress | Hand-Sewn (Method 3) | Only hand stitching belongs on fine silk; use silk buttonhole twist |
Advanced Tips for Flawless Buttonholes Without Specialized Equipment
Beyond method selection and proper sizing, there’s a deeper layer of technique knowledge that separates good buttonholes from truly excellent ones. These are the details that professional tailors don’t always share in beginner resources.
The “Practice First” Rule Is Non-Negotiable
Every single time you make a new garment or encounter a new fabric, make at least three full test buttonholes on a fabric sandwich that mirrors the garment exactly: same outer fabric, same interfacing, same number of layers. Never make your first buttonhole on the garment itself. This seems obvious in writing, but countless sewers skip this step under time pressure — and regret it.
Grain Line Matters More Than People Think
Horizontal buttonholes (used on fitted garments, trousers, and jackets) are cut on the lengthwise grain, perpendicular to the center front line. Vertical buttonholes run parallel to the center front. Getting this right affects not just appearance but function: a buttonhole cut against the grain frays more easily and loses its shape faster with wear.
Thread Color and Weight
For zigzag machine buttonholes, use regular sewing thread in a color that matches the garment — slightly darker reads better than slightly lighter. For hand-sewn buttonholes, buttonhole twist (a thicker, tightly twisted thread) produces a more prominent, professional ridge than regular thread. On dark wool, try silk buttonhole twist in a matching dark color for an almost invisible, luxurious result.
The Soap Trick for Hand Buttonholes
Before beginning a hand buttonhole, rub the cut edges of the opening very lightly with a hard bar of plain white soap (not heavily scented or glycerin-based). This lubricates the fabric fibers slightly, making them less prone to fraying as you work the stitches around the edge. It washes out completely in the first laundering.
Corded Buttonholes for Extra Strength
Both hand and machine buttonholes can be “corded” — a length of thread or thin pearl cotton is laid along the stitching line before you begin, and your stitches are worked over it. The cord creates a raised ridge that holds its shape better, resists distortion over time, and looks more polished. Corded buttonholes are a couture technique that costs nothing extra and makes a significant difference to the finished appearance.
For the zigzag method: loop a length of thread around a pin at one end of the buttonhole, then position it so it runs along the column stitch lines. Your zigzag stitches will sew over it. When done, pull the cord taut to take up any slack, then cut and bury the ends.
When Your Machine Is Part of the Problem
Sometimes the difficulty with machine buttonholes isn’t technique — it’s the machine itself. If you’re consistently getting uneven results on the zigzag method despite correct settings, there may be an underlying mechanical issue worth investigating.
Common machine problems that affect buttonhole quality include: feed dog irregularity (fabric not moving evenly through the machine), tension imbalance between the upper and bobbin thread, or a worn presser foot bar that doesn’t maintain consistent pressure. If you’re experiencing persistent problems, our comprehensive sewing machine troubleshooting guide walks through diagnostic steps in detail. For those considering an upgrade, the best sewing machines for intermediate sewers guide highlights models with particularly reliable zigzag capabilities.
Cleaning and Maintenance
Lint buildup in the bobbin area and around the feed dogs affects stitch consistency more than most sewers realize. For machines that jam frequently during detailed work like buttonholes, cleaning out the bobbin compartment before starting a precision sewing session — and changing the needle — solves the problem remarkably often. A clean, well-maintained machine is the foundation of every good result.
Frequently Asked Questions
You Don’t Need a Buttonhole Foot — You Need Confidence
The buttonhole foot is a time-saving convenience, not a prerequisite for quality work. With the methods covered in this guide — zigzag machine stitching, straight stitch reinforcement, hand buttonhole technique, keyhole variations, and bound buttonholes — you have a complete toolkit that covers every fabric type, every garment category, and every skill level.
The key is practice, preparation, and pressing. Make test buttonholes. Interface every single one. Press at every stage. And don’t rush the bar tacks — they’re what hold everything together under real-world stress.
Whether you’re finishing a linen shirt with hand-worked buttonholes or quickly getting through twelve buttonholes on a cotton blouse with your zigzag foot, the techniques in this guide will serve you well across an entire sewing lifetime.
Explore Our Sewing Machine Buying Guide →