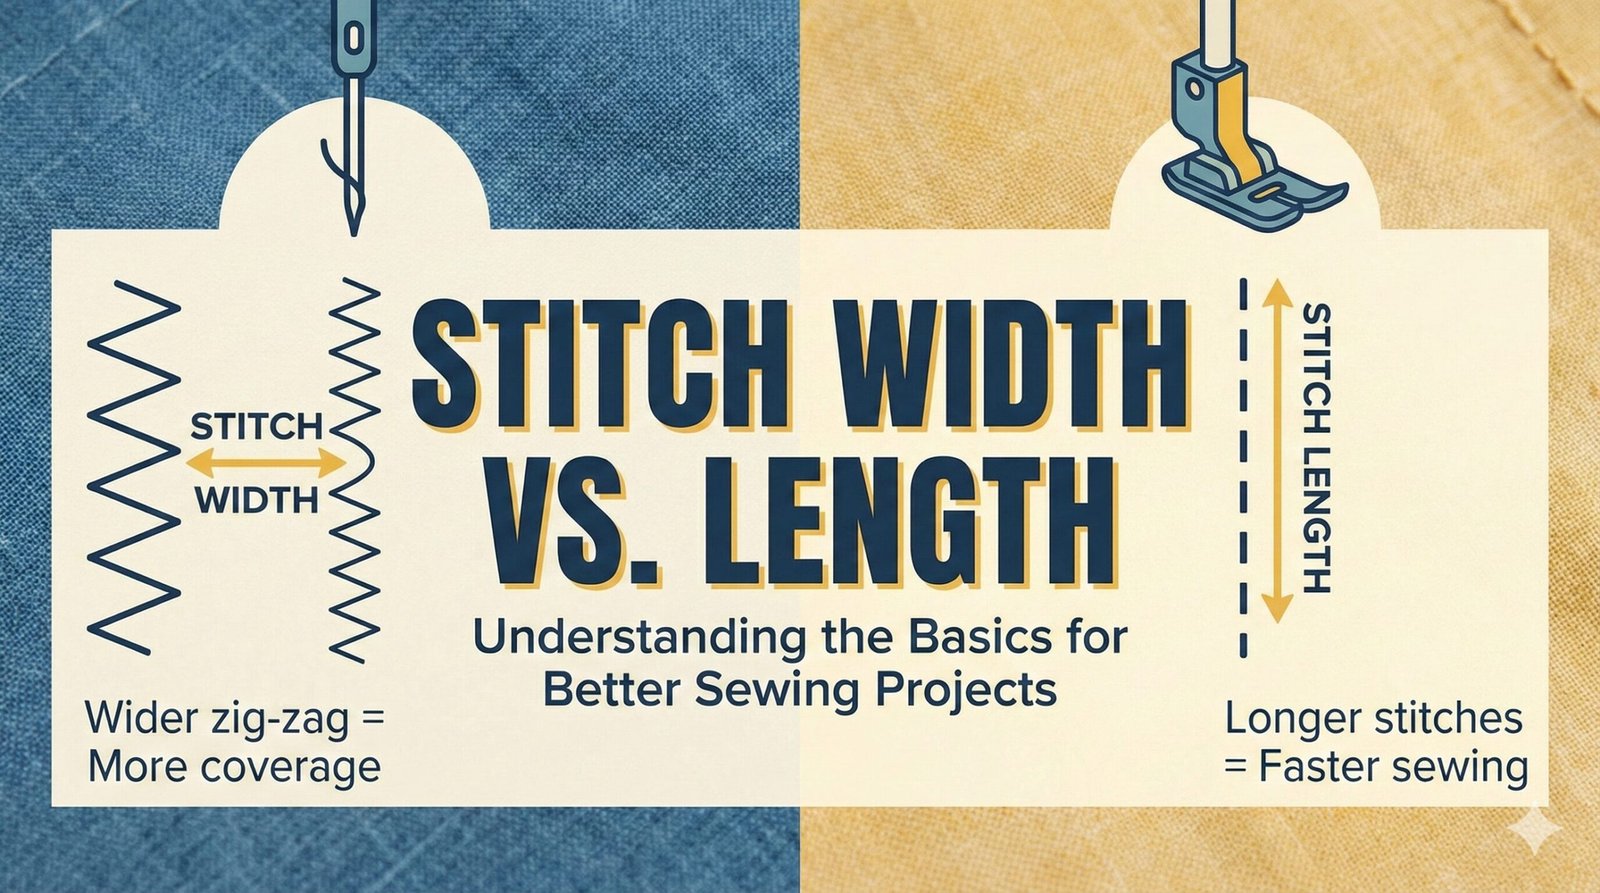
Stitch Width vs. Length: The Complete Guide to Machine Settings
You sit down at your sewing machine, ready to start a new project. You thread the needle, place your fabric under the presser foot, and then you pause. There are two dials (or buttons) staring back at you: Stitch Width and Stitch Length.
Leaving these on the “default” settings works for 80% of projects, but mastering them is what separates a “homemade” look from a professional finish. Understanding the X and Y axis of your needle allows you to sew stretch knits without popping seams, create beautiful satin stitches, and baste fabrics in seconds.
The Core Difference
Stitch Length controls how much fabric the feed dogs pull through after each stitch (the Forward/Backward motion). Longer length = faster sewing, weaker seams.
Stitch Width controls the side-to-side movement of the needle (the Left/Right motion). This creates zig-zags and decorative patterns. A straight stitch has a width of 0.
Back to Basics
Sewing Machine Features Explained: Dials, Levers, and Knobs
→
1. Stitch Length: The “Feed” Setting
Stitch length is measured in millimeters (mm) on modern machines, or Stitches Per Inch (SPI) on vintage models. It determines the physical distance the needle travels forward.
Think of stitch length as the Resolution of your seam. High resolution (short stitches) is strong and tight. Low resolution (long stitches) is loose and temporary.
Short Length (1mm)
——-
Tight, difficult to rip. Used for curves and reinforcement.
Standard Length (2.5mm)
– – – –
The universal setting for construction seams.
Long Length (4-5mm)
_ _ _
Basting/Gathering. Easy to remove.
When to Adjust Stitch Length
| Setting (mm) |
Best Use Case |
Fabric Type |
| 0.5 – 1.0 |
Reinforcing, Buttonholes, Satin Stitch |
Any (High Stress Areas) |
| 2.0 – 2.5 |
Standard Seams, Piecing |
Cotton, Linen, Poly |
| 3.0 – 3.5 |
Topstitching, Heavy Fabrics |
Denim, Canvas, Leather |
| 4.0 – 5.0 |
Basting, Gathering, Ruffling |
Muslin, Tulle |
Pro Tip: Leather & Vinyl
Never use a short stitch length on leather or vinyl. The needle creates permanent holes. If the stitches are too close together, you are essentially creating a “perforated tear line” (like a stamp), and the leather will rip right along the seam.
Practice Time
Best Sewing Patterns to Test Your Stitch Settings
→
2. Stitch Width: The “Swing” Setting
Stitch width controls the lateral movement of the needle bar. If you are sewing a straight stitch, your width should be set to 0. As you increase the number (usually 0mm to 7mm), the needle swings further to the left and right.
The Straight Stitch Trap
On computerized machines, changing the “Width” while on a straight stitch setting moves the Needle Position.
- Center Needle Position: The standard for most sewing.
- Left/Right Needle Position: Used to get closer to zippers or piping without changing the foot.
Troubleshooting
Breaking Needles? You Might Be Hitting the Presser Foot
→
The Zig-Zag and Decorative Stitches
Width is crucial for the Zig-Zag stitch.
- Narrow Width (0.5mm – 2mm): Creates a subtle stretch stitch for knits.
- Wide Width (4mm – 7mm): Used for overcasting edges (finishing seams) or decorative applique.
Dritz Sewing Gauge with Sliding Marker
While your machine has settings, verifying the actual stitch length on the fabric is key. Use this gauge to measure your Stitches Per Inch (SPI) to ensure your machine is calibrated correctly.
Check Price on Amazon
3. The Relationship: How They Work Together
The magic happens when you manipulate both settings simultaneously. This is how you create the Satin Stitch.
By setting the Width to Max (5-7mm) and the Length to Min (0.2-0.5mm), the machine swings wide but barely moves forward. The threads stack right next to each other, creating a solid bar of color. This is used for buttonholes and applique edges.
Common Troubleshooting Issues
1. Fabric Bunching (Tunneling):
If your Zig-Zag is too wide and the fabric is too thin, the fabric will tunnel under the stitch.
Fix: Reduce the Width or use a stabilizer.
2. Thread Nesting:
If the stitch length is too short (near 0), the fabric won’t move, and the thread will pile up into a bird’s nest.
Fix: Increase the Length to at least 0.5mm.
Fix It Guide
Why Is My Sewing Machine Jamming? (Tension vs. Stitch Settings)
→
4. Adjusting for Fabric Types
Different fabrics behave differently under the needle. You must test your settings on a scrap piece of the exact fabric you plan to use.
For Quilting
Quilters typically use a slightly shorter stitch length (2.0mm) for piecing to prevent the batting from poking through the seams.
Quilting 101
Beginner’s Guide to Rotary Cutting for Perfect Piecing
→
For Knits (Stretchy Fabrics)
If you pull a seam sewn with a straight stitch on a t-shirt, it will pop. You need to introduce Width. A “Lightning Bolt” stitch (Narrow Width, Standard Length) allows the thread to zigzag slightly, giving the seam elasticity so it stretches with the fabric.
Schmetz Universal Machine Needles (Assorted)
Changing your stitch settings won’t help if your needle is dull or the wrong type. If you are changing widths frequently, ensure you aren’t using a straight-stitch plate, or you will shatter these needles instantly.
Check Price on Amazon
5. The Third Dimension: Stitch Tension Relationship
While width and length control the stitch’s horizontal and vertical dimensions, tension is the crucial third dimension that determines stitch quality. Understanding how tension interacts with width and length settings is essential for professional results.
⚠️ Critical Insight: Incorrect tension can ruin even perfect width/length settings. Too tight tension with wide stitches causes fabric puckering. Too loose tension with short stitches causes looping and weak seams.
Tension Fundamentals
1
Upper Tension
Controls thread coming from spool. Higher numbers = tighter tension. Ideal range: 4-5 for most fabrics.
2
Bobbin Tension
Controls thread from bobbin. Usually factory-set. Adjust only if upper tension adjustments fail.
3
Balanced Tension
Perfect when threads meet in fabric middle. Visible as equal tension on both sides of fabric.
Tension Interaction Matrix
| Stitch Type |
Recommended Tension |
Width Setting |
Length Setting |
Adjustment Notes |
| Straight Stitch |
4.0 |
0mm |
2.5mm |
Standard balanced tension |
| Zig-Zag (Narrow) |
3.5 |
1.5mm |
2.0mm |
Reduce tension slightly for flexibility |
| Satin Stitch |
2.5-3.0 |
5.0mm |
0.3mm |
Lower tension prevents puckering |
| Decorative |
3.0-4.0 |
Varies |
1.5-2.5mm |
Test on scrap fabric first |
| Overlock (Mock) |
3.0 |
3.5mm |
2.0mm |
Use walking foot for even feed |
6. Decorative Stitch Programming and Customization
Modern computerized sewing machines offer hundreds of decorative stitches. Understanding how to program and customize these stitches involves mastering width, length, and tension in combination.
1
Stitch Memory Programming
Most computerized machines allow saving custom stitch combinations. Save your perfect satin stitch settings for future use.
2
Mirror and Reverse Functions
Create symmetrical designs by mirroring stitches. Essential for decorative borders and embroidery.
3
Stitch Combining
Chain multiple decorative stitches into custom patterns. Requires precise width/length matching at transitions.
Popular Decorative Stitch Applications
| Stitch Pattern |
Recommended Width |
Recommended Length |
Best Uses |
Special Requirements |
| Feather Stitch |
3.5-4.5mm |
2.0-2.5mm |
Crazy quilting, decorative seams |
Stabilizer recommended |
| Scallop Stitch |
5.0-6.0mm |
1.5-2.0mm |
Edge finishing, appliqué |
Use edge guide foot |
| Greek Key |
4.0-5.0mm |
2.0-2.5mm |
Borders, decorative bands |
Practice alignment first |
| Heart Pattern |
3.0-4.0mm |
2.5-3.0mm |
Children’s clothing, gifts |
Slower sewing speed |
| Leaf/Vine |
4.0-6.0mm |
2.0-3.0mm |
Botanical themes, curtains |
Free-motion capability helpful |
7. Serger Stitch Settings: Differential Feed and Width
Sergers (overlock machines) have fundamentally different stitch width and length considerations. Understanding these differences is crucial for professional garment construction.
📐 Serger vs. Regular Machine Key Differences:
- Sergers use 2-5 threads simultaneously
- Stitch width controlled by needle position and stitch finger
- Stitch length affects both straight and overlock stitches
- Differential feed controls fabric stretch/compression
- Cutting width determines seam allowance automatically
Serger Stitch Width Settings
| Serger Stitch Type |
Needle Positions |
Stitch Finger Width |
Cutting Width |
Best Applications |
| 3-Thread Overlock |
Right needle only |
2.5-5.0mm |
1/4″ (6mm) |
Lightweight fabrics, sheer materials |
| 4-Thread Safety Stitch |
Both needles |
3.0-5.0mm |
1/4″ (6mm) |
Woven garments, medium weight fabrics |
| 2-Thread Flatlock |
Left needle only |
2.0-4.0mm |
1/4″ (6mm) |
Decorative seams, activewear |
| Rolled Hem |
Right needle only |
1.0-2.0mm |
1/8″ (3mm) |
Hems on sheer fabrics, napkins |
| Coverstitch |
2-3 needles |
4.0-7.0mm |
N/A (no cutting) |
Professional hems on knits |
Differential Feed Settings
DF < 1
Stretching Mode
Lower feed dogs move faster than upper. Use for: easing sleeves, preventing puckering on knits, gathering lightweight fabrics.
DF = 1
Neutral Mode
Both feed dogs move at same speed. Use for: standard seams, most woven fabrics, balanced construction.
DF > 1
Compression Mode
Upper feed dogs move faster than lower. Use for: preventing wavy seams on knits, sewing slippery fabrics, stabilizing stretchy materials.
8. Embroidery Machine Stitch Settings
Embroidery machines have specialized stitch width and length considerations that differ dramatically from regular sewing. Understanding these settings is essential for perfect embroidery results.
⚠️ Embroidery Specifics: Embroidery stitch width is typically fixed by design file. Length is controlled by stitch density. Manual adjustments can ruin designs and break needles.
Embroidery Stitch Density Settings
| Fabric Type |
Recommended Density |
Stitch Length (Avg) |
Underlay Type |
Stabilizer Required |
| Lightweight Cotton |
0.35-0.40mm |
2.5-3.0mm |
Edge Run + Center Walk |
1-2 layers cutaway |
| Heavy Denim |
0.45-0.50mm |
2.8-3.2mm |
Zig-Zag Underlay |
1 layer tearaway |
| Stretch Knits |
0.30-0.35mm |
2.2-2.7mm |
Double Zig-Zag |
2-3 layers cutaway |
| Towels/Terry |
0.40-0.45mm |
3.0-3.5mm |
Tatami Underlay |
2 layers water-soluble |
| Leather/Vinyl |
0.50-0.60mm |
3.5-4.0mm |
No Underlay |
No stabilizer (self-supporting) |
Hoop Size and Stitch Settings Relationship
S
Small Hoop (4″x4″)
Max Stitch Count: 20,000 stitches
Best For: Monograms, small logos
Settings: Higher density (0.35mm+)
M
Medium Hoop (5″x7″)
Max Stitch Count: 50,000 stitches
Best For: Most commercial designs
Settings: Standard density (0.30-0.40mm)
L
Large Hoop (8″x12″)
Max Stitch Count: 100,000+ stitches
Best For: Complex designs, quilts
Settings: Lower density (0.25-0.35mm)
9. Industrial vs. Home Machine Stitch Settings
Industrial sewing machines operate on different principles than home machines, with stitch width and length settings that reflect their specialized purposes and higher speeds.
🏭 Industrial Machine Characteristics:
- Higher maximum speed (3,000-5,000 SPM vs. 800-1,500 SPM)
- Heavier construction for continuous operation
- Specialized stitch types (compound feed, walking foot)
- Direct drive vs. belt drive systems
- Different measurement systems (SPI vs. mm)
Industrial Stitch Setting Comparisons
| Machine Type |
Max Stitch Length |
Max Stitch Width |
Stitches Per Minute |
Common Applications |
| Single Needle Lockstitch |
5.0mm |
0mm (straight only) |
3,000-4,500 |
General garment construction |
| Overlock (Industrial) |
4.0mm |
2.0-8.0mm |
6,000-8,000 |
Seam finishing, knit garments |
| Coverstitch (Industrial) |
3.5mm |
3.0-10.0mm |
4,000-6,000 |
T-shirt hems, knitwear |
| Buttonhole Machine |
0.2-2.0mm |
1.0-5.0mm |
2,000-3,000 |
Uniform buttonhole production |
| Bartack Machine |
0.5-3.0mm |
1.0-8.0mm |
2,500-3,500 |
Reinforcement stitching |
10. Thread Weight and Stitch Appearance
Thread weight dramatically affects how stitch width and length appear on fabric. Understanding this relationship helps achieve professional results across different projects.
Thread Weight Classification System
40
All-Purpose Weight
Thickness: Medium
Best Stitch Length: 2.0-3.0mm
Width Adjustment: Standard settings work well
50
Fine/Embroidery Weight
Thickness: Thin
Best Stitch Length: 1.5-2.5mm
Width Adjustment: Reduce width 10-20%
30
Heavy/Decorative Weight
Thickness: Thick
Best Stitch Length: 3.0-4.0mm
Width Adjustment: Increase width 10-20%
Thread/Needle/Stitch Compatibility Matrix
| Thread Weight |
Needle Size |
Optimal Length |
Width Adjustment |
Best Applications |
| 60 wt (Extra Fine) |
60/8 – 70/10 |
1.0-2.0mm |
-30% from standard |
Micro-quilting, fine details |
| 50 wt (Fine) |
70/10 – 80/12 |
1.5-2.5mm |
-15% from standard |
General sewing, piecing |
| 40 wt (Standard) |
80/12 – 90/14 |
2.0-3.0mm |
No adjustment needed |
Construction seams, topstitching |
| 30 wt (Heavy) |
90/14 – 100/16 |
2.5-3.5mm |
+15% from standard |
Decorative topstitching |
| 20 wt (Extra Heavy) |
100/16 – 110/18 |
3.0-4.0mm |
+25% from standard |
Visible decorative work |
11. Comprehensive Fabric-Specific Stitch Charts
Different fabrics require specific stitch width and length combinations. This comprehensive guide covers all common fabric types with tested settings.
⚠️ Universal Rule: Always test on fabric scraps first! Humidity, thread type, and needle condition can affect optimal settings.
Woven Fabric Stitch Settings
| Fabric Type |
Stitch Length |
Stitch Width |
Needle Type |
Special Notes |
| Batiste/Voile |
1.5-2.0mm |
0mm (straight) |
Microtex 70/10 |
Use tissue paper under seams |
| Cotton Quilting |
2.0-2.2mm |
0mm |
Universal 80/12 |
Shorter for piecing accuracy |
| Linen |
2.5-3.0mm |
0mm |
Universal 90/14 |
Longer stitches prevent puckering |
| Silk Charmeuse |
2.0-2.5mm |
0mm |
Microtex 70/10 |
Use silk thread, fine needle |
| Wool Suiting |
3.0-3.5mm |
0mm |
Universal 90/14 |
Longer stitches for drape |
| Denim (10-14oz) |
3.0-3.5mm |
0mm |
Denim 100/16 |
Heavy thread recommended |
| Canvas/Duck |
3.5-4.0mm |
0mm |
Denim 110/18 |
Use walking foot |
Knit Fabric Stitch Settings
| Fabric Type |
Stitch Type |
Stitch Length |
Stitch Width |
Special Notes |
| Jersey (Light) |
Narrow Zig-Zag |
2.0-2.5mm |
1.0-1.5mm |
Ball point needle 75/11 |
| Interlock |
Lightning Stitch |
2.5-3.0mm |
0.5-1.0mm |
Stretchy stitch preferred |
| French Terry |
Overlock or Zig-Zag |
2.5-3.0mm |
2.0-3.0mm |
Walking foot essential |
| Rib Knit |
Triple Stretch |
2.0-2.5mm |
1.5-2.0mm |
Test recovery on scrap |
| Swimwear/Lycra |
Zig-Zag or Overlock |
2.0-2.5mm |
1.5-2.5mm |
Use polyester thread only |
| Fleece |
Straight or Zig-Zag |
3.0-3.5mm |
0-2.0mm |
Reduce presser foot pressure |
12. Stitch Troubleshooting Matrix
This comprehensive troubleshooting guide helps diagnose and fix stitch quality issues by examining width, length, and tension interactions.
| Problem |
Likely Width Issue |
Likely Length Issue |
Likely Tension Issue |
Solution |
| Fabric Puckering |
Too wide for fabric weight |
Too short for fabric type |
Too tight |
Reduce width, increase length, loosen tension |
| Thread Looping/Birdnests |
N/A |
Too short (fabric not advancing) |
Too loose (upper) |
Increase length, tighten upper tension |
| Thread Breaking |
Too wide for needle size |
N/A |
Too tight |
Reduce width, loosen tension, larger needle |
| Skipped Stitches |
Inconsistent width timing |
Too long for needle penetration |
N/A |
Check timing, reduce length, new needle |
| Uneven Stitch Appearance |
Width inconsistent |
Length inconsistent |
Uneven tension |
Clean feed dogs, check timing, re-thread |
| Fabric Not Feeding |
N/A |
Too short (0mm setting) |
Presser foot pressure too high |
Increase length, reduce presser foot pressure |
| Needle Breaking |
Too wide for straight stitch plate |
N/A |
N/A |
Use zig-zag plate, reduce width |
13. Historical Evolution of Stitch Settings
Understanding how stitch width and length controls have evolved provides context for modern machine capabilities and helps when working with vintage equipment.
1800s
Early Machines
Length: Fixed (2.5mm)
Width: None (straight only)
Control: Manual wheel adjustment
Examples: Singer 12, Wheeler & Wilson
1930s-50s
Zig-Zag Introduction
Length: Adjustable dial
Width: Limited (0-4mm)
Control: Mechanical cams
Examples: Singer 15-91, Bernina 530
1970s-80s
Electronic Controls
Length: Digital readout
Width: 0-7mm typical
Control: Electronic, some memory
Examples: Singer Athena 2000, Bernina 830
1990s-Now
Computerized Era
Length: 0.1-9.0mm precision
Width: 0-9mm typical
Control: Touchscreen, memory, USB
Examples: Brother Innov-is, Bernina 8 Series
14. Professional Finishing Techniques
Professional sewists use specific width and length combinations to achieve couture-level finishes. These techniques elevate homemade garments to professional quality.
Couture Stitch Applications
| Technique |
Stitch Type |
Length |
Width |
Professional Purpose |
| Understitching |
Straight |
3.0-3.5mm |
0mm |
Keeps facings from rolling to right side |
| Staystitching |
Straight |
2.0-2.5mm |
0mm |
Prevents stretching on bias edges |
| Easing |
Long Basting |
4.0-5.0mm |
0mm |
Evenly distributes fullness without gathers |
| Grading Seams |
Straight |
2.5-3.0mm |
0mm |
Reduces bulk in enclosed seams |
| Hong Kong Finish |
Zig-Zag |
2.5-3.0mm |
3.0-4.0mm |
Professional seam finishing without serger |
| French Seams |
Straight |
1.8-2.2mm |
0mm |
Enclosed seams for delicate fabrics |
| Flat-Felled Seams |
Straight |
3.0-3.5mm |
0mm |
Durable seams for workwear, jeans |
15. Automated Stitch Optimization Systems
Modern sewing machines incorporate automated systems that adjust stitch width and length based on fabric detection, thread type, and sewing speed.
🤖 Smart Stitch Technology Features:
- Fabric Sensors: Detect thickness and adjust settings automatically
- Thread Detection: Adjust tension based on thread weight
- Speed Compensation: Maintain stitch quality at different speeds
- Pattern Recognition: Optimize decorative stitch settings
- Memory Systems: Save custom settings for future use
Smart Machine Comparison
| Machine Model |
Auto-Length Adjustment |
Auto-Width Adjustment |
Fabric Detection |
Memory Capacity |
| Brother Innov-is V5 |
Yes (0.1-9.0mm) |
Yes (0-9mm) |
Basic thickness detection |
50 patterns |
| Bernina 790 Plus |
Yes (0.2-9.0mm) |
Yes (0-9mm) |
Advanced fabric/thread detection |
Unlimited with USB |
| Janome Memory Craft 15000 |
Yes (0.1-7.0mm) |
Yes (0-7mm) |
Thread tension auto-adjust |
100 patterns |
| Pfaff Creative Icon |
Yes (0.1-6.0mm) |
Yes (0-9mm) |
Integrated Dual Feed |
Unlimited with cloud |
16. Stitch Testing Protocols
Professional sewists and manufacturers use standardized testing protocols to determine optimal stitch width and length settings. Implementing these protocols ensures consistent results.
1
Fabric Preparation Test
Cut 6″x6″ squares of your fabric. Test different length/width combinations. Mark settings on each sample. Wash/dry samples to test durability.
2
Tension Balance Test
Sew two layers of different colored fabric. Check if thread colors meet in middle. Adjust tension until balanced on both sides.
3
Stretch Recovery Test
For knits: Sew seam, stretch to garment limits, release. Check if stitches pop or fabric distorts. Adjust width/length until recovery is perfect.
4
Seam Strength Test
Sew two fabric pieces together. Pull apart with measured force. Record stitch length/width that provides maximum strength before breaking.
17. Stitch Strength Engineering Principles
Understanding the engineering principles behind stitch strength helps make informed decisions about width and length settings for different applications.
⚙️ Engineering Factors Affecting Stitch Strength:
- Stitch Density: More stitches per inch = stronger seam (to a point)
- Thread Coverage: Wider stitches distribute stress across more fabric
- Fabric Damage: Too many needle holes weakens fabric structure
- Stress Distribution: Zig-zag stitches distribute stress better than straight
- Elongation Capacity: Stretch stitches must accommodate fabric movement
Strength Optimization Guidelines
| Strength Requirement |
Optimal Length |
Optimal Width |
Thread Type |
Stitch Type |
| Maximum Strength (Heavy Load) |
2.0-2.5mm |
0mm (straight) |
Heavy duty polyester |
Double-stitched seam |
| Flexible Strength (Activewear) |
2.5-3.0mm |
1.5-2.5mm |
Textured polyester |
3-step zig-zag |
| Sheer Fabric Strength |
1.5-2.0mm |
0.5-1.0mm |
Fine polyester |
Narrow zig-zag |
| Decorative Durability |
2.0-2.5mm |
3.0-5.0mm |
Heavy decorative |
Satin or decorative |
| Industrial Grade |
3.0-3.5mm |
Varies by application |
Industrial polyester |
Compound feed lockstitch |
18. Specialty Stitch Applications
Beyond basic seams, specialized stitches require specific width and length combinations for optimal results. Mastering these expands your sewing capabilities dramatically.
Specialty Stitch Guide
| Stitch Type |
Primary Use |
Width Setting |
Length Setting |
Special Requirements |
| Blind Hem Stitch |
Nearly invisible hems |
2.0-3.0mm |
2.5-3.0mm |
Blind hem foot, fold fabric correctly |
| Overlock (Mock) |
Seam finishing without serger |
3.5-4.5mm |
2.0-2.5mm |
Use overlock or zig-zag foot |
| Elastic Stitch |
Applying elastic to casings |
3.0-4.0mm |
2.5-3.0mm |
Stretch while sewing, walking foot |
| Triple Stretch |
Maximum stretch seams |
1.5-2.0mm |
2.0-2.5mm |
Test recovery thoroughly |
| Shell Stitch |
Decorative edge finishing |
4.0-6.0mm |
2.0-2.5mm |
Lightweight fabrics only |
| Smocking Stitch |
Decorative gathering |
3.0-4.0mm |
2.5-3.0mm |
Pre-mark gathering lines |
| Quilting Stitch |
Securing quilt layers |
0mm (straight) |
2.5-3.5mm |
Walking foot, longer length for hand-look |
19. Maintenance and Calibration Affecting Stitch Quality
Even perfect width and length settings won’t produce good stitches if your machine isn’t properly maintained and calibrated. Regular maintenance is essential for consistent results.
⚠️ Maintenance Checklist:
- Clean lint and dust weekly (more with heavy use)
- Oil according to manufacturer schedule
- Check needle plate for burrs monthly
- Verify feed dog alignment annually
- Check timing if stitches consistently skip
- Calibrate computerized settings after major maintenance
Calibration Test Procedure
1
Length Calibration
Set machine to 2.5mm. Sew 10 stitches on marked fabric. Measure total distance. Should be 25mm ± 0.5mm.
2
Width Calibration
Set to 5.0mm zig-zag. Sew 5 stitches. Measure peak-to-peak width. Should be 5.0mm ± 0.3mm.
3
Tension Calibration
Sew two-color test fabric. Adjust until colors meet in middle. Both sides should look identical.
4
Timing Check
Remove needle plate. Rotate hand wheel slowly. Needle should enter hole exactly at bottom position.
20. Professional Workflow Optimization
Professional sewists develop systematic approaches to stitch width and length settings that maximize efficiency and quality in production environments.
Production Sewing Settings Guide
| Production Stage |
Stitch Length |
Stitch Width |
Speed Setting |
Quality Check Points |
| Basting/Temporary |
4.0-5.0mm |
0mm |
Fast |
Easy removal, no fabric damage |
| Construction Seams |
2.5-3.0mm |
0mm |
Medium |
Consistent length, balanced tension |
| Topstitching |
3.0-3.5mm |
0mm |
Slow-Medium |
Straight lines, even spacing |
| Finishing (Zig-Zag) |
2.5-3.0mm |
3.0-4.0mm |
Medium |
Complete edge coverage, no tunneling |
| Buttonholes |
0.3-0.5mm |
4.0-5.0mm |
Slow |
Uniform density, clean cuts |
| Decorative Work |
1.5-2.5mm |
3.0-7.0mm |
Slow |
Pattern alignment, tension balance |
21. Comprehensive FAQ Section
Why does my stitch length change when I sew faster?
This is called “stitch elongation” and occurs when feed dogs can’t keep up with high sewing speeds. Solution: Use shorter stitch length at high speeds, or invest in a machine with better feed mechanism (compound feed, walking foot).
How do I convert stitches per inch (SPI) to millimeters?
Use this formula: mm = 25.4 ÷ SPI. Example: 10 SPI = 25.4 ÷ 10 = 2.54mm. Most vintage machines use SPI, while modern machines use mm. Keep a conversion chart handy.
Can I use decorative stitches for construction seams?
Generally no. Decorative stitches have different strength characteristics and thread consumption. Use them for: topstitching, embellishment, edge finishing. For construction, use straight stitch or appropriate stretch stitch.
Why does my zig-zag stitch look different on the back?
This indicates tension imbalance. On balanced zig-zag, back should show straight stitches with small dots at ends. If you see wide zig-zag on back, upper tension is too loose. If you see very narrow zig-zag, upper tension is too tight.
How often should I recalibrate my stitch settings?
Home users: Every 6 months or 50 sewing hours. Professionals: Monthly or every 20 sewing hours. More frequently if: changing thread types often, sewing heavy materials, or after machine servicing.
What’s the difference between stitch width and needle position?
Stitch width moves needle left-right during sewing. Needle position sets where needle enters fabric (left, center, right) but doesn’t move during straight stitch. On computerized machines, changing width during straight stitch changes needle position.
How does thread weight affect optimal stitch length?
Heavier thread requires longer stitches to prevent bunching. Rule of thumb: Increase stitch length 0.5mm for every 10 weight decrease (e.g., 40wt uses 2.5mm, 30wt uses 3.0mm). Always test on fabric scrap first.
Why do my stitches look perfect on top but messy underneath?
This is classic upper tension too tight or bobbin tension too loose. First re-thread completely. Then adjust upper tension down 0.5 increments. If no improvement, have bobbin tension checked by professional.
22. Future Trends in Stitch Control Technology
The future of stitch width and length control involves increased automation, AI integration, and smart technology that adapts to sewing conditions in real-time.
AI
Artificial Intelligence
Machines that learn your sewing style and automatically adjust settings. Predictive adjustments based on project type and fabric characteristics.
IoT
Internet of Things
Cloud-based stitch libraries. Remote diagnostics and calibration. Automatic updates for new fabrics and techniques.
AR
Augmented Reality
Visual overlay showing stitch placement. Real-time adjustment suggestions. Tutorial integration for complex techniques.
Bio
Biometric Feedback
Pressure-sensitive controls. Speed adaptation based on user comfort. Ergonomic optimization for individual sewists.
Conclusion: Mastering the Art and Science
Stitch Width and Length are the X and Y coordinates of your creativity. Don’t be afraid to turn those dials. Test a 4mm length for a rustic topstitch on denim, or a 1mm width for a subtle stretch seam on jersey.
Once you master these two variables, you master the machine. For more setup tips, check out our guide on Sewing Machine Setup for Beginners.
Final Pro Tip: Create a stitch settings journal. For each project, record: fabric type, thread weight, needle size, stitch width, stitch length, tension settings, and results. This personalized database becomes your most valuable sewing resource.