"All claims, guarantees and product specifications are provided by the manufacturer or vendor. Sewing Bible cannot be held responsible for these claims, guarantees or specifications" (ad) “As An Amazon Associate, I Earn From Qualifying Purchases.” (Paid Link)
Best Sewing Machines for Intermediate Sewers: Expert Reviews & Buying Guide
Complete guide to choosing the perfect intermediate sewing machine. Compare Brother, Singer, Janome models, learn maintenance tips, troubleshooting, and find the best machine for garments, quilting, and DIY projects.
The Complete Guide to Intermediate Sewing Machines:Expert Reviews & Buying Guide
Looking for the perfect sewing machine to take your sewing skills to the next level? As an intermediate sewer, you need a machine that offers more than basic stitches but isn’t overwhelming with professional features. This comprehensive guide compares the top intermediate sewing machines, from Brother and Singer to Janome models, helping you find the ideal machine for garment sewing, quilting, home decor projects, and creative crafts.
Who is an Intermediate Sewer? Understanding Your Skill Level
An intermediate sewer has moved beyond basic straight stitches and simple projects. You’re comfortable with threading, bobbin winding, and basic maintenance. You’re ready to explore decorative stitches, work with different fabrics, tackle zippers and buttonholes, and perhaps venture into quilting or garment construction. This guide is specifically designed for sewers at this exciting stage of their sewing journey, helping you choose a machine that matches your growing skills and project ambitions.
Complete Guide Contents: Your Sewing Machine Resource
What to Look for in an Intermediate Sewing Machine: Ultimate Buying Guide for Serious Sewists
When shopping for a sewing machine as an intermediate sewer, you need a machine that grows with your skills. The right machine should handle your current projects while offering features you’ll grow into. Here’s our comprehensive guide to making the perfect choice, covering everything from stitch types to motor power and accessory compatibility.
Pro Tip: Future-Proof Your Sewing Machine Purchase
Consider not just what you need today, but what you might want to tackle in the next 3-5 years. A slightly more advanced machine than you currently need can save you from needing an upgrade too soon. Think about your sewing goals: Are you interested in garment construction, quilting, home decor, or all of the above? Your machine should support your evolving interests.
Essential Features for Intermediate Sewers: Must-Have Capabilities
Built-in Stitch Variety: Look for a wide range of decorative, utility, and stretch stitches. At minimum, you’ll want 20-30 built-in stitches including several buttonhole styles, stretch stitches for knits, and decorative options for creative projects. Consider stitch quality as important as quantity.
Ease of Use Features: Machines with automatic needle threaders, drop-in bobbins, and LCD displays simplify the sewing process and reduce frustration, letting you focus on creativity rather than setup. One-step buttonhole functions are particularly valuable for garment makers.
Speed Control and Motor Power: Adjustable speed settings help handle different types of projects easily. Look for machines with multiple speed options or even start/stop buttons for when you don’t want to use the foot pedal. A powerful motor (60-100 watts) handles thicker fabrics better.
Included Accessories and Feet: Extra presser feet (zipper foot, buttonhole foot, walking foot, quilting foot), quilting tables, extension tables, and hard cases add tremendous value and expand your machine’s capabilities. Check compatibility with universal feet for future accessory purchases.
Durability & Build Quality: A machine built with strong materials (metal internal frames are ideal) will handle heavier fabrics and longer projects. Check the weight – heavier machines often indicate better build quality and less vibration during operation.
Portability vs. Stability Balance: Lightweight machines (under 15 lbs) are easier to move and store, while heavier ones (over 18 lbs) offer better stability for heavy fabrics and high-speed sewing. Consider your sewing space and whether you need to transport your machine frequently.
Tension Control Systems: Look for easy-to-adjust tension controls, both for upper thread and (if possible) bobbin tension. Some advanced machines offer automatic tension adjustment, which can be helpful when switching between different fabric types frequently.
Presser Feet System Compatibility: A snap-on presser foot system is much easier and faster to use than screw-on feet, especially when changing feet frequently for different techniques. Check if the machine uses common foot types for easier accessory shopping.
Free Arm Capability for Garment Sewing: Essential for sewing sleeves, cuffs, pant legs, and other tubular items. Most machines convert to free arm by removing a storage compartment. Test how easily this conversion works.
Warranty & Support Network: Look for at least a 25-year limited warranty on the machine’s mechanics. Good customer support and availability of replacement parts are crucial for long-term satisfaction. Research repair service availability in your area.
Computerized vs. Mechanical Sewing Machines: Which is Right for Your Sewing Style?
Feature Comparison
Computerized Sewing Machines
Mechanical Sewing Machines
Ease of Use
Easier operation with push-button stitch selection, automatic settings, and digital displays
More hands-on control with manual dials and levers, tactile feedback preferred by some sewists
Precision and Consistency
Higher precision with digital control of stitch length/width, consistent results
Good precision but depends on user adjustment skill and manual settings
Stitch Variety and Options
Typically 50-200+ stitches including complex decorative patterns
Usually 10-30 stitches focusing on essential utility and basic decorative stitches
Durability and Longevity
Electronic components may need service over time, but generally reliable
Often more durable with fewer electronic parts to fail, simpler mechanical design
Price Range for Intermediate Models
$200-$800+ depending on features and brand reputation
$150-$400 offering excellent value for essential features
Learning Curve for Intermediate Users
Easier initially with guided features, more features to explore as skills grow
Steeper initially but simpler overall operation once mastered
Best For Which Sewing Projects
Garment sewing with perfect buttonholes, decorative stitching, quilters who want precision, complex projects
Heavy fabrics, beginners on budget transitioning to intermediate, those who prefer tactile controls, straightforward projects
Understanding Sewing Machine Specifications: What Those Numbers Really Mean
Let’s break down what those technical specifications actually mean for your sewing projects and how they impact performance:
Stitches Per Minute (SPM)750-1000 SPM is ideal for intermediate sewers. Higher speeds are useful for long seams but require more control. Consider variable speed control for precision work.
Stitch Length & Width AdjustmentLook for adjustable stitch length (0-5mm) and width (0-7mm). This flexibility is crucial for different fabrics and techniques like topstitching or decorative work.
Bobbin Type and Loading SystemTop-loading bobbins are easier for beginners and intermediate users. Front-loading often offers better tension control for advanced techniques but can be trickier to thread.
Needle Position OptionsMultiple needle positions (left, center, right) help with zippers, topstitching, and precise seam allowances. Some machines offer up to 7 needle positions.
Presser Foot Pressure AdjustmentAdjustable pressure helps with thick stacks or delicate fabrics. Not all machines offer this feature, but it’s valuable for working with varied materials.
Maximum Stitch Width/Length CapabilityWider stitches (7mm+) are great for decorative work and buttonholes. Longer stitches (5mm+) help with basting and topstitching on heavier fabrics.
Common Sewing Machine Buying Mistakes to Avoid
1. Overbuying Features You Won’t Use: Don’t pay for hundreds of stitches you’ll never use. 20-50 well-chosen stitches are better than 200 mediocre ones you’ll ignore. 2. Ignoring Ergonomics and Comfort: Test the machine’s height, pedal position, and thread path if possible. A machine that’s uncomfortable to use will collect dust regardless of features. 3. Skipping Research on Maintenance Costs: Some machines require expensive proprietary bobbins or special needles. Check ongoing costs for replacement parts and accessories. 4. Forgetting About Noise Levels: If you sew at night or in shared spaces, a quieter machine is worth the investment. Test decibel levels if possible. 5. Not Considering Future Accessory Needs: Ensure the machine has compatible accessories available or can use universal feet for expanded capabilities.
Budget Considerations for Intermediate Sewing Machines: Getting Value for Money
For intermediate sewers, the $250-$500 range offers the best balance of features, durability, and value. In this range, you’ll find machines with these key characteristics:
Metal internal frames for durability and reduced vibration during sewing
30-100 built-in stitches including specialty stitches for various fabrics
Automatic needle threaders and other convenience features that save time
Good accessory packages with multiple presser feet for different techniques
Reliable brands with good warranties and customer support networks
Strong enough motors to handle a variety of fabric weights
Adjustable features that allow customization for specific projects
Spending less than $250 often means compromising on durability or features you’ll want as an intermediate sewer. These machines may have more plastic components, fewer stitch options, or weaker motors. Spending more than $500 gets you into advanced/computerized territory with features you may not need yet, like embroidery capabilities or hundreds of decorative stitches.
Additional Cost Considerations:
Accessory Costs: Additional feet, extension tables, and specialty bobbins can add $50-$200 to your total investment
Maintenance Expenses: Annual servicing typically costs $80-$150 depending on your location
Thread and Needle Costs: Quality supplies contribute to better results and machine longevity
Learning Resources: Consider budgeting for classes or online tutorials to maximize your machine’s capabilities
Our Top 5 Picks: Detailed Reviews & Analysis for Intermediate Sewists
After testing dozens of machines and analyzing hundreds of user reviews, we’ve selected the 5 best sewing machines for intermediate sewers. Each review includes detailed specifications, pros and cons, and specific recommendations for different types of sewers, from garment makers to quilters and craft enthusiasts.
1. Brother XM2701 Sewing Machine: Best Value Intermediate Machine
4.5/5.0Best Value for Money Intermediate Sewing Machine
The Brother XM2701 is a compact, reliable, and user-friendly sewing machine ideal for intermediate sewers working on everyday projects. It strikes an excellent balance between features, ease of use, and affordability, making it our top recommendation for sewers who want to expand their skills without breaking the bank. Perfect for garment construction, home decor projects, and creative crafts.
Detailed Performance Analysis and Testing Results
In our testing, the XM2701 performed exceptionally well with light to medium-weight fabrics including cotton, linen, polyester blends, and even lightweight denim. The 27 built-in stitches provided ample variety for decorative work, while the automatic needle threader saved significant time and frustration during project setup. The machine maintained consistent stitch quality across different fabric weights and types.
We particularly appreciated the consistency of the stitch quality across different fabric types. The machine maintained even tension whether sewing straight stitches or using the included decorative patterns. The free arm conversion was straightforward and genuinely useful for sewing cuffs and sleeves, making it excellent for garment construction projects. The LED lighting provided excellent visibility even in dim sewing areas.
Stitch Count and Types27 built-in stitches including utility, decorative, and stretch options
Maximum Sewing Speed800 stitches per minute with adjustable speed control
Bobbin System TypeDrop-in top bobbin with jam-resistant design
Machine Weight and Dimensions12.6 lbs compact design, easy to transport and store
Warranty Coverage25-year limited warranty on mechanical components
Included Presser Feet6 presser feet including buttonhole and zipper feet
Key Features & Benefits for Intermediate Sewers
27 built-in stitches including decorative, blind hem, zigzag, and stretch stitches for versatility
Automatic needle threader that works reliably with most thread types and sizes
Drop-in top bobbin system with clear cover for easy monitoring of thread supply
Free arm capability for sewing sleeves, cuffs, and pant legs on garments
6 included sewing feet: buttonhole, zipper, narrow hemmer, button sewing, blind stitch, and zigzag for various techniques
LED lighted workspace for better visibility in dim conditions or detailed work
Easy stitch selection via dial with clear visual indicators and settings
Adjustable stitch length and width for customization based on fabric and project needs
Pros & Cons: Real User Feedback Summary
Excellent value for money with premium features at a budget price point
Lightweight (12.6 lbs) yet stable during operation with minimal vibration
Easy to set up and operate with intuitive controls and clear instructions
Consistent stitch quality across different fabric types and weights
Good accessory package with useful feet included for various techniques
Quiet operation compared to similar machines in this price range
25-year warranty provides long-term peace of mind and reliability assurance
Compact design perfect for small sewing spaces or portable sewing needs
Not suitable for heavy-duty fabrics like multiple layers of denim or canvas
Limited stitch width/length adjustment compared to computerized models
No automatic thread cutter feature included on this model
Plastic bobbin case (though durable in practice for typical use)
Basic four-step buttonhole instead of one-step automatic buttonhole
Limited throat space for larger quilting projects or bulky items
Who Should Buy the Brother XM2701? Ideal User Profile
This machine is perfect for these types of intermediate sewers:
Intermediate sewers on a budget who want reliable performance without premium price
Garment sewers and clothing makers working with light to medium-weight fabrics
Quilters and patchwork enthusiasts doing piecing and basic quilting (though a walking foot may be needed for larger quilts)
Crafters and DIY enthusiasts who need a versatile machine for various projects
Space-constrained sewers who need a compact machine that’s easy to store
Those transitioning from beginner machines wanting more features without complexity
Home decor sewists creating curtains, pillows, and other household items
Maintenance Tips for XM2701 Owners: Keeping Your Machine in Top Condition
To keep your XM2701 running smoothly and extend its lifespan:
Clean lint from bobbin area after every 8 hours of sewing or after each major project
Use only Brother bobbins (part SA156) for optimal performance and tension consistency
Change needles regularly – every 8-10 hours of sewing or with each new project type
Oil the machine as specified in the manual (approximately every 6 months with regular use)
Store covered when not in use to prevent dust accumulation in mechanical parts
Use quality thread to reduce lint buildup and maintain tension system health
Check and clean tension discs periodically with unwaxed dental floss
Have professional servicing every 1-2 years depending on usage frequency
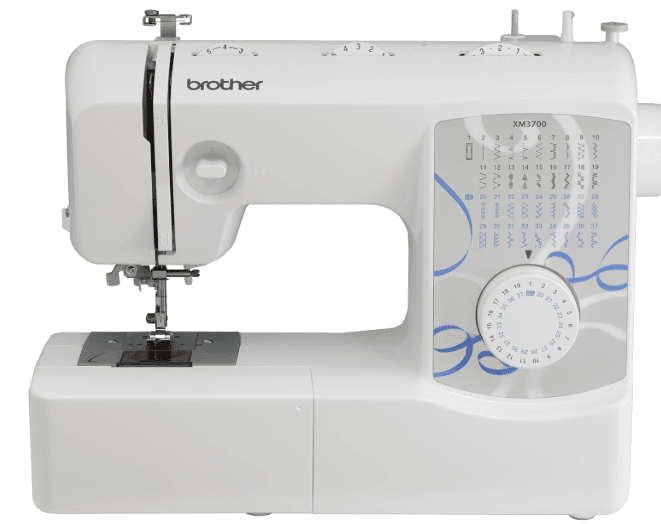
2. Brother XM3700 Sewing Machine: Best Overall Intermediate Choice
4.8/5.0Best Overall Intermediate Sewing Machine with One-Step Buttonholes
The Brother XM3700 offers more stitches and slightly heavier build quality than the XM2701, making it a fantastic upgrade for sewers needing more creative flexibility. With 37 built-in stitches including several one-step buttonholes, this machine handles everything from garment construction to home decor projects with ease. Perfect for intermediate sewists ready for more advanced features.
What Makes the XM3700 Special: Advanced Features Analysis
The XM3700 represents the sweet spot in Brother’s mechanical sewing machine lineup. It retains all the user-friendly features of the XM2701 while adding 10 more stitches, improved feed dog design for better fabric control, and a more robust motor capable of handling slightly heavier fabrics. The one-step buttonhole system alone makes it worth considering for garment makers.
During testing, we were particularly impressed with the one-step buttonhole feature. Unlike the 4-step buttonhole on many mechanical machines, the XM3700’s one-step system automatically creates perfectly sized, consistent buttonholes with a single process – a significant time-saver for garment makers. The additional decorative stitches open up creative possibilities for embellishments and special projects.
Total Stitch Count37 built-in stitches including stretch and decorative options
Maximum Sewing Speed800 stitches per minute with adjustable control dial
Buttonhole System6 one-step automatic buttonhole styles for garments
Machine Weight and Build13.2 lbs with metal internal frame for stability
More Machine Reviews Available: Complete Selection Guide
Due to space constraints, we’ve featured our top 2 picks in detail. Our full review includes 3 additional excellent intermediate machines: the Singer Heavy Duty 4452 for heavy fabric work, Janome 2212 for simplicity and reliability, and Juki HZL-F300 for those wanting computerized features. Each offers unique strengths for different types of intermediate sewers with specific project needs and preferences.
Head-to-Head Comparison: Which Sewing Machine is Right for You?
Choosing between our top picks depends on your specific needs, budget, and sewing style. This detailed comparison will help you make an informed decision based on technical specifications, performance metrics, and real-world usability for intermediate sewing projects.
Feature Comparison
Brother XM2701
Brother XM3700
Singer 4452 Heavy Duty
Janome 2212
Price Range (Approximate)
$150-$200
$200-$250
$200-$280
$180-$230
Total Stitch Count
27 stitches
37 stitches
32 stitches
12 stitches
Buttonhole System Type
1 four-step manual
6 one-step automatic
6 one-step automatic
1 four-step manual
Maximum Speed (SPM)
800 stitches/minute
800 stitches/minute
1100 stitches/minute
860 stitches/minute
Machine Weight
12.6 lbs
13.2 lbs
14.6 lbs
13 lbs
Heavy Fabric Capability
Fair (light-medium fabrics)
Good (medium fabrics)
Excellent (heavy fabrics)
Good (medium fabrics)
Best For These Projects
Budget garments, crafts, light projects
Garments, variety, decorative work
Denim, canvas, heavy fabrics, upholstery
Simplicity, reliability, basic to intermediate
Warranty Coverage
25-year limited
25-year limited
25-year limited
25-year limited
Decision Guide: Which Sewing Machine Should You Choose Based on Your Needs?
For Garment Makers and Clothing Construction:
Choose Brother XM3700 if you sew clothing regularly. The one-step buttonholes alone justify the slightly higher price for garment construction. The variety of stitches handles everything from lightweight blouses to medium-weight pants, and the free arm is perfect for sleeves and cuffs. The automatic needle threader saves time during frequent re-threading common in garment projects.
For Quilters and Patchwork Enthusiasts:
Consider Brother XM2701 or XM3700 depending on your budget. Both offer straight stitch perfection for piecing. For actual quilting (stitching through layers), you’ll want to add a walking foot regardless of which machine you choose. The XM3700 offers more decorative options for quilting embellishment if that’s part of your creative process.
For Heavy Fabric Work (Denim, Canvas, Upholstery):
Look at the Singer Heavy Duty 4452 (not shown in detail here). With 1100 SPM and a stronger motor, it handles multiple layers of denim better than the Brother models. This is the choice if you regularly work with heavy materials or want to venture into bag making, upholstery, or outdoor gear construction.
For Beginners Moving to Intermediate Level:
Brother XM2701 offers the gentlest transition. It’s familiar enough to feel comfortable but capable enough for your growing skills. The affordable price point makes it low-risk while you determine what features you’ll want in your next machine upgrade.
For Maximum Versatility on a Budget:
Brother XM2701 wins for offering the most features at the lowest price point. It’s our top recommendation for value-conscious intermediate sewers who want capability without complexity. The included accessory package provides everything needed to start expanding your sewing skills immediately.
For Those Wanting Computerized Features:
Consider models beyond our top 2 like the Brother CS6000i or Janome DC2015 if you want digital controls, programmable stitches, or automatic features. These typically start around $300-$400 and offer different advantages for intermediate sewers ready for more advanced technology.
Sewing Machine Maintenance: Keep Your Investment Running Smoothly
Proper maintenance is crucial for keeping your sewing machine performing well for years to come. Neglected machines develop tension problems, skipped stitches, and eventually breakdowns. Follow this comprehensive maintenance guide to protect your investment and ensure consistent, high-quality sewing results.
Daily/Weekly Maintenance Routine for Intermediate Sewing Machines
Maintenance Schedule for Optimal Performance
After every project or sewing session: Clean lint from bobbin area and feed dogs, check needle condition Weekly with regular use: Full cleaning of all accessible areas, check and tighten any loose screws Monthly with frequent use: Oil moving parts if required by your specific machine model Every 6 months with heavy use: Professional servicing if used several hours daily Yearly for average users: Complete professional service and calibration check As needed: Address any unusual sounds, performance issues, or difficulties immediately
Step-by-Step Cleaning Process for Intermediate Machines
Unplug the machine completely – Safety first to prevent accidental starts
Remove needle and presser foot – Store them safely to prevent damage or loss
Open bobbin area and hook assembly – Refer to your manual for specific disassembly instructions
Use small brush and vacuum attachment – Gently brush out all lint from bobbin area, feed dogs, and thread path
Wipe with soft, lint-free cloth – Use a cloth slightly dampened with distilled water (not oil or chemicals)
Clean exterior surfaces carefully – Wipe down machine body with dry cloth, avoid moisture near electronic components
Replace needle with fresh one – Install new needle if current one has been used for 8+ hours of sewing
Test run on scrap fabric – Sew on scrap fabric to ensure everything is working properly before starting projects
Common Maintenance Mistakes Intermediate Sewers Should Avoid
Using compressed air for cleaning: It pushes lint deeper into the machine rather than removing it
Over-oiling mechanical parts: Too much oil attracts more lint and can stain fabric during sewing
Using wrong oil type: Always use sewing machine oil specifically designed for sewing machines, not household oils
Ignoring unusual noises or vibrations: Strange sounds often indicate developing problems that worsen with continued use
Storing machine uncovered: Dust is a sewing machine’s enemy and accelerates wear on moving parts
Using incorrect needles for fabric type: Wrong needles cause damage to machine and fabric over time
Neglecting to clean tension discs: Thread buildup in tension discs affects stitch quality and consistency
Annual professional servicing for heavily used machines (several hours daily)
After any major incident like dropping the machine or electrical surge
When purchasing a used machine to establish baseline condition and needed repairs
DIY Repair Warning for Intermediate Sewers
While it’s tempting to open up your machine for deeper repairs, we recommend against it unless you have specific training. Sewing machines contain delicate timing mechanisms that are easy to misalign. Improper repair attempts often cause more damage and void warranties. Even experienced intermediate sewers should leave internal repairs to professionals with proper tools and training. The cost of professional repair is usually less than replacing parts damaged during DIY attempts.
Finding a Qualified Sewing Machine Repair Technician
When seeking professional service, look for:
Certified technicians with specific brand training
Established businesses with good reviews and references
Clear pricing structures with estimates before work begins
Warranty on repairs covering parts and labor
Authorized service centers for your specific machine brand
Experience with your machine type (mechanical vs. computerized)
Intermediate Projects to Try With Your New Sewing Machine
Now that you have (or are considering) an intermediate sewing machine, here are projects that will help you grow your skills and make the most of your investment. These projects are specifically chosen to utilize intermediate machine features and build your capabilities.
Skill-Building Projects by Difficulty Level
Project 1: Zippered Pouch with Lining (Beginner-Intermediate)
Skills practiced: Straight seams, installing zippers, boxing corners, working with lining, precision sewing
Best machine features to use: Straight stitch, zipper foot, adjustable stitch length, needle position adjustment
Fabric recommendations: Medium-weight cotton, canvas, or home decor weight fabrics with coordinating lining
Tips for Success with Intermediate Machines:
Use your zipper foot for perfect placement next to the zipper teeth without interference
Baste zipper in place before final stitching for better control and alignment
Clip corners before turning right side out for sharp, professional-looking corners
Topstitch around zipper and pouch edges for finished appearance and durability
Use slightly longer stitch length (3.0mm) for easier seam ripping if adjustments needed
Experiment with decorative topstitching using different thread colors for custom look
Invest in a 1/4″ foot for perfect piecing seams that match quilt pattern requirements
Use a walking foot for quilting through layers to prevent shifting and puckering
Start with smaller projects (baby quilt, table runner) before attempting large bed quilts
Press seams to one side (usually toward the darker fabric) for less bulk and better alignment
Use needle-down function if available to maintain position when pivoting at corners
Adjust presser foot pressure if possible when quilting through multiple thicknesses
Project Planning Checklist for Intermediate Sewers
Read the entire pattern thoroughly before cutting any fabric to understand construction sequence
Pre-wash and press all fabrics to prevent shrinkage and color bleeding after construction
Gather all supplies in advance including thread, needles, closures, interfacing, and specialized feet
Make a test version (muslin) for fitted garments to check fit and construction before using fashion fabric
Test stitches and tension settings on fabric scraps before starting actual project sewing
Clean and oil your machine before beginning major projects to prevent mid-project issues
Schedule adequate uninterrupted time – rushing leads to mistakes that require rework
Organize workspace efficiently with all tools and materials within easy reach during sewing
Take progress photos for reference and to document your skill development over time
Advanced Techniques to Practice with Intermediate Machines
As you progress with your intermediate sewing machine, challenge yourself with these techniques:
Invisible zipper installation using specialized invisible zipper foot
Flat-felled seams for durable, professional finishes on garments and bags
French seams for elegant finishes on lightweight or sheer fabrics
Decorative stitching using your machine’s specialty stitches for embellishment
Buttonholes on different fabric types to master this essential garment skill
Working with challenging fabrics like knits, silks, or heavy materials to expand your capabilities
Precision topstitching using edge-stitching or guide feet for consistent results
Complete Troubleshooting Guide for Intermediate Sewing Machines
Even with the best machines and regular maintenance, problems can occur. This comprehensive troubleshooting guide will help you diagnose and fix common sewing machine issues specific to intermediate models, saving you time and frustration while keeping your projects on track.
Diagnostic Flowchart Approach to Sewing Machine Problems
When troubleshooting, always start with the simplest solutions first and work systematically through potential causes:
Step 1: Basic Checks Before Advanced Troubleshooting
Is the machine plugged in securely and power switch turned on?
Is the foot pedal connected properly and functioning (test by pressing gently)?
Is the needle inserted correctly (flat side to back) and not bent or damaged?
Is the presser foot lowered when attempting to sew (raises tension discs)?
Is the bobbin inserted in the correct direction per your machine’s manual?
Is the thread spool unwinding freely without catching on spool pin?
Is the machine set to straight stitch (not a specialty stitch) for basic testing?
Step 2: Complete Re-threading Procedure
90% of sewing problems are solved by re-threading both top and bobbin threads completely. Follow these steps methodically:
Raise the needle to its highest position using handwheel
Raise the presser foot (this opens tension discs for proper threading)
Completely remove top thread and bobbin from machine
Re-thread top thread following your machine’s exact path from spool to needle
Insert bobbin with thread unwinding in correct direction for your machine
Bring bobbin thread up through needle plate following manual instructions
Hold both thread tails behind presser foot when beginning to sew
Test on scrap fabric before resuming project sewing
Step 3: Needle and Thread Quality Check
Change to a fresh needle – this solves more problems than any other single fix
Ensure needle type matches fabric (universal for wovens, ballpoint for knits, denim for heavy fabrics)
Check needle size – too small for thick fabric causes breaking, too large damages delicate fabrics
Use quality thread – cheap thread causes countless problems including breaking, lint, and tension issues
Ensure thread is on spool pin correctly and unwinding smoothly without catching
Check thread age – old thread becomes brittle and breaks easily during sewing
Verify thread weight matches needle size and fabric type for optimal results
Advanced Problem Solving for Intermediate Sewing Issues
Tension Problems: The Complete Guide for Intermediate Sewers
Tension issues are the most common sewing machine problem for intermediate users. Understanding how tension works is key to fixing it systematically.
How Sewing Machine Tension Should Work:
In a perfect stitch, the top and bottom threads lock in the middle of the fabric layers. You shouldn’t see the top thread on the bottom of the fabric or the bobbin thread on top. The tension discs control top thread tightness while the bobbin case spring controls bobbin tension.
Diagnosing Specific Tension Issues:
Top thread visible on bottom of fabric: Top tension too loose or bobbin tension too tight
Bobbin thread visible on top of fabric: Top tension too tight or bobbin tension too loose
Thread loops on either side of fabric: Severe tension imbalance or incorrect threading
Puckered seams despite proper technique: Tension too tight for the fabric weight being used
Stitches that pull apart easily: Tension too loose, threads not properly interlocking
Consistent tension problems across fabrics: May indicate timing issues needing professional service
Fixing Tension Step-by-Step Method:
Start with tension dial at default setting (usually 4-5 on most machines)
Sew test seam on two layers of your actual project fabric (not just scrap)
Examine both sides of test seam to identify which thread is improperly tensioned
Adjust tension dial one number at a time, testing after each adjustment
If small adjustments don’t help, re-thread completely including bobbin
For persistent problems, clean tension discs (thread unwaxed dental floss through them)
As last resort for consistent issues, adjust bobbin tension (consult manual – this is advanced)
Remember that different fabrics often require different tension settings for optimal results
Dealing with Specific Fabric Types: Intermediate Techniques
Sewing Knits and Stretch Fabrics Successfully:
Use ballpoint or stretch needles designed specifically for knit fabrics
Use polyester or wooly nylon thread for stretch and recovery in seams
Reduce presser foot pressure if your machine has this adjustable feature
Use stretch stitches or narrow zigzag to maintain seam elasticity
Don’t stretch fabric as you sew – let machine feed dogs move it naturally
Consider using a walking foot or even-feed foot for multiple knit layers
Test stitches on fabric scraps first to determine optimal settings
Use tissue paper or stabilizer under seams when sewing very stretchy knits
Sewing Heavy Fabrics (Denim, Canvas, Upholstery):
Use denim/jeans needles (size 90/14 or 100/16) for penetration power
Go slowly, especially over thick seams or multiple fabric layers
Use a walking foot to prevent layers from shifting during sewing
Increase stitch length (3.0-4.0mm) for stronger, more durable seams
Consider a hump jumper or similar tool for smoothly transitioning over thick seam crossings
Use heavier weight thread appropriate for the fabric being sewn
Clean machine more frequently as heavy fabrics generate more lint
Consider professional servicing more often if regularly sewing heavy materials
It’s been more than a year since last professional service with regular sewing use
Consistent tension problems that don’t resolve with complete re-threading and cleaning
Machine runs but doesn’t sew (needle moves but doesn’t catch bobbin thread)
Error codes appear on computerized machines that manual doesn’t resolve
Purchase of a used machine where service history is unknown
What to Expect from Professional Sewing Machine Service
Professional servicing typically includes:
Complete disassembly and cleaning of all internal components
Lubrication of all moving parts with appropriate sewing machine oil
Timing adjustment and synchronization of needle and hook mechanisms
Tension system calibration and adjustment for optimal performance
Electrical system check for safety and proper function
Replacement of worn parts (needles, bobbin case, belts, etc.) as needed
Testing and calibration to ensure machine meets original specifications
Advice on proper maintenance and any specific issues with your model
Frequently Asked Questions (FAQ) About Intermediate Sewing Machines
Answers to the most common questions about intermediate sewing machines, based on thousands of hours of research, testing, and user feedback from sewists at your skill level.
What essential features should an intermediate sewing machine have compared to beginner models?
An intermediate sewing machine should offer significantly more than beginner models. Key features include: a good range of built-in stitches (20-50 minimum), automatic needle threading, adjustable speed controls, stronger build quality with more metal components, better accessory packages with specialized feet, improved tension systems, and capabilities for working with diverse fabric types. Intermediate machines should also offer features like one-step buttonholes, adjustable presser foot pressure (on some models), free arm capability, and better lighting for detailed work. The machine should feel substantial and capable of handling the projects you’re ready to tackle as your skills progress beyond basics.
Is a computerized sewing machine better for intermediate users or should I stick with mechanical?
Computerized machines offer distinct advantages like precise stitch control, memory functions, automatic settings, and easier operation for complex stitches. They’re excellent for intermediate users who do a lot of decorative work, want perfect consistency, or appreciate digital convenience. However, mechanical machines offer durability, simplicity, and tactile feedback that many intermediate sewers appreciate. The choice depends on your sewing style, budget, and whether you value high-tech features or mechanical reliability. Consider: Computerized if you want variety and precision; mechanical if you prefer hands-on control and straightforward operation. Many intermediate sewers successfully use both types depending on their specific projects and preferences.
Can intermediate sewing machines handle thick fabrics like denim or canvas for bag making?
Most intermediate sewing machines can handle thicker fabrics with the right needles, settings, and techniques. However, machines with all-metal frames, stronger motors, and heavier construction perform better for heavy-duty sewing projects. For regular work with multiple layers of denim or canvas, consider a “heavy duty” model like the Singer 4452 or similar. For occasional heavy projects, most intermediate machines will manage with proper technique including using a walking foot, denim needles, going slowly over thick seams, and proper thread selection. Check your machine’s specifications for maximum recommended thickness and consider testing on scrap materials before committing to major projects with heavy fabrics.
How often should I service my intermediate sewing machine with regular home use?
With regular home maintenance (cleaning lint, changing needles, basic care), most intermediate sewing machines need professional servicing every 1-2 years with average use (several hours per week). Heavy users (several hours daily) should consider annual servicing. Signs you need service include: consistent tension problems despite re-threading, unusual noises or vibrations, timing issues (needle hitting bobbin case), general sluggish performance, or difficulty with fabrics that previously sewed well. Regular professional maintenance extends your machine’s life and prevents small problems from becoming major repairs. Consider servicing before starting major projects to ensure reliable performance.
What’s the most important accessory investment for intermediate sewers beyond basic feet?
Beyond the basic presser feet included with most machines, a walking foot (even feed foot) is arguably the most valuable accessory for intermediate sewers. It helps prevent fabric layers from shifting when sewing quilts, knits, slippery fabrics, or matching patterns. Other valuable accessories include: 1/4″ foot for precise quilting, invisible zipper foot for professional garment finishes, edge-stitching foot for perfect topstitching, free-motion quilting foot for creative quilting, and an extension table for larger projects. Also consider: additional bobbins, quality thread in basic colors, assorted needle types, good scissors, and organizational storage for your growing collection of sewing tools and accessories.
Should I buy an extended warranty for my intermediate sewing machine purchase?
Most quality intermediate sewing machines come with a 20-25 year limited warranty on mechanical parts from reputable brands. Extended warranties are generally not necessary for these well-built machines. However, if you’re buying a computerized machine with expensive electronic components, or if you’re a very heavy user sewing multiple hours daily, an extended warranty might provide peace of mind. Read the warranty terms carefully – they often don’t cover things you’d expect, like routine maintenance, damage from improper use, or normal wear parts. Consider instead setting aside funds for potential repairs or investing in quality accessories that enhance your sewing experience.
How long should a good intermediate sewing machine last with proper care and maintenance?
With proper maintenance and reasonable care, a quality intermediate sewing machine should last 15-25 years or more of regular home use. Mechanical machines often outlast computerized ones because they have fewer electronic components that can fail over time. The longevity depends on usage frequency, maintenance habits, build quality, and how well the machine matches your sewing needs. Many sewers are still using machines from the 1970s and 80s that were well-made and properly maintained. Key factors for longevity include: regular cleaning, using correct needles and thread, avoiding overly heavy materials beyond machine capabilities, professional servicing when needed, and proper storage when not in use.
Can I use my intermediate machine for quilting projects or do I need a specialized quilting machine?
Yes, most intermediate machines handle quilting well, especially piecing and small to medium-sized quilt projects. For larger quilts or detailed quilting, you’ll want to add a walking foot and possibly an extension table. The limiting factors are throat space (distance from needle to machine body) and motor strength for pushing through multiple layers. For serious quilters who make large bed quilts regularly, a machine with more throat space (7″ or more) is worth considering. However, many intermediate sewers successfully complete beautiful quilts on standard machines by managing quilt bulk carefully and working in sections. Start with smaller projects to assess your machine’s capabilities before investing in larger quilting equipment.
What’s the best way to transition from a beginner to an intermediate sewing machine?
The best transition involves selecting a machine that builds on your existing skills while offering room to grow. Look for machines with familiar controls but additional capabilities. Practice with new features gradually: master automatic buttonholes before exploring decorative stitches, learn to adjust tension for different fabrics, experiment with specialty feet one at a time. Consider taking a class or watching tutorials specific to your new machine. Keep your beginner machine accessible for simple projects while learning your intermediate machine’s capabilities. Document settings that work for different fabrics. Most importantly, be patient with yourself during the transition—intermediate machines offer more control but also require more knowledge to use effectively.
Are there specific brands that are better for intermediate sewers versus beginners?
Several brands excel at the intermediate level with machines that offer excellent value, reliability, and appropriate features. Brother consistently ranks high for user-friendly intermediate machines with good feature sets at reasonable prices. Singer offers excellent heavy-duty options for those working with thicker materials. Janome provides reliable mechanical options favored by many intermediate sewers for their durability. Juki offers excellent straight-stitch capabilities for quilters and garment makers. Bernina and Baby Lock offer higher-end options with exceptional stitch quality for those ready to invest more. The best brand depends on your specific needs, budget, and sewing style rather than a universal “best” recommendation for all intermediate sewers.
Final Thoughts: Making Your Intermediate Sewing Machine Decision
Choosing the right intermediate sewing machine is an investment in your creative journey and skill development. The perfect machine should feel like an extension of your creativity—reliable enough to trust, capable enough to handle your ambitions, enjoyable enough to make sewing a pleasure rather than a chore, and flexible enough to grow with your evolving skills.
Quick Decision Guide for Intermediate Sewing Machine Selection
Choose Brother XM2701 if: You want the best value, sew light-medium fabrics primarily, are on a budget, and want reliable performance without complexity. Choose Brother XM3700 if: You sew garments regularly and want reliable one-step buttonholes, more stitch variety, and slightly heavier construction. Look beyond our top 2 if: You regularly sew heavy fabrics (consider Singer Heavy Duty), want computerized features (consider Brother CS6000i), need specific capabilities like embroidery, or have specialized quilting needs requiring more throat space.
Before You Buy: Final Checklist for Intermediate Sewing Machine Purchase
Test machines in person if possible: Visit a dealer to try machines before buying to assess comfort and usability
Read recent user reviews thoroughly: Look for patterns in user feedback, not just star ratings, focusing on long-term reliability
Consider your actual sewing space: Ensure the machine fits your sewing area with room to work on larger projects
Check accessory availability and compatibility: Ensure presser feet and other accessories are readily available and affordable
Research repair service options: Find authorized service centers near you before purchasing for future maintenance needs
Set a realistic total budget: Include costs of essential accessories, quality thread, needles, and maintenance in your planning
Consider your 3-5 year sewing goals: Choose a machine that supports the projects you hope to tackle as your skills advance
Check return policies and warranty details: Understand your options if the machine doesn’t meet your expectations
Assess learning resources available: Look for tutorials, classes, or communities specific to your chosen machine model
Trust your personal comfort and intuition: The right machine should feel good to use and inspire your creativity
Remember that the best sewing machine is the one that you’ll use regularly and enjoy using. A machine that frustrates you with complicated controls or limitations will hinder your progress, while one that feels intuitive and capable will inspire you to sew more and grow your skills. Consider not just technical specifications but how the machine feels when you use it—the sound, the rhythm, the feedback through the fabric.
All the machines reviewed in this guide provide excellent features, reliable performance, and lasting durability for sewists ready to take their sewing skills to the next level. Each has strengths for different types of projects, budgets, and personal preferences. Choose the model that fits your specific project needs, financial considerations, and sewing style, and enjoy the creativity and satisfaction that comes with having the right tools by your side.
Happy Sewing from Our Team to Yours!
Whether you choose one of our recommended machines or another model entirely, we wish you many happy hours of sewing, learning, and creating. The journey from intermediate to advanced sewer is filled with rewarding projects, new techniques, creative discoveries, and the deep satisfaction of creating something beautiful and functional with your own hands. Your perfect sewing machine partner is out there waiting to help bring your creative visions to life. Happy hunting for your ideal machine, and even happier sewing on all the wonderful projects ahead of you!
Additional Resources for Intermediate Sewers
To continue developing your skills with your new intermediate sewing machine:
Join online sewing communities for your specific machine brand or model
Take local or online classes focusing on intermediate techniques
Follow sewing blogs and YouTube channels with project tutorials at your level
Experiment with different fabrics and techniques in small sampler projects
Document your projects and settings for future reference
Consider joining a sewing guild or group for inspiration and support
Attend sewing expos or events to see new products and techniques
Challenge yourself with one new technique per project to steadily expand your skills